
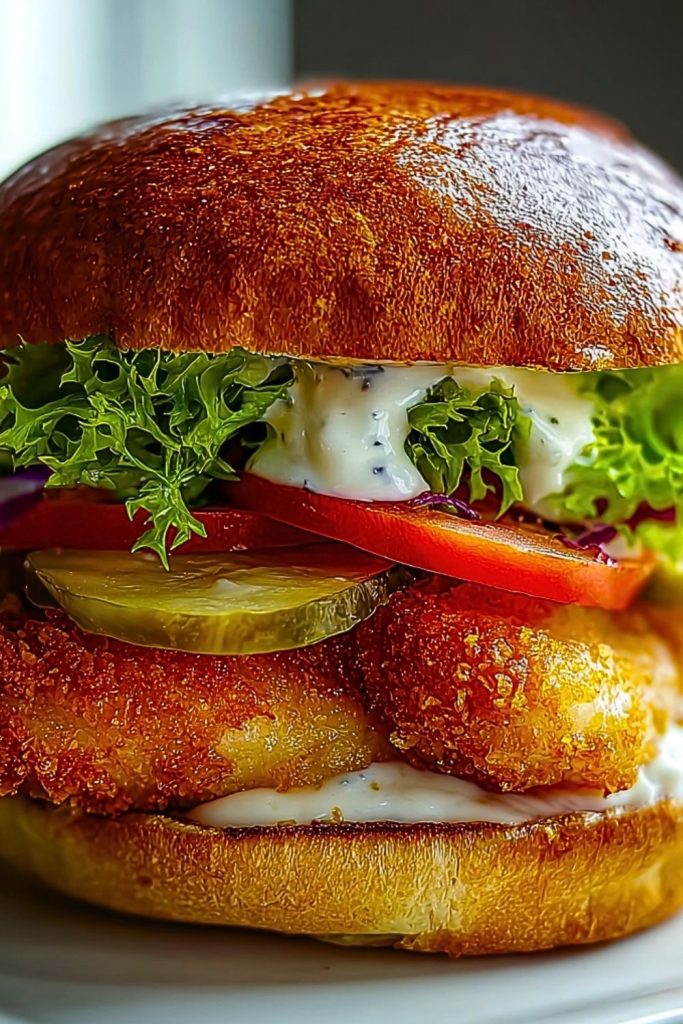
The Crispy Fried Cod Sandwich is a golden, crunchy delight that turns a humble piece of fish into an irresistible main event. With its shatteringly crisp coating and tender, flaky cod inside, this sandwich strikes the perfect balance between texture and flavor. The buttery toasted bun cradles the fish alongside layers of fresh tomatoes, crisp lettuce, tangy pickles, and a generous spread of herby tartar sauce. Every bite is a mix of crunch, creaminess, freshness, and rich, savory flavor.

This isn’t your average fish sandwich—it’s a crave-worthy upgrade that brings restaurant-quality taste to your home kitchen. Ideal for lunches, casual dinners, or weekend treats, this sandwich is quick to make yet deeply satisfying. Whether you’re feeding the family or just indulging yourself, the Crispy Fried Cod Sandwich is a winning choice that delivers every time.
Why You’ll Love This Crispy Fried Cod Sandwich
- Restaurant Flavor at Home: Achieves that deep-fried perfection with a few simple tricks and pantry staples.
- Fast & Satisfying: Ready in under 30 minutes, making it ideal for busy weeknights.
- Customizable: Pile on your favorite toppings or switch up the sauce to make it your own.
- Perfect Crunch: Thanks to the double dredge method, each bite gives a satisfying crisp.
- Fresh Ingredients: The contrast between the hot, crispy cod and cool veggies creates a balanced, mouthwatering bite.
Preparation Phase & Tools to Use (Essential Tools and Equipment, and the Importance of Each Tool)
Getting the Crispy Fried Cod Sandwich just right starts with setting up your station and using the right tools. Here’s what you’ll need—and why they matter:
- Cast Iron Skillet or Deep Frying Pan: Holds heat evenly and maintains oil temperature, crucial for crispy, golden-brown fish.
- Wire Rack with Baking Sheet: Allows fried fillets to rest without getting soggy, keeping that hard-earned crunch intact.
- Tongs: Essential for safely flipping and lifting hot, delicate cod from the oil without breaking it.
- Mixing Bowls: You’ll need at least two—for the dredging station (flour and egg batter) and for the seasoned coating.
- Paper Towels: To absorb excess oil after frying.
- Meat Thermometer (optional): Ensures the cod is cooked through to the safe internal temperature of 145°F without overcooking.
- Sharp Knife & Cutting Board: For prepping toppings like lettuce, tomato, and pickles.
Having everything in place makes the cooking smooth, fast, and frustration-free.
Preparation Tips
- Pat the Fish Dry: Use paper towels to blot excess moisture from the cod. This helps the breading stick and crisp up evenly.
- Chill the Fillets: A short rest in the fridge after breading helps the coating adhere better and results in a crisper crust.
- Preheat the Oil Properly: Bring your oil to 350°F before frying. Too cool, and the fish turns greasy; too hot, and the outside will burn before the inside is done.
- Don’t Crowd the Pan: Fry in batches if needed. Overcrowding drops the oil temperature, leading to soggy results.
- Use Buttermilk (optional): For a more flavorful, tender crust, marinate the cod in buttermilk before breading.
- Toast the Buns: Lightly butter and toast your buns in a skillet or under the broiler for added flavor and structure.
These small steps elevate your sandwich from good to unforgettable.
Ingredients for this Crispy Fried Cod Sandwich
For the Crispy Fried Cod Sandwich, you’ll need a mix of fresh ingredients for that perfect crunch, flavor, and balance. Here’s what you’ll need:
For the Fried Cod:
- 4 pieces of cod fillets (about 4-6 oz each), skinless and boneless
- 1 cup all-purpose flour (for dredging)
- 1 teaspoon garlic powder
- 1 teaspoon onion powder
- 1 teaspoon paprika
- Salt and pepper, to taste
- 1 large egg
- 1 cup buttermilk (or regular milk if preferred)
- 2 cups panko breadcrumbs (for a super crispy crust)
- Vegetable oil, for frying
For the Sandwich:
- 4 soft hamburger buns (brioche or toasted buns work best)
- 1 large tomato, sliced
- 1 cup lettuce (iceberg or romaine), washed and dried
- 1/2 cup pickles, sliced
- 1/2 cup tartar sauce (store-bought or homemade)
This combination of fresh and pantry ingredients ensures a delicious, hearty sandwich with a crispy crunch and balanced flavors. You can easily modify the toppings based on personal preference, but this basic setup is perfect for that classic, irresistible taste.
Step 1: Prepare the Cod Fillets
Start by patting the cod fillets dry with paper towels to remove excess moisture. This helps the coating adhere better and prevents sogginess during frying. Season both sides of the fish fillets with salt and pepper.
Step 2: Dredge the Cod
In one bowl, whisk the egg and buttermilk together. In another bowl, combine the flour, garlic powder, onion powder, paprika, salt, and pepper. Finally, place the panko breadcrumbs in a third shallow dish.
Dip each piece of cod into the flour mixture, making sure it’s evenly coated, then dip it into the egg mixture, allowing any excess to drip off. Coat the fillet in the panko breadcrumbs, pressing down lightly to ensure a full, even coverage. Repeat with the remaining fillets.
Step 3: Heat the Oil
In a large skillet or deep frying pan, heat about 2 inches of vegetable oil over medium-high heat. Use a thermometer to check the temperature—aim for around 350°F for frying.
Step 4: Fry the Cod
Once the oil is hot, carefully lower the cod fillets into the oil using tongs. Don’t overcrowd the pan—fry in batches if needed. Fry the fish for 3-4 minutes per side, or until the coating is golden brown and the internal temperature reaches 145°F. Remove the cod from the oil and place it on a wire rack set over a baking sheet to drain excess oil.
Step 5: Toast the Buns
While the fish is frying, butter the inside of each hamburger bun and toast them lightly on a skillet or under the broiler until golden brown. This adds flavor and helps prevent the bun from becoming soggy.
Step 6: Assemble the Sandwich
Spread tartar sauce on the bottom bun. Layer on the fried cod fillet, followed by a slice of tomato, pickles, and a generous handful of lettuce. Top with the other half of the bun.
With these steps, you’re ready to enjoy a crispy, golden fried cod sandwich that’s as satisfying as it is delicious.
Notes
- Fish Alternatives: While cod is a popular choice, you can easily swap it for other white fish like haddock, tilapia, or pollock. Make sure the fish fillets are thick enough to handle frying.
- Breading Variations: For a different crunch, try using cornmeal instead of breadcrumbs for a slightly gritty, Southern-style breading.
- Tartar Sauce Substitutes: If you don’t have tartar sauce, a creamy dill sauce, aioli, or even a simple mayo-ketchup mix can work as tasty alternatives.
- Spices: Feel free to adjust the seasonings in the flour dredge to match your taste—add cayenne for heat, or more paprika for a smoky flavor.
Watch Out for These Mistakes While Cooking
- Skipping Drying the Fish: If you don’t dry your fillets well, the breading won’t stick properly and can fall off during frying.
- Oil Too Hot or Too Cold: If the oil is too hot, the fish can burn before cooking through. If it’s too cold, the fish absorbs too much oil and becomes greasy.
- Overcrowding the Pan: Frying too many fillets at once lowers the oil temperature, resulting in soggy fish. Fry in batches to ensure crispness.
- Not Resting the Fried Fish: Immediately placing fried fish on a paper towel-lined plate can trap moisture and ruin the crunch. A wire rack allows for proper air circulation and keeps the fish crispy.
- Under or Overcooking the Fish: Cod cooks quickly, and overcooking can dry it out. Keep an eye on the temperature and texture for best results.
By avoiding these pitfalls, you’ll ensure your crispy fried cod sandwich turns out perfectly every time.
What to Serve With Crispy Fried Cod Sandwich?
Pairing the Crispy Fried Cod Sandwich with complementary sides elevates the meal and adds variety. Here are some great options to serve alongside this delightful sandwich:
1. French Fries
Classic, crispy fries are a go-to side dish that’s a perfect match for the crunch of the cod. Serve them with a side of ketchup or malt vinegar for an extra punch.
2. Coleslaw
The creamy, tangy crunch of coleslaw contrasts beautifully with the crispy fish. The freshness and texture make it an ideal side for balance.
3. Onion Rings
For extra crunch and flavor, onion rings are an excellent sidekick to a fried fish sandwich. Their crispy exterior and sweet onion flavor are the perfect complement.
4. Pickled Vegetables
Pickled cucumbers, carrots, or even jalapeños bring acidity and tang to cut through the richness of the fried cod, enhancing the overall flavor profile.
5. Sweet Potato Fries
If you’re in the mood for something a little different, try sweet potato fries. Their subtle sweetness pairs nicely with the savory, crispy fish.
6. Garden Salad
A light, fresh salad with a citrus vinaigrette helps balance out the heaviness of the fried fish. Toss in some mixed greens, cherry tomatoes, and avocado for added flavor.
7. Grilled Vegetables
Roasted or grilled vegetables like zucchini, bell peppers, and asparagus are a healthy and flavorful side that pairs well with fried dishes.
8. Corn on the Cob
Grilled or boiled corn on the cob, slathered with butter and sprinkled with salt, is an excellent side that adds a touch of sweetness and smokiness.
These sides not only complement the flavors of the crispy fried cod sandwich but also add variety and texture to the meal, making it feel even more satisfying.
Storage Instructions
The Crispy Fried Cod Sandwich is best enjoyed fresh, but if you have leftovers, you can store them for later. Here’s how to store each component:
- Fried Cod Fillets: Allow the fried fish to cool completely before storing. Place them in an airtight container and refrigerate for up to 2 days. For reheating, bake the fillets in a 375°F oven for about 10-12 minutes, or until the exterior crisps back up.
- Sandwich Buns: Store the leftover buns in a sealed bag at room temperature for 1-2 days. If you want to preserve their freshness longer, you can freeze them for up to 1 month.
- Toppings (Tomato, Lettuce, Pickles): Fresh toppings like tomatoes and lettuce should be kept in separate containers in the fridge. These will last for 2-3 days. Pickles can be stored in their original jar for weeks.
To assemble again, simply reheat the fish, toast the buns, and add fresh toppings.
Estimated Nutrition
This sandwich is a treat, and while it’s indulgent, it provides a good source of protein and omega-3s from the cod. Here’s an estimated breakdown:
- Calories: ~600-700 per sandwich (depending on serving size and condiments)
- Protein: 30-35 grams
- Fat: 20-25 grams
- Carbohydrates: 50-55 grams
- Fiber: 2-3 grams
- Sodium: 700-800 mg
Keep in mind that the nutritional values can vary based on the specific ingredients used and any modifications to the recipe (like adding more sauce or toppings).
By following the proper storage techniques, you can extend the life of your Crispy Fried Cod Sandwich and enjoy it even after your first meal.
Frequently Asked Questions
1. Can I use a different type of fish for this sandwich?
Yes! You can substitute cod with other mild, white fish like haddock, tilapia, or even halibut. Just make sure the fillets are thick enough to handle frying.
2. How can I make the breading extra crispy?
To get an extra crispy coating, make sure to use panko breadcrumbs instead of regular breadcrumbs, and don’t skip the double-dip process (flour, egg, then breadcrumbs). You can also chill the breaded fillets for 15 minutes before frying.
3. Can I make the sandwich ahead of time?
While the fried cod is best enjoyed immediately, you can prep the fillets, bread them, and store them in the fridge before frying. Just fry them fresh when you’re ready to serve.
4. How do I make homemade tartar sauce?
You can make tartar sauce by combining 1/2 cup mayo, 1 tablespoon Dijon mustard, 1 tablespoon lemon juice, 1 tablespoon capers (chopped), 1 tablespoon chopped pickles, and a pinch of salt and pepper.
5. Can I bake the cod instead of frying it?
Yes, you can bake the cod! Coat the fish in the same breading and bake it at 400°F for 12-15 minutes, or until golden and crispy. While it won’t be as crispy as frying, it’s a healthier option.
6. Can I use regular milk instead of buttermilk?
Yes, you can substitute regular milk for buttermilk. If you want to replicate the tanginess, add a tablespoon of lemon juice or vinegar to the milk and let it sit for a few minutes before using.
7. Can I freeze the fried fish?
You can freeze the fried cod fillets for up to 1 month. Let them cool completely before wrapping them tightly in foil or storing them in a freezer-safe bag. When ready to eat, reheat in the oven to crisp them back up.
8. What’s the best way to reheat the leftover sandwich?
Reheat the fish fillets in a 375°F oven for 10-12 minutes to restore the crispiness. Toast the buns fresh and assemble the sandwich with fresh toppings for the best results.
Conclusion
The Crispy Fried Cod Sandwich is a delicious, satisfying meal that brings restaurant-quality flavor right to your kitchen. It’s perfect for a quick lunch, casual dinner, or even a weekend treat. Whether you follow the traditional recipe or get creative with your toppings and sauces, it’s sure to be a hit every time. With simple ingredients and easy steps, you can enjoy this crispy, golden sandwich that’s full of flavor and texture. Make it your go-to comfort food that never disappoints!

Crispy Fried Cod Sandwich
- Prep Time: 15 minutes
- Cook Time: 15 minutes
- Total Time: 30 minutes
- Yield: 4 sandwiches 1x
- Category: Main Course
Description
The Crispy Fried Cod Sandwich is a delicious, golden creation featuring tender cod fillets encased in a crispy, flavorful breading. It’s served on a soft, toasted bun with tangy tartar sauce, crunchy pickles, fresh lettuce, and juicy tomato, creating a perfect balance of textures and flavors. Whether you’re making it for a quick weeknight meal or a weekend treat, this sandwich is sure to be a hit!
Ingredients
1 cup all-purpose flour
1 teaspoon garlic powder
1 teaspoon onion powder
1 teaspoon paprika
Salt and pepper, to taste
1 large egg
1 cup buttermilk (or regular milk)
2 cups panko breadcrumbs
Vegetable oil, for frying
4 soft hamburger buns
1 large tomato, sliced
1 cup lettuce, washed and dried
1/2 cup pickles, sliced
1/2 cup tartar sauce
Instructions
1. Pat the cod fillets dry with paper towels. Season both sides with salt and pepper.
2. In one bowl, whisk together the egg and buttermilk. In another bowl, combine the flour, garlic powder, onion powder, paprika, salt, and pepper. In a third bowl, place the panko breadcrumbs.
3. Dredge each fillet by dipping it into the flour mixture, then the egg mixture, and finally the panko breadcrumbs. Press down lightly to ensure full coverage.
4. Heat about 2 inches of vegetable oil in a deep frying pan or cast iron skillet over medium-high heat to 350°F.
5. Fry the breaded cod fillets in batches for 3-4 minutes per side or until golden brown and cooked through. Use a meat thermometer to check the internal temperature—should be 145°F.
6. Remove the fried cod and place it on a wire rack to drain excess oil.
7. Butter and toast the inside of the buns in a skillet or under the broiler until golden brown.
8. Spread tartar sauce on the bottom bun, then layer on the fried cod, followed by tomato, pickles, and lettuce. Top with the other half of the bun.
Notes
Fish Alternatives: You can substitute cod with other mild, white fish like haddock, tilapia, or even halibut.
Breading Variations: For a different crunch, try using cornmeal instead of breadcrumbs.
Tartar Sauce Substitutes: Try a creamy dill sauce or aioli as an alternative.
Spices: Adjust the seasonings in the flour dredge to suit your taste—add cayenne for heat, or more paprika for a smoky flavor.
Nutrition
- Calories: 650
- Sodium: 750mg
- Fat: 23g
- Carbohydrates: 52g
- Fiber: 3g
- Protein: 32g