
There’s something wonderfully comforting about a bowl of chili, especially when it’s packed with robust flavor, tender ground beef, sweet corn, and hearty beans—all simmered in a rich tomato broth. Wendy’s Chili is a beloved fast food classic, known for its warm spices, homestyle texture, and crave-worthy balance of savory and tangy. Whether you’re recreating it for nostalgia or simply need a reliable meal for busy weeknights, this copycat version delivers the same bold taste and satisfying consistency.
Perfect for feeding a crowd, meal prepping, or warming up on chilly evenings, this chili hits every mark for flavor and practicality. It’s one of those dishes that gets even better the next day, and it’s incredibly versatile—serve it as-is, over rice, with tortilla chips, or even as a baked potato topper. Ready to make a pot of cozy, filling goodness? Let’s dive in!
Why You’ll Love This Wendy’s Chili Recipe
- Iconic Flavor: Tastes just like the real deal from Wendy’s—savory, hearty, and lightly spiced.
- Easy to Make: One pot, minimal fuss, and ready in under an hour.
- Meal-Prep Friendly: Stores beautifully for days, making it perfect for leftovers.
- Versatile: Customize with extra toppings or serve in creative ways (like chili dogs or nachos).
- Budget-Friendly: Uses pantry staples and stretches well to feed a group.
- Comfort Food Perfection: A satisfying, soul-warming meal every single time.
Preparation Phase & Tools to Use for Wendy’s Chili Recipe
Before diving into the deliciousness of Wendy’s Chili, make sure your kitchen is equipped with the right tools. This will save you time and ensure that everything cooks evenly and efficiently. Here’s what you’ll need and why each item matters:
Essential Tools and Equipment
- Large Heavy-Bottomed Pot or Dutch Oven
This is the heart of your chili operation. A sturdy pot ensures even heat distribution, allowing the chili to simmer slowly and develop rich flavors without scorching the bottom. - Wooden Spoon or Heat-Resistant Spatula
You’ll use this to break up the ground beef and stir the chili as it cooks. A wooden spoon is gentle on your cookware and great for scraping up the flavorful bits from the bottom. - Sharp Chef’s Knife & Cutting Board
You’ll need these for prepping onions, peppers, and garlic. A sharp knife speeds up your chopping and keeps cuts precise. - Measuring Cups and Spoons
Spices and tomato products need accuracy to mimic the signature Wendy’s flavor, so don’t eyeball—measure. - Can Opener
You’ll likely be using canned beans, tomatoes, and maybe corn—make sure your can opener is working smoothly!
Preparation Tips
- Brown the Meat Well
Don’t rush this step. Let the beef sear and get those golden-brown bits for maximum flavor. - Sauté Aromatics Separately
After browning the meat, briefly cook your onions, peppers, and garlic in the beef fat to draw out their sweetness and deepen the flavor of the whole pot. - Drain Fat if Necessary
If using fattier ground beef, consider draining some grease before adding the rest of the ingredients—but leave a little for richness. - Simmer Gently, Not Aggressively
Keep the heat low and let everything marry together. A 30-45 minute simmer will transform a good chili into a great one. - Taste and Adjust Seasoning
The longer it simmers, the more flavor develops. Taste near the end and tweak the salt, spice, or chili powder if needed. - Chili Gets Better with Time
If you can, make it a few hours ahead or even the day before. The flavors deepen and meld beautifully overnight.
Ingredients for This Wendy’s Chili Recipe
To recreate the iconic Wendy’s Chili flavor at home, you’ll need a mix of fresh ingredients, pantry staples, and a carefully balanced blend of spices. This ingredient list sticks closely to the fast-food favorite, offering a hearty, smoky, and slightly sweet chili that’s instantly recognizable.
Here’s everything you’ll need:
Fresh Ingredients:
- 2 lbs ground beef (80/20 for flavor, or lean if you prefer less grease)
- 1 large onion, diced
- 1 green bell pepper, diced
- 1 celery stalk, finely chopped
- 3 garlic cloves, minced
Canned & Pantry Ingredients:
- 1 (29 oz) can tomato sauce
- 1 (29 oz) can diced tomatoes
- 1 (15 oz) can pinto beans, drained and rinsed
- 1 (15 oz) can kidney beans, drained and rinsed
- 1 (15 oz) can whole kernel corn (optional but adds sweetness and texture)
- 1 cup water (or beef broth for more depth)
- 2 tablespoons tomato paste
Spices & Seasonings:
- 2 tablespoons chili powder
- 1 teaspoon cumin
- 1 teaspoon garlic powder
- ½ teaspoon onion powder
- ½ teaspoon smoked paprika
- ½ teaspoon salt (adjust to taste)
- ½ teaspoon black pepper
- ½ tablespoon sugar (balances the acidity of the tomatoes)
- ¼ teaspoon cayenne pepper (optional, for heat)
Optional Toppings:
- Sour cream
- Chopped green onions
- Shredded cheddar cheese
- Crackers or tortilla chips
Step-by-Step Cooking Instructions for Wendy’s Chili Recipe
Let’s break down this crowd-pleasing recipe into simple, clear steps. You’ll be surprised how quickly this flavorful chili comes together with just one big pot and some layering of ingredients.
Step 1: Brown the Ground Beef
Place a large pot or Dutch oven over medium-high heat. Add the ground beef and cook until fully browned, breaking it apart with a wooden spoon as it cooks. This should take about 7–10 minutes.
Optional: Drain excess fat, especially if using higher-fat beef, but leave about a tablespoon for flavor.
Step 2: Sauté the Aromatics
Add diced onions, green bell pepper, celery, and garlic directly into the pot with the browned beef. Cook for about 5 minutes, or until the vegetables are soft and fragrant. Stir frequently to prevent sticking.
Step 3: Add Tomato Base
Stir in the tomato paste and let it cook for 1 minute to deepen the flavor. Then add the tomato sauce and diced tomatoes (with their juice). Mix well to combine all ingredients evenly.
Step 4: Season the Chili
Sprinkle in the chili powder, cumin, garlic powder, onion powder, smoked paprika, sugar, salt, black pepper, and cayenne if using. Stir everything together, ensuring the beef and veggies are coated in the spices.
Step 5: Add Beans, Corn & Water
Pour in the drained kidney beans, pinto beans, and corn. Add the water (or beef broth for richer flavor) and give everything a hearty stir.
Step 6: Simmer Slowly
Bring the pot to a gentle boil, then reduce the heat to low. Cover loosely with a lid and let it simmer for 30–45 minutes, stirring occasionally. This gives the flavors time to blend and thicken into that classic chili texture.
Step 7: Taste and Adjust
After simmering, taste your chili and adjust seasoning as needed—more salt, a pinch more sugar, or an extra dash of chili powder, depending on your preference.
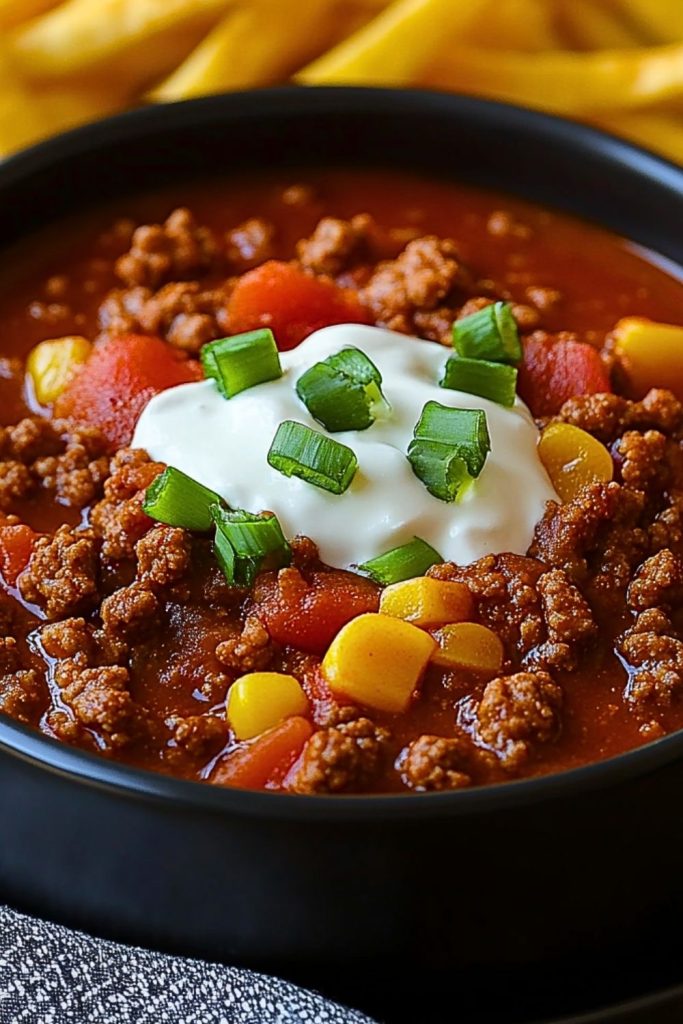
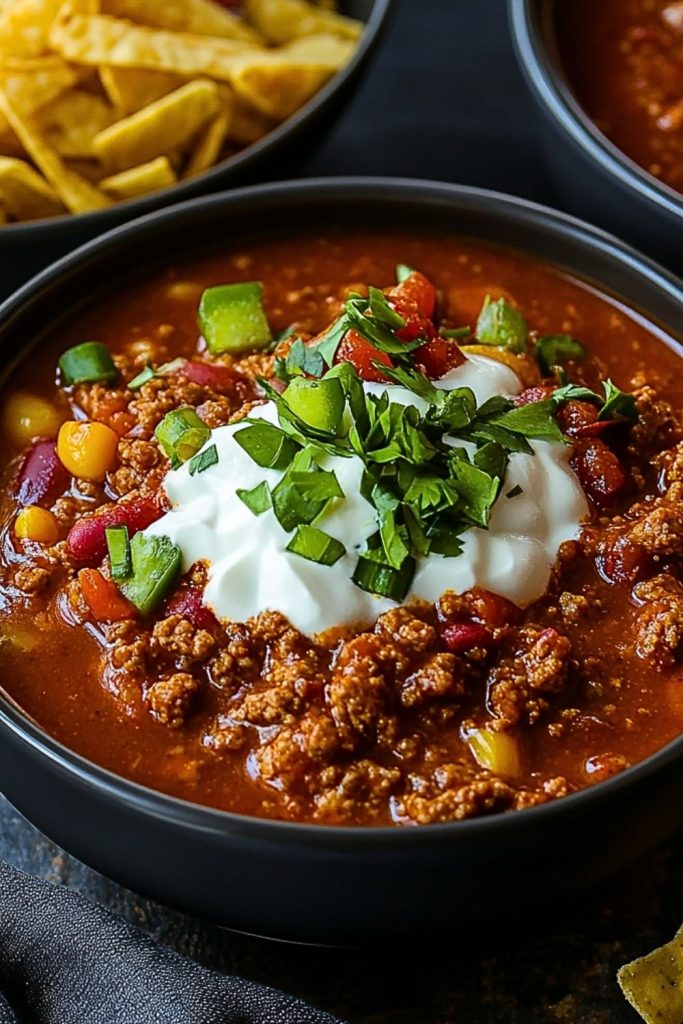
Step 8: Serve and Garnish
Ladle the chili into bowls and top with sour cream, chopped green onions, shredded cheddar cheese, or crackers. Serve hot and enjoy every spoonful!
Notes
- Make It Your Own: Wendy’s Chili has a classic flavor, but you can easily personalize it. Add jalapeños for heat, swap in black beans, or stir in a bit of cocoa powder or espresso for depth.
- Double the Batch: This chili freezes incredibly well. Make a double batch and store half for future lazy-day dinners.
- Beef Options: While ground beef is traditional, you can substitute ground turkey or a plant-based ground meat for a lighter or vegetarian option.
- Let It Rest: If you have the time, let the chili rest off the heat for 15 minutes before serving. This allows the flavors to settle and thicken just a bit more.
- Low & Slow Wins: While you can make this chili in under an hour, letting it simmer longer (up to 1.5 hours) results in even richer flavor.
Watch Out for These Mistakes While Cooking
Overcooking the Veggies Too Early
Adding the bell pepper and celery too soon or cooking them on high heat can make them mushy. You want them tender, not limp.
Under-seasoning
Taste as you go, especially near the end of simmering. Beans and tomatoes absorb a lot of salt and spice, so adjust accordingly.
Too Watery?
Don’t panic if the chili looks thin at first. It thickens as it simmers. But if it’s still too loose, uncover the pot and simmer a bit longer.
Skipping the Sauté
Cooking the aromatics in fat (from the beef) before adding liquids creates layers of flavor. Don’t rush this part.
Adding Cold Ingredients
If using canned items from the fridge, let them warm slightly before adding. Cold ingredients can drop the chili’s temperature and slow down cooking.
Not Letting It Cool Before Storing
Avoid putting hot chili straight into the fridge. Let it cool on the counter first to prevent condensation and sogginess.
What to Serve With Wendy’s Chili?
Wendy’s-style chili is delicious all on its own, but pairing it with the right sides or toppings can elevate it into a full-blown comfort meal. Whether you’re going for cozy, hearty, or fun and casual, these ideas will round out your bowl of chili perfectly.
8 Recommendations
1. Cornbread
Slightly sweet and golden on the outside, cornbread is the ultimate chili sidekick. It soaks up all that savory tomato broth beautifully.
2. Baked Potatoes
Spoon chili over a fluffy baked potato and top with cheese and sour cream for an instant chili-stuffed spud dinner. It’s filling, warm, and incredibly satisfying.
3. Tortilla Chips or Corn Chips
Crispy chips add a welcome crunch. Use them for dipping or crush them over the top for texture.
4. Simple Green Salad
A crisp salad with a light vinaigrette balances the richness of the chili and keeps things fresh.
5. Garlic Bread or Texas Toast
Bold move? Maybe. But chili and buttery, garlicky toast is a combo you’ll crave again.
6. Chili Dogs
Use your leftovers! Pile this chili onto grilled hot dogs and top with shredded cheese and onions. A stadium classic, right at home.
7. Steamed White or Brown Rice
Serving chili over rice not only stretches the meal but gives it a subtle texture boost and makes it extra hearty.
8. Mac and Cheese
This one’s for the indulgent souls—spoon some chili over creamy mac and cheese for a kid-friendly, flavor-loaded mash-up.
Storage Instructions
One of the best things about Wendy’s Chili is how well it stores—it actually improves with time as the spices and flavors meld together. Whether you’re meal prepping or saving leftovers, here’s how to store it properly:
Refrigeration
- Store in Airtight Containers: Allow the chili to cool slightly before transferring to containers with tight-fitting lids.
- Shelf Life: Keeps well in the fridge for up to 4–5 days.
- Reheat on Stovetop or Microwave: Add a splash of water or broth when reheating to loosen the consistency.
Freezing
- Freeze in Batches: Portion into freezer-safe containers or zip-lock bags. Lay bags flat to save space.
- Storage Duration: Can be frozen for up to 3 months without losing flavor.
- Thaw & Reheat: Thaw overnight in the fridge and reheat gently on the stovetop over medium-low heat.
Tip: Label containers with the date so you know how long they’ve been stored.
Estimated Nutrition (Per 1-Cup Serving)
These numbers are approximate and may vary based on specific ingredient brands and serving sizes used.
- Calories: 260
- Protein: 18g
- Carbohydrates: 22g
- Fiber: 6g
- Fat: 11g
- Saturated Fat: 4g
- Cholesterol: 40mg
- Sodium: 680mg
- Sugars: 5g
For a lighter option, you can use lean ground turkey and low-sodium canned goods.
Frequently Asked Questions
Let’s clear up some common questions about this Wendy’s Chili Recipe—so you can cook with confidence and serve with pride!
1. Can I make this in a slow cooker?
Yes! Brown the beef and sauté the aromatics first, then transfer everything into your slow cooker. Cook on low for 6–8 hours or high for 3–4 hours for deep, slow-simmered flavor.
2. Is this chili spicy?
Wendy’s chili has a mild kick, but it’s not overly spicy. You can turn up the heat by adding jalapeños, extra cayenne, or hot sauce. Want it milder? Cut back on the chili powder or skip the cayenne entirely.
3. Can I make it vegetarian?
Absolutely! Swap the ground beef for a plant-based crumble or chopped mushrooms and use vegetable broth instead of water or beef broth. It’s still hearty and full of flavor.
4. What if I don’t have tomato paste?
You can skip it, but tomato paste helps add richness and depth. As an alternative, reduce the tomato sauce slightly or add a bit of ketchup for balance.
5. Can I use dried beans instead of canned?
Yes, but they need to be pre-cooked first. Dried beans should be soaked and fully cooked before adding to the chili to ensure proper texture and cooking time.
6. Is it gluten-free?
Yes, this chili is naturally gluten-free as long as your ingredients (especially broth and canned goods) are certified gluten-free. Always double-check labels if gluten is a concern.
7. How can I thicken the chili?
Let it simmer uncovered to reduce the liquid. You can also mash a few beans or stir in a tablespoon of cornmeal or masa harina for a Tex-Mex twist.
8. Can I serve this at a party?
Definitely! Wendy’s Chili is a great party dish. Serve it buffet-style with bowls of toppings—sour cream, cheese, chopped onions, jalapeños, and tortilla chips—so guests can customize their bowls.
Conclusion
Wendy’s Chili isn’t just fast food—it’s feel-good food. It’s cozy, rich, and packed with flavor in every spoonful. This homemade version brings all that goodness straight to your kitchen in an easy, budget-friendly recipe that works for casual dinners, meal prep, game day spreads, or a hearty lunch.
Once you try this from-scratch version, you might never go back to the drive-thru. And the best part? You can customize it endlessly—spicy, mild, veggie-packed, or meaty and bold. However you like it, you’re just one pot away from a warm bowl of comfort.

Wendy’s Chili Recipe
- Prep Time: 15 minutes
- Cook Time: 45 minutes
- Total Time: 1 hour
- Yield: 8–10 servings 1x
Description
Craving a bowl of cozy, hearty comfort food that’s packed with flavor and ready to satisfy the whole family? This homemade Wendy’s Chili copycat recipe checks every box. With juicy ground beef, tender beans, and bold spices all simmered together in a rich tomato base, this dish captures the signature fast-food flavor we all know and love—without ever leaving your kitchen. Perfect for easy dinner ideas, meal prep, or a quick lunch, it’s a filling, healthy snack or weeknight lifesaver. This easy recipe is the ultimate blend of convenience, taste, and nostalgia.
Ingredients
- 2 lbs ground beef
- 1 large onion, diced
- 1 green bell pepper, diced
- 1 celery stalk, finely chopped
- 3 garlic cloves, minced
- 1 (29 oz) can tomato sauce
- 1 (29 oz) can diced tomatoes
- 1 (15 oz) can pinto beans, drained and rinsed
- 1 (15 oz) can kidney beans, drained and rinsed
- 1 (15 oz) can whole kernel corn (optional)
- 1 cup water or beef broth
- 2 tablespoons tomato paste
- 2 tablespoons chili powder
- 1 teaspoon cumin
- 1 teaspoon garlic powder
- 1/2 teaspoon onion powder
- 1/2 teaspoon smoked paprika
- 1/2 teaspoon salt
- 1/2 teaspoon black pepper
- 1/2 tablespoon sugar
- 1/4 teaspoon cayenne pepper (optional)
Instructions
- In a large pot, brown ground beef over medium-high heat. Break apart the meat as it cooks. Drain excess fat if needed.
- Add diced onion, bell pepper, celery, and garlic. Sauté until vegetables are soft, about 5 minutes.
- Stir in tomato paste, then add tomato sauce and diced tomatoes. Mix well.
- Add chili powder, cumin, garlic powder, onion powder, smoked paprika, salt, pepper, sugar, and cayenne (if using).
- Stir in beans, corn (optional), and water or broth. Mix thoroughly.
- Bring chili to a gentle boil, then reduce heat to low. Cover loosely and simmer for 30–45 minutes.
- Taste and adjust seasonings as needed. Simmer uncovered to thicken if desired.
- Serve hot with toppings like cheese, sour cream, green onions, or tortilla chips.