
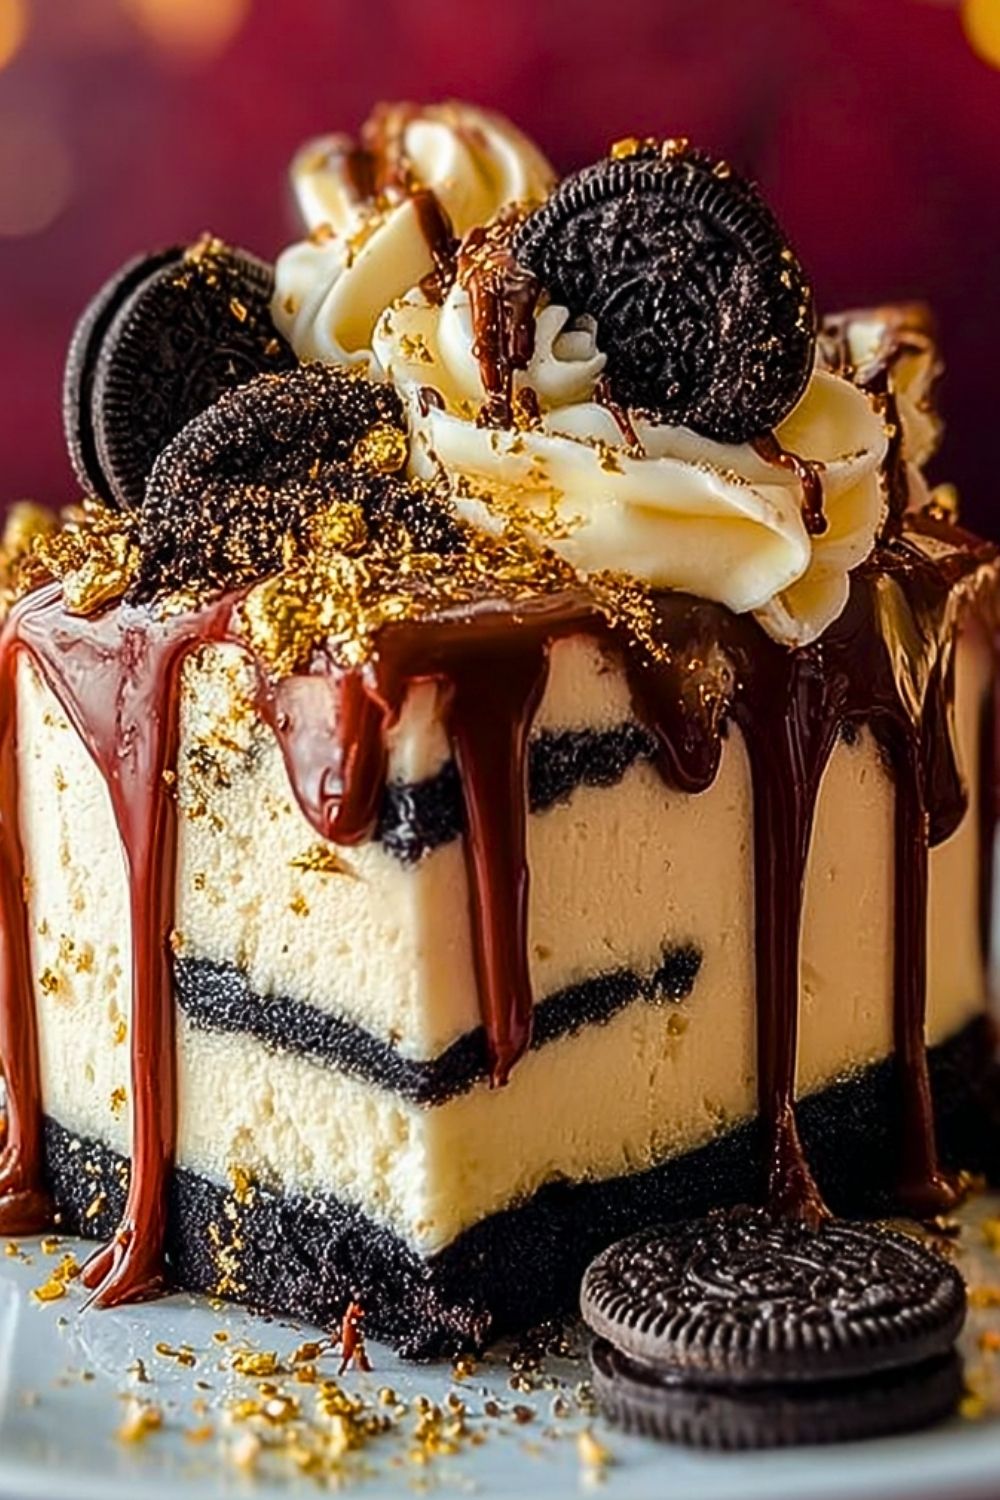
This Strawberry Red Velvet Oreo Cheesecake Drip Cake is what dessert dreams are made of. Layer upon layer of luscious flavor, this cake is a showstopper that combines the richness of red velvet, the creaminess of cheesecake, the crunch of Oreos, and the brightness of strawberries — all brought together with a silky white chocolate drip. It’s a full sensory experience, both visually stunning and absolutely indulgent on the palate.
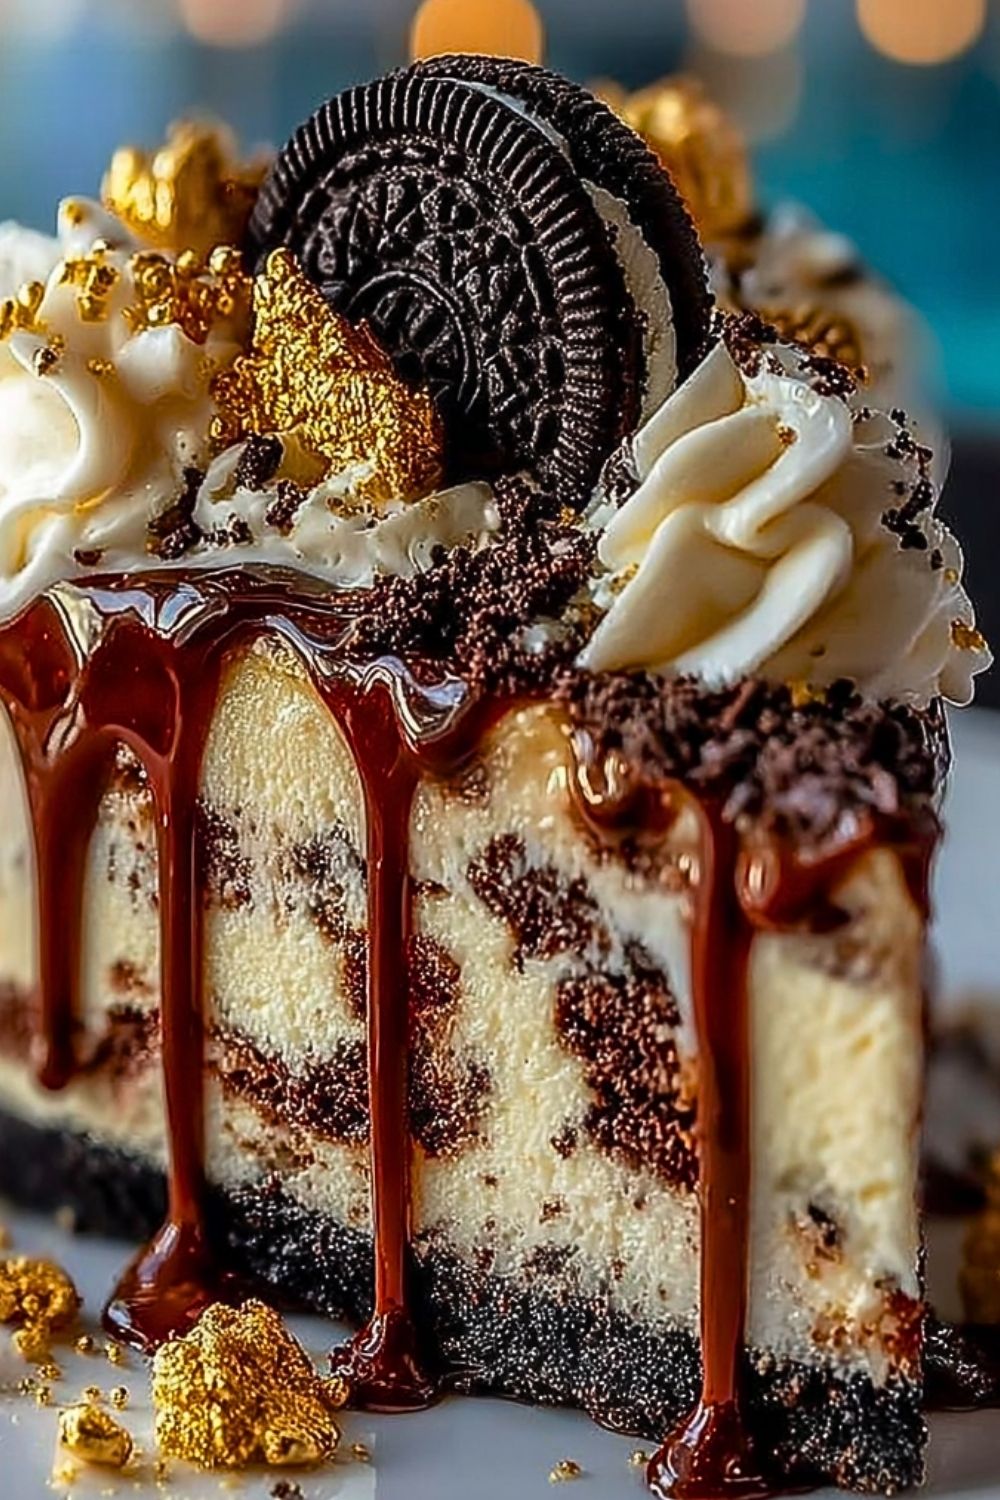
The beauty of this cake lies in its contrast — fluffy yet dense, sweet with just the right hint of tang, velvety but with a satisfying crunch from cookie crumbles. It’s not just a cake; it’s an event. Whether you’re celebrating a special occasion or simply want to wow your friends and family, this cake delivers on flavor, texture, and presentation.
Why You’ll Love This Strawberry Red Velvet Oreo Cheesecake Drip Cake
- Multi-textured decadence: Every bite hits you with a combination of creamy, crunchy, and soft textures.
- Visually stunning: This cake is Instagram-ready with layers of red velvet and cheesecake, topped with a gorgeous white chocolate drip and decorated with strawberries and Oreos.
- Flavor fusion: The tartness of strawberries cuts through the richness of cheesecake, while red velvet and Oreos bring in their classic flavors for a well-balanced bite.
- Perfect for celebrations: It’s the ultimate centerpiece for birthdays, holidays, or any dessert table that needs an upgrade.
- Customizable: You can tweak the layers, change the drip, or swap in flavored Oreos to make it your own.
Preparation Phase & Tools to Use
Essential Tools and Equipment (and Why You Need Them):
Creating a multi-layered dessert like the Strawberry Red Velvet Oreo Cheesecake Drip Cake requires the right gear to get bakery-level results at home:
- Springform Pan (9-inch): Absolutely essential for the cheesecake layer — it allows you to release the cake cleanly without destroying its structure.
- Round Cake Pans (2 or 3 of the same size): These are used for the red velvet layers. Using pans of the same size ensures even baking and stacking.
- Hand or Stand Mixer: You’ll need power to whip the cream cheese until smooth, mix batters thoroughly, and prepare the whipped topping (if using).
- Parchment Paper: Lining your pans makes cake removal easier and cleaner, reducing the risk of breakage.
- Offset Spatula: For even spreading of frosting and cheesecake filling between layers.
- Cake Turntable (optional but helpful): Makes frosting and decorating the cake a lot easier, especially when doing the drip.
- Microwave-safe Bowl or Double Boiler: For melting white chocolate for the drip.
- Piping Bag with Tips: Optional but great for decorative swirls or adding visual flair on top.
- Cooling Racks: Ensures your cake layers and cheesecake cool evenly without becoming soggy.
- Refrigerator Space: Make sure you have enough room to chill the cheesecake layer and fully assembled cake before serving.
Preparation Tips
- Room Temperature Ingredients: Especially for cream cheese, butter, and eggs — this ensures smooth mixing and prevents lumpy batter or frosting.
- Bake Cheesecake a Day Ahead: Letting the cheesecake layer chill overnight allows it to firm up and makes stacking easier.
- Level Your Cakes: Use a serrated knife or cake leveler to trim domed tops off your red velvet cakes — this prevents sliding when stacked.
- Chill Before the Drip: Make sure the cake is cold before applying the white chocolate drip so it sets perfectly and doesn’t run all the way down.
- Use a Toothpick Test: To ensure red velvet layers are fully baked — the toothpick should come out with only a few crumbs, not batter.
- Don’t Rush the Cooling: Letting each layer cool properly is key to getting clean layers and avoiding a melted mess.
- Decorate Just Before Serving: Especially with fresh strawberries — they can start to leak juice after a few hours.
Ingredients for This Strawberry Red Velvet Oreo Cheesecake Drip Cake
For the Red Velvet Cake Layers
- 2 ½ cups all-purpose flour
- 1 ½ cups granulated sugar
- 1 tsp baking soda
- 1 tsp fine salt
- 1 tsp cocoa powder
- 1 ½ cups vegetable oil
- 1 cup buttermilk, at room temperature
- 2 large eggs, at room temperature
- 2 tbsp red food coloring (liquid or gel)
- 1 tsp vanilla extract
- 1 tsp white vinegar
For the Oreo Cheesecake Layer
- 24 oz (3 blocks) cream cheese, softened
- 1 cup granulated sugar
- 3 large eggs
- 1 tsp vanilla extract
- ½ cup sour cream
- 12 Oreo cookies, crushed
For the Cream Cheese Frosting
- 1 cup unsalted butter, softened
- 16 oz cream cheese, softened
- 5 cups powdered sugar, sifted
- 2 tsp vanilla extract
- Pinch of salt
For the White Chocolate Drip
- ¾ cup white chocolate chips or chopped white chocolate
- ¼ cup heavy cream
Toppings and Decoration
- 8–10 fresh strawberries, halved
- 6–8 Oreo cookies, whole or crushed for garnish
- Optional: red velvet cake crumbs (from trimmed cake tops)
- Optional: whipped cream swirls using piping bag
Step 1: Make the Oreo Cheesecake Layer
- Preheat oven to 325°F (163°C). Line the bottom of a 9-inch springform pan with parchment paper and lightly grease the sides.
- In a large bowl, beat the cream cheese until smooth. Add sugar and mix until combined.
- Add eggs one at a time, mixing well after each addition. Mix in vanilla and sour cream until smooth.
- Gently fold in the crushed Oreos.
- Pour the batter into the springform pan and bake for 50–60 minutes, or until the center is just set and slightly wobbly.
- Turn off the oven, crack the door open, and let the cheesecake cool inside for 1 hour.
- Remove from oven, cool completely, then chill for at least 4 hours or overnight.
Step 2: Bake the Red Velvet Cake Layers
- Preheat oven to 350°F (177°C). Grease and line two or three 9-inch round cake pans with parchment paper.
- In a large bowl, whisk together flour, sugar, baking soda, salt, and cocoa powder.
- In another bowl, whisk together oil, buttermilk, eggs, food coloring, vanilla, and vinegar.
- Add the wet ingredients to the dry and mix just until combined — do not overmix.
- Divide the batter evenly among pans and bake for 25–30 minutes, or until a toothpick comes out with just a few crumbs.
- Let cakes cool in pans for 10 minutes, then turn out onto wire racks to cool completely.
Step 3: Make the Cream Cheese Frosting
- Beat the butter and cream cheese together until smooth and fluffy.
- Gradually add powdered sugar, one cup at a time, beating well between each addition.
- Add vanilla and a pinch of salt; beat until light and creamy.
- Chill for 15–20 minutes if the frosting feels too soft for stacking.
Step 4: Assemble the Cake
- Level the cake layers if needed using a serrated knife.
- Place one red velvet cake layer on your cake board or plate. Spread a layer of frosting on top.
- Carefully add the chilled Oreo cheesecake layer. Top with frosting again.
- Add the final red velvet cake layer. Crumb coat the entire cake with a thin layer of frosting and chill for 30 minutes.
- Apply the final frosting coat, smoothing it with an offset spatula.
Step 5: Make and Add the White Chocolate Drip
- Heat heavy cream in the microwave until hot (not boiling). Pour over white chocolate and let sit for 1–2 minutes.
- Stir until smooth and let it cool slightly until it thickens enough to drip slowly.
- Using a spoon or piping bottle, carefully drip chocolate around the edges of the chilled cake.
Step 6: Decorate
- Garnish the top with halved strawberries and whole or crushed Oreos.
- Pipe whipped cream swirls if desired and sprinkle with leftover red velvet cake crumbs for added flair.
- Chill the cake for 1 hour before serving to set everything in place.
Notes
- Chill Time Matters: Allowing the cheesecake and frosted cake to chill properly between steps gives you cleaner layers and better structure.
- Make Ahead Friendly: You can bake the red velvet layers and cheesecake a day in advance to save time during assembly.
- Stabilize the Frosting: If your cream cheese frosting feels too soft for stacking, pop it into the fridge for 15–20 minutes before using.
Watch Out for These Mistakes While Cooking
- Skipping Room Temperature Ingredients: Cold cream cheese or eggs can cause lumpy batter or frosting that splits.
- Overbaking the Cheesecake: It should still have a slight jiggle in the center when you turn the oven off — it will continue to set as it cools.
- Drip Chocolate That’s Too Hot: If your white chocolate is too warm, it will run down the sides too quickly and look messy.
- Unleveled Cake Layers: Not trimming domed tops can cause instability when stacking, leading to a leaning or sliding cake.
- Overmixing the Cake Batter: Once the dry and wet ingredients are combined, mix just until incorporated to avoid dense cake.
- Skipping the Crumb Coat: A thin initial layer of frosting locks in crumbs and gives you a cleaner final coat.
- Decorating Too Early: Add fresh strawberries and whipped cream close to serving time to keep the toppings from wilting or leaking juice.
- Forgetting to Cool Completely: Assembling warm layers will melt your frosting and ruin the structure of the cake.
What to Serve With Strawberry Red Velvet Oreo Cheesecake Drip Cake?
This cake is rich and indulgent, so pairing it with the right sides and drinks can elevate the entire dessert experience. Whether you’re hosting a dinner party or just having a slice with friends, here are a few great companions to consider.
8 Recommendations
1. Fresh Berries on the Side
A simple bowl of strawberries, raspberries, or blueberries helps balance the richness with some refreshing acidity.
2. Espresso or Strong Coffee
The bitterness of coffee cuts through the sweetness beautifully and complements the chocolate and cream cheese notes.
3. Sparkling Rosé or Prosecco
If you’re celebrating, light bubbly wines pair perfectly with fruity and creamy desserts like this one.
4. Vanilla Bean Ice Cream
A scoop of vanilla ice cream adds cool contrast and an extra indulgent touch without overwhelming the cake’s flavors.
5. Unsweetened Whipped Cream
For those who want something lighter, a dollop of freshly whipped cream offers a soft, airy complement.
6. Milk (Chilled or Warmed)
A timeless classic — especially great for kids or those who just love the nostalgia of cake and milk.
7. Dark Chocolate Shavings or Sauce
Serve a slice with a drizzle of dark chocolate sauce for added depth and a touch of bitterness.
8. Mint Garnish or Infused Water
A mint leaf garnish or a chilled glass of mint-infused water can refresh the palate between bites and cleanse the richness.
Storage Instructions
To keep your Strawberry Red Velvet Oreo Cheesecake Drip Cake fresh and beautiful for as long as possible, follow these storage tips:
- Refrigeration: Always store this cake in the refrigerator due to the cream cheese frosting and cheesecake layer. Keep it covered with a cake dome or loosely wrapped in plastic wrap. It stays fresh for up to 4–5 days.
- Freezing: You can freeze individual slices or the entire unfrosted cake (red velvet layers and cheesecake layer) for longer storage. Wrap tightly in plastic wrap and aluminum foil, then freeze for up to 2 months. Thaw overnight in the fridge before assembling or serving.
- Avoid Freezing Fresh Toppings: Strawberries and whipped cream do not freeze well — add these fresh just before serving.
Estimated Nutrition (Per Slice – based on 16 slices)
- Calories: ~670 kcal
- Total Fat: 42g
- Saturated Fat: 20g
- Unsaturated Fat: 18g
- Trans Fat: 0.5g
- Cholesterol: 130mg
- Sodium: 430mg
- Carbohydrates: 66g
- Sugar: 49g
- Fiber: 2g
- Protein: 7g
- Serving Size: 1 slice (of 16)
- Diet: Vegetarian
- Keywords: Celebration cake, birthday cake, red velvet dessert, cheesecake layer cake
Note: These values are estimates and can vary depending on specific ingredients or serving sizes.
Frequently Asked Questions
1. Can I use boxed red velvet cake mix instead of making it from scratch?
Absolutely! If you’re short on time, a quality boxed red velvet mix works well. Just make sure to bake it in the same size pans and let it cool completely before assembling.
2. Can I skip the white chocolate drip?
Yes — while it adds elegance and extra sweetness, it’s optional. You could also try a dark chocolate or strawberry ganache drip instead.
3. Do I need to use a springform pan for the cheesecake?
Yes, it’s highly recommended. The springform allows easy release of the cheesecake without damaging it, which is crucial for clean stacking.
4. Can I make this cake gluten-free?
You can! Use a gluten-free all-purpose flour blend for the red velvet cake and certified gluten-free Oreos. Check that all other ingredients are labeled GF.
5. How do I make sure the layers don’t slide off?
Chilling the cheesecake and frosting thoroughly before assembling helps a lot. Also, leveling each cake layer ensures stability.
6. Can I make the entire cake a day ahead?
Yes. In fact, it’s better the next day! Just hold off on fresh strawberries and whipped cream until shortly before serving.
7. How do I get the perfect drip effect?
Let the melted white chocolate cool for a few minutes before applying it to a cold cake. If it’s too hot, it’ll run off too quickly.
8. Can I use other Oreo flavors?
Definitely! Try Golden Oreos for a vanilla twist or Red Velvet Oreos (if available) for extra flavor alignment.
Conclusion
The Strawberry Red Velvet Oreo Cheesecake Drip Cake is more than just a dessert — it’s a celebration centerpiece, a flavor-packed showstopper, and a true labor of love. Every layer brings something exciting: from the moist red velvet cake to the rich, cookie-studded cheesecake, finished with a creamy frosting and elegant white chocolate drip. It’s perfect for birthdays, anniversaries, or any time you want to make dessert unforgettable.
With the right tools, good planning, and these step-by-step instructions, even a home baker can master this impressive layered cake. Once you’ve made it, don’t be surprised if it becomes your go-to signature for every special event.

Strawberry Red Velvet Oreo Cheesecake Drip Cake
- Prep Time: 45 minutes
- Cook Time: 1 hour 30 minutes
- Total Time: 8 hours
- Yield: 16 slices 1x
- Category: Dessert
- Method: Baking
- Cuisine: American
- Diet: Vegetarian
Description
Get ready to impress with this Strawberry Red Velvet Oreo Cheesecake Drip Cake — a layered masterpiece that blends the richness of red velvet, the creaminess of Oreo-studded cheesecake, and the elegance of a white chocolate drip. Whether you’re looking for a quick dessert showstopper, a birthday cake idea, or a celebration-worthy centerpiece, this cake delivers bold flavor and stunning visual appeal. Perfect for birthdays, parties, or when you want to steal the spotlight with your baking skills.
Ingredients
2 ½ cups all-purpose flour
1 ½ cups granulated sugar
1 teaspoon baking soda
1 teaspoon fine salt
1 teaspoon cocoa powder
1 ½ cups vegetable oil
1 cup buttermilk, at room temperature
2 large eggs, at room temperature
2 tablespoons red food coloring
1 teaspoon vanilla extract
1 teaspoon white vinegar
24 ounces cream cheese, softened
1 cup granulated sugar
3 large eggs
1 teaspoon vanilla extract
½ cup sour cream
12 Oreo cookies, crushed
1 cup unsalted butter, softened
16 ounces cream cheese, softened
5 cups powdered sugar, sifted
2 teaspoons vanilla extract
1 pinch salt
¾ cup white chocolate chips
¼ cup heavy cream
8 strawberries, halved
6 Oreo cookies, whole or crushed
Optional: red velvet cake crumbs
Optional: whipped cream swirls
Instructions
1. Preheat oven to 325°F (163°C). Line a 9-inch springform pan with parchment and grease lightly.
2. Beat cream cheese until smooth. Add sugar, then eggs one at a time. Mix in vanilla and sour cream.
3. Fold in crushed Oreos. Pour into pan and bake 50–60 minutes until the center is set but slightly wobbly.
4. Turn off oven, crack door, and let cool for 1 hour. Chill completely for at least 4 hours or overnight.
5. Preheat oven to 350°F (177°C) for red velvet layers. Grease and line two or three 9-inch cake pans.
6. Whisk flour, sugar, baking soda, salt, and cocoa powder in one bowl.
7. In another bowl, whisk oil, buttermilk, eggs, red food coloring, vanilla, and vinegar.
8. Combine wet and dry ingredients. Mix just until incorporated.
9. Divide batter between pans and bake 25–30 minutes. Cool 10 minutes in pans, then on wire racks.
10. Beat butter and cream cheese for frosting until fluffy. Gradually add powdered sugar, then vanilla and salt.
11. Level cake layers if needed. Place one red velvet layer on cake board and spread frosting on top.
12. Add chilled cheesecake layer, then another red velvet layer. Crumb coat entire cake and chill 30 minutes.
13. Apply final frosting layer and smooth.
14. Heat cream and pour over white chocolate. Let sit 1–2 minutes, then stir until smooth.
15. Cool slightly before dripping over edges of cold cake.
16. Decorate with strawberries, Oreos, whipped cream swirls, and red velvet crumbs. Chill 1 hour before serving.
Notes
Chill the cheesecake and frosting before assembling to help the cake stack cleanly and hold its shape.
Don’t skip the crumb coat layer — it locks in loose crumbs for a smoother finish.
Add fresh toppings just before serving to keep everything looking and tasting fresh.
Nutrition
- Serving Size: 1 slice
- Calories: 670
- Sugar: 49g
- Sodium: 430mg
- Fat: 42g
- Saturated Fat: 20g
- Unsaturated Fat: 18g
- Trans Fat: 0.5g
- Carbohydrates: 66g
- Fiber: 2g
- Protein: 7g
- Cholesterol: 130mg
Keywords: celebration cake, red velvet dessert, oreo cheesecake, birthday cake ideas, easy drip cake