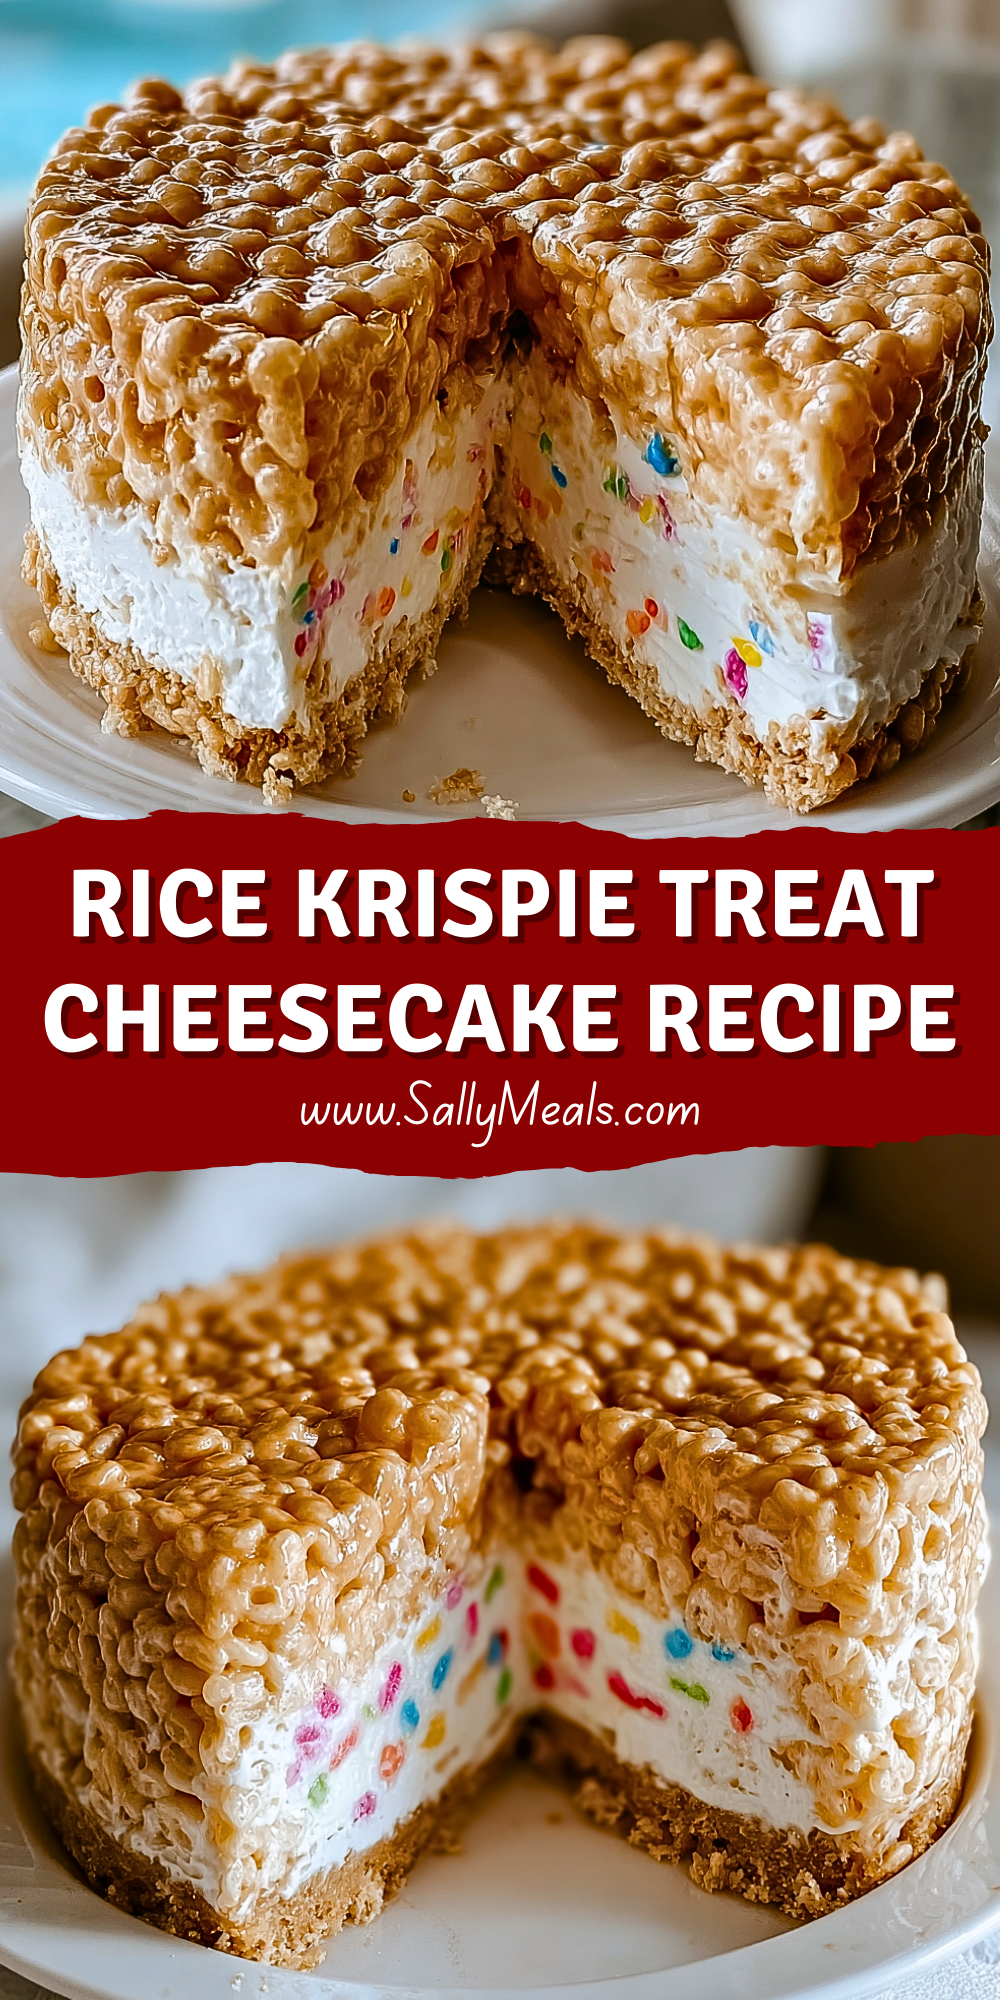
I have a serious weakness for nostalgic desserts, and this Rice Krispie Treat Cheesecake hits every note perfectly. Imagine the classic marshmallow-y crunch of Rice Krispie treats, but upgraded with a rich, creamy cheesecake filling nestled in between crispy, gooey layers. It’s one of those desserts that looks impressive, tastes like childhood, and is ridiculously simple to pull together—no oven required.
What I love most is how fun and unexpected it is. It’s not your typical cheesecake—it’s lighter, quicker to make, and the textures are so satisfying. The combination of buttery cereal layers with a whipped, slightly tangy filling creates a balance that’s sweet without being overwhelming. Whether you’re bringing it to a party or making it with your kids on a weekend afternoon, this recipe always gets people talking.
Why You’ll Love This Rice Krispie Treat Cheesecake Recipe
This dessert is a dream for anyone who wants maximum reward with minimal effort. You don’t need a springform pan, a water bath, or even an oven. It’s a playful mash-up of two beloved treats: the classic Rice Krispie square and creamy cheesecake. You can prep it ahead, customize it with sprinkles, chocolate chips, or even peanut butter—and it still turns out picture-perfect every time.
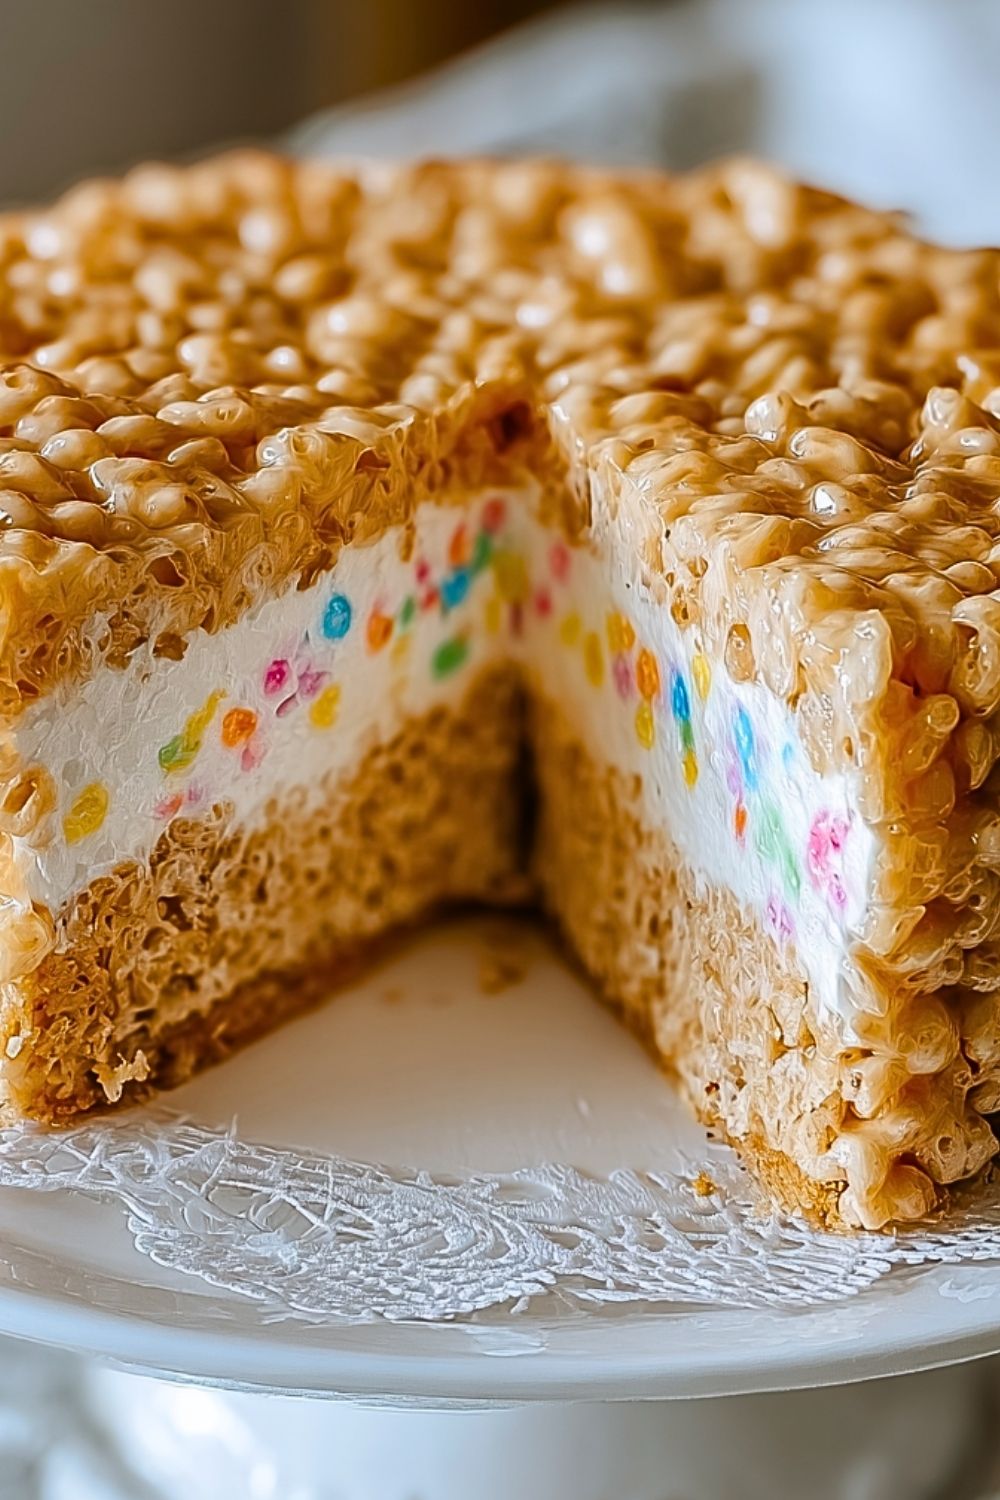
The texture alone is worth it: crunchy and chewy from the cereal layers, and fluffy and smooth from the filling. Plus, it holds its shape beautifully, making it ideal for slicing and serving.
What Kind of Marshmallows Work Best?
You want to use fresh mini marshmallows for this recipe—they melt quickly and evenly, giving that signature gooey consistency without overcooking. Stale or jumbo marshmallows tend to clump and can result in uneven texture. If you’re in a pinch, standard-size marshmallows work too, just make sure to chop them up a bit before melting.
Options for Substitutions
This recipe is incredibly forgiving and fun to play around with. If you’re avoiding dairy, you can easily use dairy-free cream cheese and a plant-based whipped topping. For a deeper flavor, brown butter can replace regular butter in the cereal mixture. You can also sub out the Rice Krispies for Cocoa Krispies or Fruity Pebbles for a colorful twist. And if you want to amp up the flavor, adding a teaspoon of vanilla or almond extract to the cheesecake filling makes a big impact.
Ingredients for This Rice Krispie Treat Cheesecake Recipe
- Rice Krispies cereal – The foundation of the crust and topping. Light, crisp, and perfect for holding everything together.
- Mini marshmallows – The key to the gooey, sticky binding that makes the cereal layers so satisfying. Fresh ones melt more evenly.
- Unsalted butter – Adds richness and helps create that perfect chewy texture in the cereal mixture.
- Cream cheese – The heart of the cheesecake filling. Smooth, tangy, and creamy.
- Powdered sugar – Sweetens the filling without any grittiness.
- Vanilla extract – Enhances the flavor of the cheesecake filling with a warm, familiar note.
- Whipped topping – Makes the cheesecake light and airy. You can use store-bought or homemade stabilized whipped cream.
- Sprinkles (optional) – Add color and a playful, celebratory touch to the filling.
Step 1: Prepare the Bottom Crust Layer
In a large saucepan, melt butter over low heat. Stir in mini marshmallows and continue stirring until completely melted and smooth. Remove from heat and quickly fold in Rice Krispies cereal. Mix until fully coated. Press half the mixture firmly into a greased springform pan or deep dish lined with parchment paper to form the bottom crust. Let it cool and set.
Step 2: Make the Cheesecake Filling
In a medium bowl, beat the softened cream cheese until smooth. Add powdered sugar and vanilla extract, then continue to beat until light and creamy. Gently fold in the whipped topping until fully combined. If using, stir in colorful sprinkles for a fun twist.
Step 3: Layer the Cheesecake Filling
Spoon the cream cheese mixture over the cooled cereal crust layer. Use a spatula to spread it evenly to the edges, smoothing the top. Place in the fridge to firm up slightly while you prepare the top layer.
Step 4: Add the Top Layer
Repeat the same process as the bottom layer: melt butter and marshmallows, stir in Rice Krispies, and mix until coated. Let it cool just a bit so it’s easier to handle but still pliable. Carefully spread or press this over the cheesecake filling layer. Lightly press it into place without squishing the filling.
Step 5: Chill Before Serving
Place the entire cheesecake in the refrigerator for at least 2 hours, preferably longer, to allow the filling to set completely. When ready to serve, run a warm knife around the edge before releasing from the pan. Slice with a sharp knife and enjoy!
How Long to Prepare the Rice Krispie Treat Cheesecake
This dessert is a great option when you’re short on time but still want to impress. Most of the work involves melting, mixing, and layering, which can be done in under 30 minutes.
Prep Time: You’ll need about 20–25 minutes for the cereal layers and cheesecake filling. Since nothing is baked, there’s no oven time to worry about.
Chill Time: For the best texture and sliceability, give the cheesecake at least 2 hours to chill in the fridge. Overnight is even better if you’re planning ahead.
Tips for Perfect Rice Krispie Treat Cheesecake
- Use parchment paper to line the pan for easy removal and cleaner slices.
- Lightly grease your hands or spatula when pressing the cereal mixture to prevent sticking.
- Make sure the cereal layers are fully cooled before adding the filling to keep it firm.
- Soften the cream cheese before mixing to get a smooth, lump-free filling.
- Chill the assembled cake long enough to allow the cheesecake layer to firm up properly.
Watch Out for These Mistakes While Cooking
- Overheating the marshmallows: This can cause them to harden and make the cereal layers tough.
- Not packing the crust tightly: A loose base can fall apart when slicing.
- Adding filling to a warm base: Always let the bottom layer cool before spreading the filling.
- Skipping chill time: The cheesecake won’t hold its shape if you don’t allow it to set properly.
- Using old marshmallows: They don’t melt as well and can ruin the consistency.
What to Serve With Rice Krispie Treat Cheesecake?
1. Fresh Berries
The tartness of strawberries, raspberries, or blueberries balances the sweetness beautifully.
2. Chocolate Sauce
Drizzle over slices for a decadent upgrade.
3. Whipped Cream
A dollop on top adds extra fluffiness and visual appeal.
4. Coffee or Espresso
The rich bitterness of coffee pairs wonderfully with the sweet, chewy layers.
5. Salted Caramel Drizzle
A light touch of salted caramel enhances the marshmallow-butter flavor.
Storage Instructions
Refrigerator: Store any leftovers in an airtight container in the fridge for up to 5 days. The cheesecake layer stays firm, and the cereal remains crisp.
Freezer: You can freeze this cheesecake, though the texture of the cereal may soften slightly. Wrap individual slices in plastic wrap, then foil, and freeze for up to 1 month. Thaw in the fridge overnight before serving.
Estimated Nutrition (per slice, based on 12 servings)
- Calories: 310
- Fat: 14g
- Saturated Fat: 9g
- Carbohydrates: 42g
- Sugar: 24g
- Protein: 3g
- Fiber: 0g
- Sodium: 180mg
Frequently Asked Questions
Can I make this ahead of time?
Absolutely. You can prepare it the night before and refrigerate overnight. Just keep it covered.
Can I use store-brand cereal?
Yes, generic brands of crispy rice cereal work just as well. Choose one with a good crunch.
How do I keep the cereal layer from sticking to the pan?
Use parchment paper and lightly grease it, or spray the pan with non-stick spray.
Can I make this recipe gluten-free?
Yes! Use certified gluten-free crispy rice cereal and check that your marshmallows and other ingredients are GF.
What if I don’t have whipped topping?
You can substitute with homemade whipped cream—just stabilize it with a bit of cornstarch or powdered sugar so it holds up.
Conclusion
Rice Krispie Treat Cheesecake is one of those desserts that looks impressive, tastes nostalgic, and couldn’t be easier to make. It combines everything I love about no-bake recipes: quick prep, minimal mess, and maximum flavor. Whether you’re serving it for a birthday party, potluck, or just a fun treat at home, it’s a guaranteed crowd-pleaser that’s as playful as it is delicious.
Rice Krispie Treat Cheesecake Recipe
- Prep Time: 25 minutes
- Cook Time: 0 minutes
- Total Time: 2 hours 25 minutes
- Yield: 12 servings 1x
- Category: Dessert
- Method: No-Bake
- Cuisine: American
Description
Looking for an easy no-bake dessert that’s fun, nostalgic, and totally irresistible? This Rice Krispie Treat Cheesecake is your go-to! With crunchy marshmallow cereal layers sandwiching a light and fluffy cheesecake filling, it’s a crowd-pleaser for parties, birthdays, or even a quick weekend treat. Great for those seeking easy dessert ideas, quick breakfast options, or a playful twist on classic cheesecake. It’s creamy, crunchy, and totally no-fuss.
Ingredients
6 cups Rice Krispies cereal
10 oz mini marshmallows
6 tablespoons unsalted butter
16 oz cream cheese, softened
1 cup powdered sugar
1 teaspoon vanilla extract
8 oz whipped topping
1/4 cup sprinkles (optional)
Instructions
1. Melt 3 tablespoons butter in a large saucepan over low heat.
2. Add 5 oz mini marshmallows and stir until completely melted and smooth.
3. Stir in 3 cups Rice Krispies cereal until fully coated.
4. Press the mixture into the bottom of a greased or parchment-lined springform pan.
5. In a mixing bowl, beat softened cream cheese until smooth.
6. Add powdered sugar and vanilla extract; beat until light and fluffy.
7. Fold in whipped topping until combined, then stir in sprinkles if using.
8. Spread cheesecake filling evenly over the cereal crust layer and smooth the top.
9. Repeat the cereal layer process with the remaining butter, marshmallows, and cereal.
10. Gently press the second cereal layer over the cheesecake filling.
11. Refrigerate for at least 2 hours to set before slicing and serving.
Notes
Use parchment paper to make removing the cheesecake from the pan super easy.
Lightly grease your hands or spatula to press the cereal mixture without sticking.
Soften the cream cheese fully before mixing to ensure a smooth, creamy filling.
Nutrition
- Serving Size: 1 slice
- Calories: 310
- Sugar: 24g
- Sodium: 180mg
- Fat: 14g
- Saturated Fat: 9g
- Unsaturated Fat: 3g
- Trans Fat: 0g
- Carbohydrates: 42g
- Fiber: 0g
- Protein: 3g
- Cholesterol: 35mg
Keywords: no-bake dessert, easy cheesecake, rice krispie treats, quick dessert, birthday dessert