
When I first made this Effortless Easy Chocolate Pie, I was amazed at how something so simple could taste so luxurious. The silky chocolate filling, the buttery crust, and the whipped cream topping make it feel like a gourmet dessert — yet it comes together with barely any effort. It’s the kind of pie that impresses guests and satisfies cravings without chaining you to the kitchen.
This pie has become my go-to for any occasion — whether it’s a last-minute dinner party, a cozy family gathering, or just a personal reward after a long day. Each bite delivers the perfect balance of rich cocoa goodness and melt-in-your-mouth creaminess. Trust me, once you try this, it will quickly earn a permanent place in your favorite dessert rotation.
Why You’ll Love This Effortless Easy Chocolate Pie
- Ridiculously Simple: Minimal ingredients, no fancy techniques, just mix, bake, chill, and enjoy.
- Rich and Creamy: The chocolate filling is decadently smooth, like a slice of a chocolate truffle.
- Crowd-Pleaser: Even picky eaters can’t resist a slice of this beauty.
- Flexible: Customize it with toppings like whipped cream, chocolate shavings, or fresh berries.
- Make Ahead Friendly: Perfect for prepping the day before your event.
- No Stress Dessert: It’s basically foolproof — a major win for busy or beginner bakers!
What Kind of Chocolate Should I Use for Effortless Easy Chocolate Pie?
Choosing the right chocolate is the secret to making this pie absolutely irresistible. I always recommend using a high-quality semi-sweet chocolate — something you truly enjoy eating straight out of the package. If you prefer a deeper, slightly bitter flavor, you can opt for dark chocolate with around 60–70% cacao. Milk chocolate can work too, but it will make the pie much sweeter and softer.
In short, the better the chocolate, the better the pie — so don’t be afraid to splurge a little here. After all, chocolate is the star of the show!
Options for Substitutions
Sometimes, you need a little flexibility depending on what’s already in your pantry. Here are some simple swap ideas:
- Crust: Instead of a traditional pie crust, you can use a graham cracker crust or even crushed Oreos for a no-bake base.
- Chocolate: Swap semi-sweet chocolate for bittersweet, milk chocolate, or even white chocolate if you want a fun twist.
- Cream: If heavy cream isn’t available, full-fat coconut milk can be a delicious dairy-free alternative.
- Toppings: No whipped cream? Sprinkle powdered sugar, drizzle caramel sauce, or top with fresh raspberries instead.
- Butter: Plant-based butter substitutes work well if you’re aiming for a vegan-friendly dessert.
Ingredients for This Effortless Easy Chocolate Pie
Each ingredient plays an important role in making this pie taste heavenly:
- Semi-Sweet Chocolate: Provides the rich, decadent flavor and creamy texture that defines this pie.
- Heavy Whipping Cream: Essential for creating that silky, truffle-like filling.
- Butter: Adds extra richness and gives the chocolate filling an ultra-smooth finish.
- Vanilla Extract: A small amount enhances the chocolate’s natural flavors and adds a cozy aroma.
- Pie Crust: Whether store-bought or homemade, it serves as the crisp, buttery base that holds all that luscious filling.
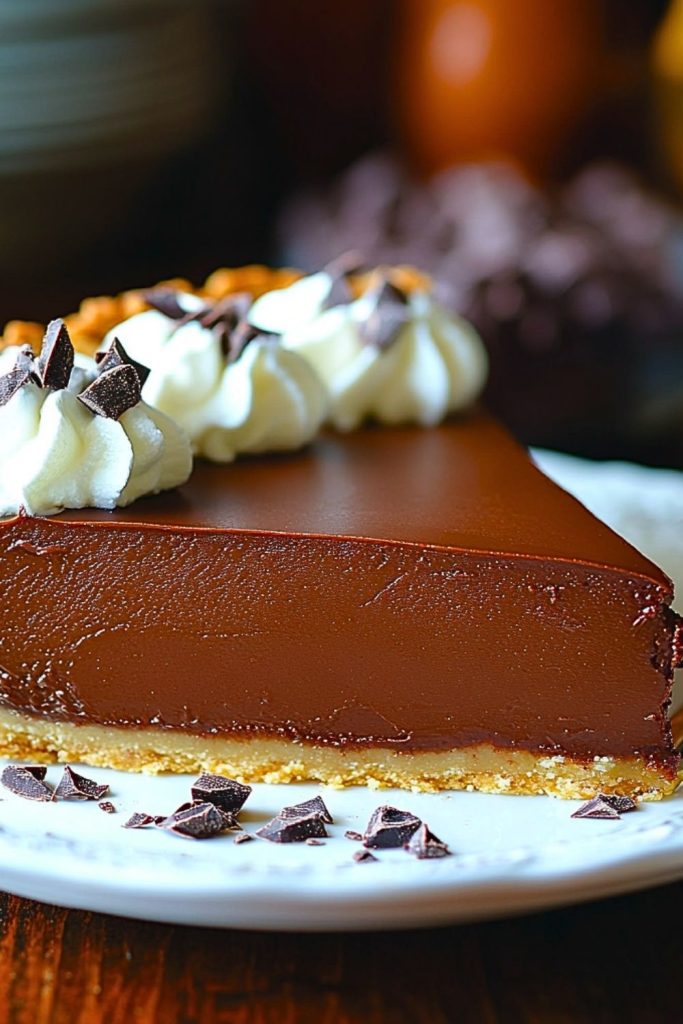
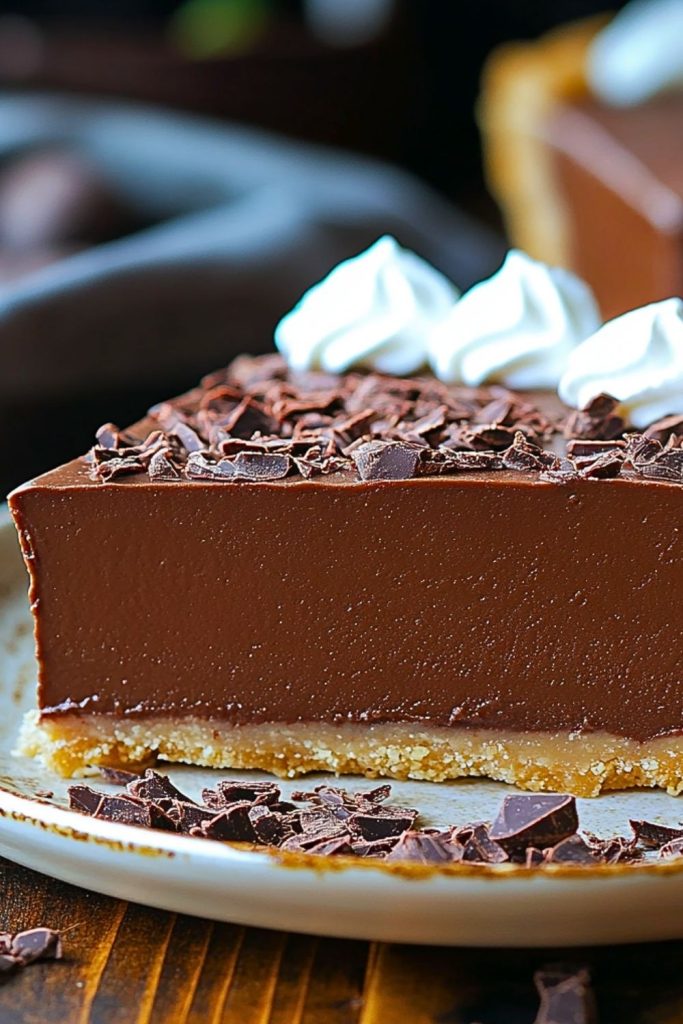
- Whipped Cream (for topping): Adds a light, airy contrast to the dense chocolate, making every bite more balanced and luxurious.
- Chocolate Shavings or Chunks (for garnish): Give the pie an elegant finish and an extra pop of chocolate flavor.
Step 1: Prepare the Crust
Start by pre-baking your pie crust if you’re using a traditional pastry shell. Follow the package instructions or bake at 375°F (190°C) for about 12–15 minutes until it’s golden and firm. Let it cool completely before adding the filling.
Step 2: Melt the Chocolate and Butter
In a heatproof bowl set over simmering water (or using a microwave in short bursts), gently melt the semi-sweet chocolate and butter together. Stir often to keep it smooth and glossy, and avoid overheating to prevent the chocolate from seizing.
Step 3: Warm the Cream
In a small saucepan, heat the heavy whipping cream just until it begins to simmer. You don’t want it boiling — just hot enough to meld perfectly with the melted chocolate.
Step 4: Make the Ganache Filling
Slowly pour the hot cream over the melted chocolate mixture. Let it sit undisturbed for a minute or two, then stir gently from the center outward until completely smooth. Add the vanilla extract and stir again.
Step 5: Assemble the Pie
Pour the luscious chocolate ganache into the cooled pie crust. Smooth out the top with a spatula or the back of a spoon.
Step 6: Chill
Refrigerate the pie for at least 4 hours, or until the filling is firm to the touch. For best results, chill it overnight to allow the flavors and texture to fully set.
Step 7: Decorate and Serve
Just before serving, pipe or spoon dollops of whipped cream around the edges and sprinkle with chocolate shavings. Slice, serve, and watch it disappear!
How Long to Cook the Effortless Easy Chocolate Pie
Good news — the “cooking” part of this pie is wonderfully minimal!
If you are using a traditional pastry crust, you’ll bake the empty crust first (about 12–15 minutes at 375°F/190°C), just until it’s golden and set.
As for the luscious chocolate filling? It doesn’t need baking at all! Once you pour the ganache into the crust, the pie simply chills in the refrigerator for at least 4 hours, or preferably overnight, to firm up perfectly.
It’s basically magic — no need to turn the oven on again after the crust is done!
Tips for Perfect Effortless Easy Chocolate Pie
- Use high-quality chocolate: Since chocolate is the main event here, using a good brand will make all the difference in flavor and texture.
- Avoid overheating the chocolate: Whether melting over a double boiler or in the microwave, go slow and stir often to prevent grainy texture.
- Cool the crust completely: Pouring warm filling into a hot crust can make it soggy — patience pays off here!
- Let the ganache rest before stirring: Giving the hot cream a minute to sit on the chocolate before stirring helps ensure a smoother, silkier filling.
- Chill thoroughly: Don’t rush the setting process — cold, firm chocolate is what gives the pie its dreamy texture.
- Add toppings just before serving: This keeps whipped cream looking fresh and prevents it from melting or deflating.
- Slice with a warm knife: Run your knife under hot water and wipe it dry before each cut for clean, beautiful slices.
- Store uncovered for the first hour: If you cover the pie immediately, condensation might drip onto the chocolate surface.
Watch Out for These Mistakes While Cooking
Even though this Effortless Easy Chocolate Pie is simple, a few small missteps can impact the final result:
- Overheating the Chocolate: High heat can cause chocolate to seize and turn grainy. Always melt it gently and patiently.
- Boiling the Cream: If your cream boils instead of simmering, it might break the chocolate ganache and create a greasy texture.
- Not Letting the Crust Cool: Pouring warm filling into a hot crust can lead to sogginess — make sure the crust is fully cooled.
- Skipping the Chill Time: Rushing the setting process results in a runny pie. Give it the full chill time it deserves.
- Using Low-Quality Chocolate: The pie’s flavor heavily depends on the chocolate, so pick something rich and delicious.
- Overmixing the Ganache: Stir the cream and chocolate gently; too much agitation can ruin that silky finish.
- Adding Whipped Cream Too Early: Decorate just before serving so the topping stays fluffy and fresh.
- Not Wiping the Knife Between Slices: A clean, warm knife ensures beautiful, sharp cuts without messy edges.
What to Serve With Effortless Easy Chocolate Pie?
1. Fresh Berries
Bright strawberries, raspberries, or blueberries add a burst of tartness that pairs perfectly with the rich chocolate.
2. Espresso or Coffee
A small shot of espresso or a cozy cup of coffee cuts through the richness beautifully and balances the flavors.
3. Vanilla Ice Cream
A scoop of creamy vanilla ice cream on the side is pure indulgence — cold, creamy, and totally dreamy.
4. Salted Caramel Drizzle
A few swirls of salted caramel over the top bring a luxurious, sweet-salty dimension.
5. Whipped Cream Mountains
Pile extra whipped cream high for an extra-light and airy contrast to the dense chocolate filling.
6. Crushed Pistachios
Sprinkling chopped pistachios over each slice adds an irresistible crunch and a subtle nutty flavor.
7. Mint Leaves
Fresh mint not only looks elegant but also adds a refreshing note that balances the richness.
8. Toasted Coconut Flakes
Lightly toasted coconut flakes can add texture and a tropical flair that’s surprising and delightful.
Storage Instructions
To store your Effortless Easy Chocolate Pie, simply follow these steps:
- Refrigerate: Keep the pie covered in the fridge for up to 5 days. The cool temperature helps maintain the pie’s firm texture and keeps the crust crisp.
- Avoid Freezing: This pie doesn’t freeze well because the chocolate ganache can become grainy when thawed. Stick to refrigeration for the best results.
- Cover Properly: If you have leftovers, make sure to cover the pie tightly with plastic wrap or use an airtight container to keep it fresh.
- Serve Chilled: For the best texture and flavor, always serve the pie chilled. Let it rest in the fridge until you’re ready to slice and serve.
Estimated Nutrition
Here’s an approximate breakdown of the nutrition per slice of the Effortless Easy Chocolate Pie (assuming 8 slices):
- Calories: 350–400 kcal
- Fat: 25–30g
- Saturated Fat: 14–16g
- Carbohydrates: 35–40g
- Fiber: 2g
- Sugars: 20–25g
- Protein: 3–4g
- Cholesterol: 60–75mg
- Sodium: 150–200mg
Note: These values can vary based on the exact ingredients and portion sizes, so be sure to adjust accordingly if you’re making substitutions or using different crusts.
Frequently Asked Questions
1. Can I use a store-bought crust for this pie?
Yes! A store-bought pie crust works perfectly for this recipe. You can also try a graham cracker crust or an Oreo crust for a twist.
2. How can I make this pie dairy-free?
To make the pie dairy-free, use coconut cream or almond milk in place of the heavy cream, and opt for a dairy-free butter substitute. For the crust, make sure to choose a dairy-free version or use a crushed cookie crust.
3. Can I make this pie ahead of time?
Absolutely! This pie is perfect for making ahead. In fact, it’s best when chilled overnight, allowing the flavors to meld and the ganache to set fully.
4. How do I prevent the whipped cream from deflating?
Whip the cream just before serving and make sure it’s nice and cold before you start. For extra stability, you can add a teaspoon of powdered sugar and vanilla while whipping.
5. Can I freeze this chocolate pie?
Freezing isn’t recommended for this pie because the ganache filling may become grainy when thawed. Stick to refrigerating for the best texture.
6. Can I use milk chocolate instead of semi-sweet?
Yes! You can swap semi-sweet chocolate for milk chocolate, but keep in mind that the pie will be sweeter and have a softer texture. If you prefer a less sweet pie, semi-sweet or dark chocolate is your best bet.
7. How do I make sure the ganache is smooth?
Be gentle when melting the chocolate and cream, and stir slowly. If it looks a bit grainy, don’t worry — just keep stirring, and it will come together into a smooth, glossy ganache.
8. How long will the pie last in the fridge?
The pie can be stored in the fridge for up to 5 days. Just make sure it’s covered tightly to keep it fresh and maintain the texture.
Conclusion
The Effortless Easy Chocolate Pie is the ultimate dessert for when you want something that’s both quick and indulgent. With its rich, velvety chocolate filling and easy-to-make crust, this pie offers all the decadence of a gourmet dessert without the fuss. Whether you’re making it for a special occasion or just because, it’s sure to satisfy any chocolate craving with minimal effort. Don’t forget to add a dollop of whipped cream or your favorite topping, and you’re all set for a truly irresistible treat.

Effortless Easy Chocolate Pie
- Prep Time: 15 minutes
- Chill Time: 4 hours minimum (overnight recommended)
- Cook Time: 12 minutes (for the pie crust if using store-bought)
- Total Time: 28 minute
- Yield: 8 slices 1x
Description
Are you ready to dive into a dessert that’s rich, decadent, and completely effortless? This Effortless Easy Chocolate Pie is the perfect quick treat for any chocolate lover. With its silky, smooth chocolate ganache filling, buttery pie crust, and optional whipped cream topping, this pie is an indulgence that feels luxurious, yet it’s so easy to make. Whether you’re hosting a gathering or simply craving something sweet after dinner, this dessert will hit the spot every time. It’s creamy, chocolatey, and oh-so-satisfying. With just a few simple ingredients, you can whip up this dessert in no time — no baking skills required! Perfect for any occasion, and even better when paired with fresh berries or a scoop of vanilla ice cream. Get ready to make this the star of your dessert table!
Ingredients
- 1 pre-made pie crust (or homemade if you prefer)
- 8 oz semi-sweet chocolate (finely chopped or in chips)
- 1 cup heavy whipping cream
- 1/4 cup unsalted butter
- 1 tsp vanilla extract
- Whipped cream (for topping)
- Chocolate shavings or chunks (for garnish)
Instructions
- Preheat your oven and bake the pie crust according to package instructions (if using a store-bought crust), or prepare your homemade crust. Allow it to cool completely before filling.
- Melt the chocolate and butter together in a heatproof bowl over simmering water (double boiler method) or microwave in short bursts, stirring often until smooth.
- Heat the cream in a small saucepan over medium heat until it begins to simmer (not boil). Remove from heat.
- Combine the cream and chocolate mixture. Pour the hot cream over the melted chocolate and butter, allowing it to sit for a minute before stirring gently until smooth and glossy.
- Add vanilla extract and stir again until fully incorporated.
- Pour the ganache filling into the cooled pie crust, smoothing it out evenly with a spatula.
- Chill the pie in the refrigerator for at least 4 hours, or overnight for the best results.
- Top with whipped cream and chocolate shavings just before serving for an elegant finish.