When I first made this bubblegum ice cream, it was meant to be a playful nod to childhood nostalgia—something sweet, colorful, and whimsical. I didn’t expect it to become the most requested treat in my household! With its vibrant pink hue and bursts of candy flavor, it captures the essence of bubblegum in a creamy, melt-in-your-mouth form. It’s not just for kids either—adults light up at the first spoonful, instantly transported back to carefree days.
The best part? You don’t need a fancy ice cream maker to enjoy it. Just a few simple ingredients and a touch of creativity will get you there. Whether you’re preparing for a birthday party, summer gathering, or just craving something unique, this bubblegum ice cream brings fun and flavor in every bite.
Why You’ll Love This Creamy Homemade Bubblegum Ice Cream
- Nostalgic and fun: Brings out the child in everyone with its playful color and taste.
- No-churn friendly: No ice cream machine required!
- Customizable: Add candy sprinkles, bubblegum bits, or swirl in extra flavors.
- Smooth and creamy: Perfect texture with a sweet, velvety finish.
- Great for parties: A guaranteed crowd-pleaser that doubles as a conversation starter.
What Kind of Bubblegum Flavoring Should I Use?
This recipe’s star ingredient is bubblegum flavoring, and not all are created equal. You want one that captures the sweet, slightly fruity essence of classic pink bubblegum—think of those bright pink gumballs from your childhood. I recommend using a concentrated bubblegum extract or candy flavoring, which you can find online or in specialty baking stores. A little goes a long way, so start small and adjust to your preference.
If you can’t find extract, melting down a few pieces of pink bubblegum in warm milk can work in a pinch, but the flavor won’t be as bold or clean. Be mindful of texture if you go this route.
Options for Substitutions
You can make this ice cream your own with a few clever swaps:
- Milk Alternatives: Swap whole milk with coconut milk or almond milk for a dairy-free version, though the texture might be slightly less creamy.
- Heavy Cream: For a lighter option, use half-and-half, but keep in mind it won’t whip as stiffly.
- Sweetener: Regular granulated sugar works best, but honey or maple syrup can be used for a different depth of flavor.
- Food Coloring: Pink gel food coloring gives that signature look, but you can skip it if you’re going natural.
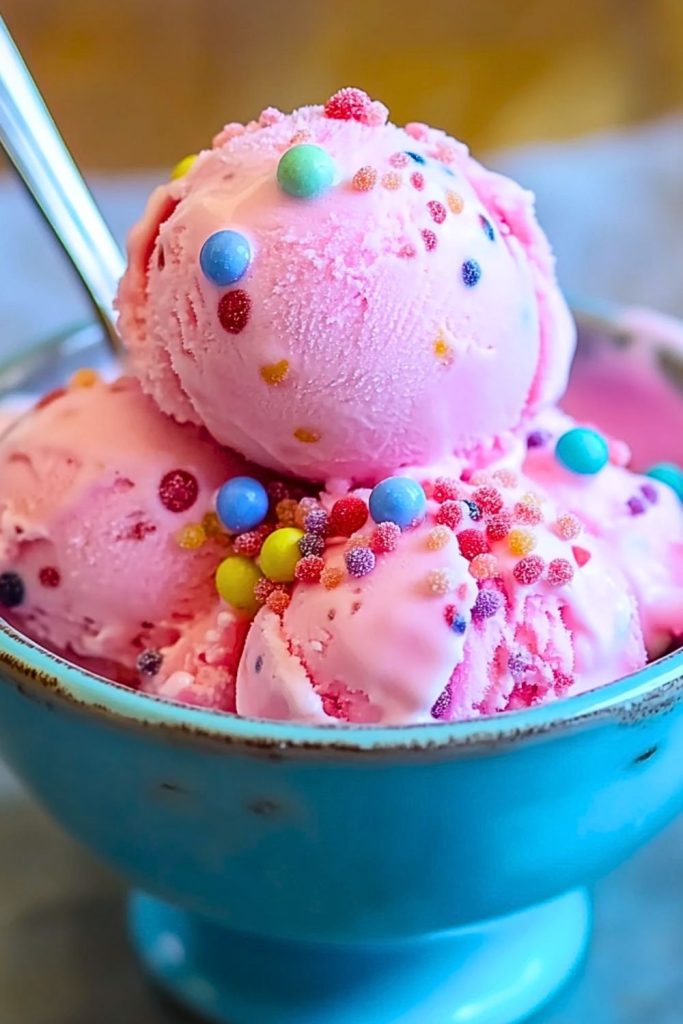
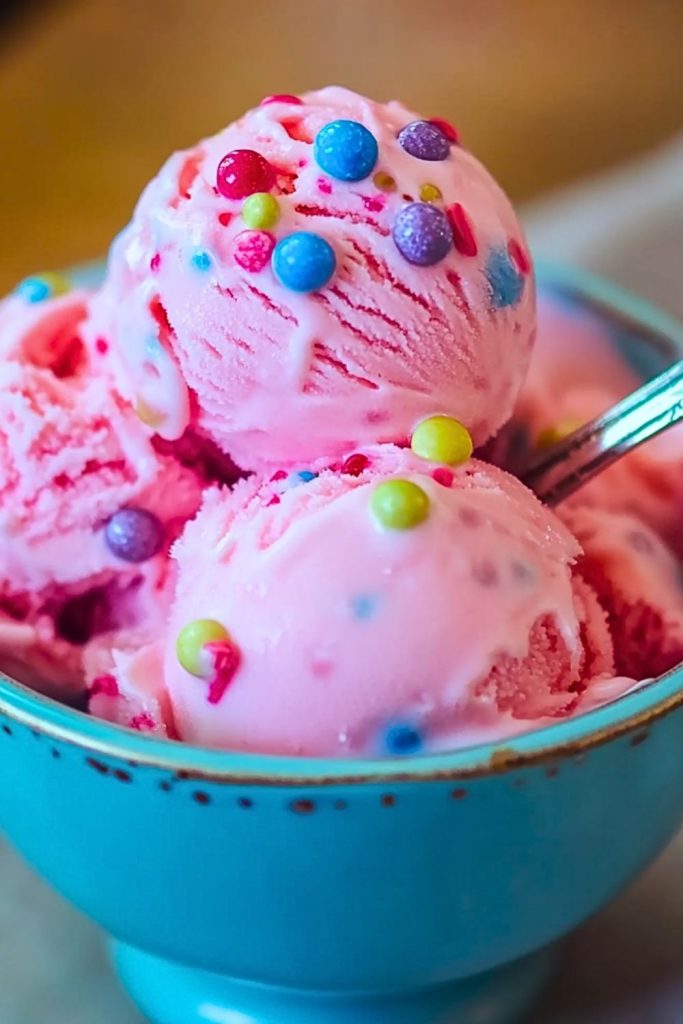
- Toppings: Don’t have candy-coated chocolate balls? Use crushed bubblegum, rainbow sprinkles, or mini marshmallows for a fun finish.
Ingredients for Creamy Homemade Bubblegum Ice Cream
Each ingredient in this recipe plays an essential role in delivering that dreamy texture and nostalgic flavor. Here’s a closer look at what you’ll need and why:
- Heavy Whipping Cream
This is the backbone of the ice cream, giving it that rich, velvety texture. When whipped, it traps air and creates a light, fluffy base. - Sweetened Condensed Milk
Acts as both a sweetener and a softener. It brings sweetness and helps prevent the ice cream from becoming icy. - Bubblegum Flavoring (Extract)
Just a small amount gives the entire batch that classic bubblegum taste. Look for concentrated extracts to keep the flavor clean and strong. - Pink Food Coloring (Gel or Liquid)
Optional, but it really sells the bubblegum vibe. A tiny drop gives the ice cream that cheerful, candy-like hue. - Sprinkles or Bubblegum Bits (Optional Mix-ins)
These add a pop of color, fun textures, and make every scoop feel festive and exciting—especially for kids. - Vanilla Extract (Optional)
Enhances and balances the sweetness of the bubblegum flavor, rounding out the taste beautifully.
Step 1: Whip the Cream
Start by pouring the heavy whipping cream into a large, cold mixing bowl. Using a hand mixer or stand mixer, whip it on medium-high speed until stiff peaks form. This step builds the fluffy foundation for your ice cream—don’t under-whip, but stop before it turns into butter.
Step 2: Combine the Base
In a separate bowl, stir together the sweetened condensed milk, bubblegum flavoring, vanilla extract (if using), and pink food coloring. Mix until everything is well combined and smooth. Taste and adjust the flavoring or color as needed—it’s your moment to fine-tune the fun!
Step 3: Fold the Cream Into the Mixture
Gently fold the whipped cream into the bubblegum base using a rubber spatula. Be careful not to deflate the cream; you want to keep the mixture light and airy. Mix just until you don’t see any more streaks.
Step 4: Add the Mix-Ins
If you’re using candy sprinkles, bubblegum bits, or any other fun toppings, now’s the time to fold them in. You can also layer them in while transferring the mix to your container for swirls of texture throughout.
Step 5: Transfer and Freeze
Pour the mixture into a freezer-safe loaf pan or airtight container. Smooth the top with a spatula and add a few extra sprinkles on top if you like. Cover with plastic wrap or a lid and freeze for at least 6 hours, or overnight for best results.
How Long to Freeze Creamy Homemade Bubblegum Ice Cream
Unlike churned ice cream, this no-churn version doesn’t require cooking—but it does need time to set properly. After assembling the ice cream, it should be frozen for at least 6 hours, though overnight (8–12 hours) will give the best texture and firmness. It’s important not to rush this stage or the ice cream will be too soft to scoop cleanly.
For quicker chilling, place your container at the back of the freezer where temperatures are most stable and coldest.
Tips for Perfect Creamy Homemade Bubblegum Ice Cream
- Chill Your Mixing Bowl: Pop the mixing bowl in the fridge or freezer for 15 minutes before whipping cream to help it whip faster and fluffier.
- Don’t Overmix: When folding the whipped cream into the base, gentle strokes preserve the air and create a lighter ice cream.
- Taste Before Freezing: Bubblegum flavor strength can vary. Taste your mixture and adjust before it sets—it’s your last chance!
- Use a Shallow Container: A wide, shallow container freezes more evenly and quickly than deep ones.
- Let It Soften Before Scooping: When ready to serve, let the ice cream sit at room temperature for 5 minutes. This softens it just enough for smooth scooping.
- Avoid Too Many Mix-ins: While fun, too many toppings can weigh the ice cream down or interfere with its creamy texture. A light sprinkle goes a long way.
Watch Out for These Mistakes While Cooking
Even though this is a no-churn, beginner-friendly recipe, there are still a few pitfalls to avoid if you want that perfect scoop:
- Using Warm Ingredients: If your cream or condensed milk isn’t cold, the mixture won’t whip or set properly. Always start with chilled ingredients.
- Overwhipping the Cream: Whipping past stiff peaks will turn your cream grainy or buttery. Keep a close eye!
- Too Much Flavoring: Bubblegum extract is strong. Overdoing it can make the flavor artificial or overwhelming. Start small—you can always add more.
- Adding Mix-ins Too Early: If you add sprinkles or candies before folding the whipped cream, they may sink or bleed color. Mix them in at the very end.
- Not Freezing Long Enough: Patience is everything. If the ice cream is under-frozen, it’ll be more like a milkshake than a scoopable dessert.
- Skipping the Fold: Don’t just stir the whipped cream in—fold it gently. This step preserves the air and creates that dreamy texture.
What to Serve With Creamy Homemade Bubblegum Ice Cream?
Pairing this vibrant treat with other goodies can turn it into a full dessert experience. Here are some of my favorite serving ideas:
Chocolate Chip Cookies
Classic cookies add a chewy, slightly salty balance to the sweet bubblegum ice cream—perfect for ice cream sandwiches!
Fresh Berries
Strawberries or raspberries bring a tart freshness that complements the rich, creamy sweetness of the ice cream.
Funfetti Cake
Celebrate big! A scoop of bubblegum ice cream atop a slice of funfetti cake makes for a birthday-worthy combo.
Vanilla Cupcakes
Top a frosted cupcake with a mini scoop of bubblegum ice cream for a party treat both kids and adults will love.
Cotton Candy
Double the fun and fluff—serve the ice cream with tufts of pastel cotton candy for a carnival-style presentation.
Chocolate Sauce
A drizzle of warm chocolate sauce over the pink ice cream creates a rich contrast and elevates the entire experience.
Ice Cream Cones
Sometimes simple is best. Serve it in colorful cones for a classic, portable treat.
Storage Instructions
Proper storage is key to keeping your Creamy Homemade Bubblegum Ice Cream tasting fresh and smooth long after the first scoop. Here’s how to do it right:
- Use an Airtight Container: A tightly sealed container keeps out ice crystals and freezer odors. A loaf pan wrapped in plastic wrap or a silicone lid works too.
- Press Plastic Wrap to the Surface: Before sealing, lay a piece of plastic wrap directly on the surface of the ice cream. This prevents ice from forming on top.
- Label and Date: Bubblegum flavor holds well, but for best taste and texture, enjoy within 2–3 weeks.
- Keep It in the Coldest Part of the Freezer: That’s usually the back—keeping it there helps maintain consistent temperature and avoids softening.
- Let It Sit Before Serving: Take the container out and let it soften at room temperature for about 5 minutes before scooping.
Estimated Nutrition
Please note that exact nutrition values will vary based on your mix-ins and portion size, but here’s a general estimate for a standard ½-cup serving:
- Calories: ~260
- Total Fat: 18g
- Saturated Fat: 11g
- Cholesterol: 65mg
- Sodium: 55mg
- Total Carbohydrates: 22g
- Sugars: 21g
- Protein: 3g
Adding toppings like sprinkles, candy pieces, or cookie crumbles will raise the calorie and sugar counts, so adjust according to your preferences.
Frequently Asked Questions
What does bubblegum ice cream taste like?
It tastes exactly how it sounds—sweet, nostalgic, and fruity, similar to classic pink bubblegum. It’s a playful blend of cotton candy and subtle banana-strawberry notes with a creamy base.
Do I need an ice cream maker to make this recipe?
Nope! This is a no-churn recipe, meaning you don’t need any special equipment. Just a mixer, a few bowls, and your freezer.
Can I use real bubblegum instead of extract?
You can, but it’s not ideal. Real gum doesn’t fully dissolve and can create a waxy texture. Bubblegum extract gives a stronger, cleaner flavor with a better finish.
How long does homemade bubblegum ice cream last in the freezer?
It’s best eaten within 2–3 weeks. After that, it can start to form ice crystals and lose its creamy texture.
Can I make this recipe dairy-free?
Yes, you can substitute the heavy cream with full-fat coconut cream and use a dairy-free condensed milk. The flavor and texture will change slightly but it will still be delicious.
Is the food coloring necessary?
Not at all! The pink coloring is purely for fun and visual appeal. You can leave it out for a natural version.
Can kids help make this recipe?
Absolutely! It’s a fun recipe for kids to join in—especially when it’s time to fold in sprinkles or pick fun toppings.
Why is my ice cream too hard to scoop?
If it’s rock solid, let it sit at room temperature for 5–10 minutes before scooping. Avoid storing it in the freezer door where temperatures fluctuate.
Conclusion
Making Creamy Homemade Bubblegum Ice Cream is more than just a recipe—it’s a celebration of color, sweetness, and childhood joy. Whether you’re serving it at a party or indulging in a whimsical treat just for yourself, this ice cream delivers a playful punch of flavor in every spoonful. With no fancy equipment required and easy customizations, it’s a delightful dessert that brings out the kid in everyone.
Ready to scoop, swirl, and smile?

Creamy Homemade Bubblegum Ice Cream
- Prep Time: 15 minutes
- Freeze Time: 6 hours
- Total Time: 6 hours 15 minutes
- Yield: About 1.5 quarts (8 servings) 1x
Description
This creamy homemade bubblegum ice cream brings the nostalgic flavor of classic pink bubblegum into a rich, smooth, and colorful frozen treat. No ice cream machine needed! Perfect for parties, summer days, or just a playful dessert adventure.
Ingredients
- 2 cups heavy whipping cream (chilled)
- 1 can (14 oz) sweetened condensed milk
- 1 to 2 teaspoons bubblegum extract (to taste)
- 1/2 teaspoon vanilla extract (optional)
- A few drops of pink food coloring (optional)
- 1/4 cup candy sprinkles or bubblegum bits (optional)
Instructions
- In a cold mixing bowl, whip the heavy cream until stiff peaks form.
- In a separate bowl, mix the sweetened condensed milk, bubblegum extract, vanilla extract (if using), and pink food coloring.
- Gently fold the whipped cream into the flavored mixture using a spatula. Do not overmix.
- Fold in candy sprinkles or bubblegum bits if using.
- Transfer the mixture into a loaf pan or airtight container.
- Smooth the top, cover with plastic wrap or lid, and freeze for at least 6 hours or overnight.
- Let it sit at room temperature for 5 minutes before scooping. Enjoy!