
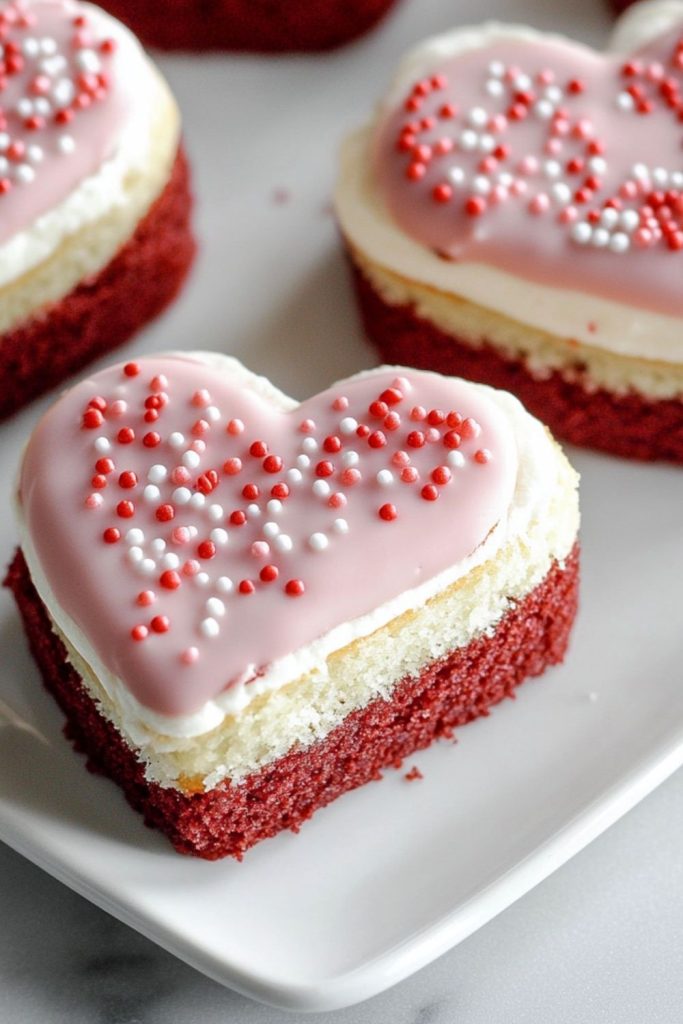
Light, airy, and perfectly sweet, these Copycat Little Debbie Valentine Cakes are a homemade tribute to the iconic treat. Each adorable heart-shaped layer cake features three moist and colorful layers — a buttery vanilla base, a rich red velvet middle, and a fluffy white cake topping. All of this goodness is sealed with a silky pink icing and a delicate swirl of white frosting, sprinkled with red sugar hearts to finish.

They’re not only charming in appearance, but also indulgent and surprisingly simple to make from scratch. These cakes are the ultimate Valentine’s Day bake or a sweet surprise for someone you love. Whether you’re recreating a nostalgic childhood favorite or showing off your baking skills, these cakes will win hearts at first bite.
Why You’ll Love This Copycat Little Debbie Valentine Cakes Recipe
- Nostalgia Made Fresh: Enjoy the childhood favorite with the quality of homemade ingredients and without the preservatives.
- Customizable & Festive: Change up the icing colors and sprinkles for different holidays or themes.
- Deliciously Layered: Each bite has a perfect balance of buttery vanilla, velvety cocoa richness, and soft sponge texture.
- Eye-Catching Presentation: These heart-shaped beauties are as stunning on the plate as they are tasty.
Preparation Phase & Tools to Use (Essential Tools and Their Importance)
Before diving into the layering magic of these Valentine cakes, make sure your kitchen is equipped with the right tools. Here’s what you’ll need and why each item matters:
- Electric Mixer (Stand or Hand): This ensures your batters are smooth, well-aerated, and perfectly combined — especially important for the fluffy white cake layer.
- Three Mixing Bowls: You’ll be preparing multiple cake layers separately, so having extra bowls avoids flavor cross-over and streamlines the process.
- Heart-Shaped Cookie Cutter: A key element for shaping the cakes into that signature Valentine heart — choose one with sharp edges for clean cuts.
- Sheet Pans (or Jelly Roll Pans): These allow for even, thin layers that are easy to cut and layer later. Line them with parchment paper for easy release.
- Offset Spatula: Great for spreading batters evenly and icing the top with precision.
- Cooling Racks: Allow cakes to cool evenly, preventing soggy bottoms or overbaking.
- Piping Bag with Fine Tip: For piping the white heart design cleanly and neatly over the pink icing.
- Serrated Knife (optional): Helpful for trimming cake layers for evenness before stacking.
Having these tools on hand will help you move through each step smoothly and yield bakery-level results.
Preparation Tips
- Room Temperature Ingredients: Make sure butter, eggs, and milk are at room temp. This ensures a consistent batter texture and helps cakes rise evenly.
- Chill the Layers: After baking, let the layers cool fully and consider refrigerating them for 20–30 minutes. It makes cutting and layering much easier without crumbling.
- Use Gel Food Coloring: For vibrant pink and red hues, gel food coloring provides a rich tone without thinning the batter.
- Sift Dry Ingredients: Especially for the white cake layer, sifting helps maintain a delicate crumb.
- Apply Icing When Cool: Never ice a warm cake — it will melt the icing. Patience pays off here.
- Don’t Overmix: Once you add flour, mix just until combined to avoid tough cake.
- Wipe Cookie Cutter Between Cuts: To keep edges clean and defined.
Proper prep is half the victory in making these look-alike Valentine cakes. Set yourself up for success with these tips!
Ingredients for This Copycat Little Debbie Valentine Cakes Recipe
This recipe consists of three layers and a beautiful icing finish. Each component contributes to the visual and flavor harmony of these nostalgic treats.
For the Vanilla Bottom Layer
- ½ cup unsalted butter (softened)
- ¾ cup granulated sugar
- 2 large eggs
- 1 tsp vanilla extract
- 1½ cups all-purpose flour
- 1 tsp baking powder
- ¼ tsp salt
- ½ cup whole milk
For the Red Velvet Middle Layer
- ½ cup unsalted butter (softened)
- ¾ cup granulated sugar
- 2 large eggs
- 1 tbsp cocoa powder
- 1½ cups all-purpose flour
- 1 tsp vanilla extract
- ½ cup buttermilk
- ½ tsp baking soda
- ½ tsp white vinegar
- Red gel food coloring (as needed for desired vibrance)
For the White Cake Top Layer
- 3 egg whites
- ½ cup granulated sugar
- 1 tsp vanilla extract
- ½ cup milk
- 1¼ cups cake flour (or sifted all-purpose flour)
- 1 tsp baking powder
- ¼ tsp salt
For the Pink Icing and Decorations
- 1½ cups powdered sugar
- 2–3 tbsp milk (adjust for consistency)
- Pink gel food coloring
- White royal icing or white melted candy melts (for heart design)
- Red sprinkles or heart-shaped sugar confetti
Each layer brings its own texture and flavor, working together to replicate — and elevate — the classic Valentine snack cakes.
Step-by-Step Instructions for Copycat Little Debbie Valentine Cakes
Step 1: Bake the Vanilla Bottom Layer
- Preheat your oven to 350°F (175°C). Line a sheet pan with parchment paper.
- In a mixing bowl, cream together the butter and sugar until light and fluffy.
- Add eggs one at a time, beating well after each addition. Stir in vanilla extract.
- In a separate bowl, whisk together flour, baking powder, and salt.
- Alternately add the flour mixture and milk to the butter mixture, starting and ending with flour.
- Spread batter evenly into the prepared pan and bake for 12–15 minutes or until a toothpick comes out clean.
- Let the layer cool completely on a wire rack.
Step 2: Prepare the Red Velvet Middle Layer
- Preheat oven again to 350°F (if not already on). Line a second sheet pan with parchment paper.
- Cream butter and sugar until fluffy. Beat in the eggs one at a time.
- Mix in cocoa powder, vanilla, and enough red gel coloring to achieve a vibrant color.
- In a separate bowl, whisk flour. In another, combine buttermilk, baking soda, and vinegar.
- Gradually mix dry and wet ingredients into the butter mixture until just combined.
- Spread the batter evenly in the pan and bake 12–15 minutes. Cool completely.
Step 3: Bake the White Cake Top Layer
- Beat egg whites until soft peaks form. Set aside.
- In a new bowl, cream sugar and vanilla with milk. Sift in flour, baking powder, and salt.
- Gently fold in egg whites to keep the batter light and airy.
- Spread into a lined sheet pan and bake for 12–14 minutes. Cool fully before handling.
Step 4: Assemble the Cake Layers
- Once all three layers are cooled, trim edges if needed for uniformity.
- Carefully stack: vanilla layer on bottom, red velvet in the middle, white cake on top.
- Gently press layers together and refrigerate for 30 minutes to firm up.
Step 5: Cut and Decorate
- Use a heart-shaped cookie cutter to cut out cakes from the stacked layers.
- Mix powdered sugar, milk, and pink food coloring to form the icing. It should be thick but pourable.
- Spoon or pipe the icing over the top of each heart cake. Let set for 10–15 minutes.
- Use a piping bag to draw white hearts on top. Finish with red sprinkles while the icing is still tacky.
- Allow icing to set fully before serving.
Each step builds toward the signature layered sweetness and charming presentation of these little heart-shaped cakes.
Notes
- Chill for Cleaner Cuts: After stacking the cake layers, a short chill in the fridge helps them firm up. This makes cutting with a cookie cutter much easier and prevents smudged edges.
- Make Ahead: You can bake the layers a day ahead and refrigerate them wrapped in plastic. Assemble and ice the next day for fresher presentation.
- Flavor Boosts: Add a dash of almond extract to the vanilla layer for a unique twist, or a touch of espresso powder to the red velvet for deeper cocoa notes.
- For Perfect Hearts: Use a metal cookie cutter and press straight down firmly—avoid twisting, which can distort the shape.
Watch Out for These Mistakes While Cooking
- Overbaking the Layers: Thin sheet cakes can go from perfect to dry quickly. Keep a close eye on them, and test a few minutes early with a toothpick.
- Using Too Much Food Coloring: Gel colors are potent. Add small amounts gradually; too much can affect taste and texture.
- Stacking Uneven Layers: Uneven thickness makes assembly harder. Use an offset spatula to spread batter evenly and trim after baking if needed.
- Applying Icing on Warm Cakes: Always wait until layers are fully cool. Warm cakes will melt your icing and ruin the look.
- Cutting Without Chilling: Trying to cut heart shapes from a soft cake stack will smudge the layers. Chill for at least 30 minutes first.
- Skipping Parchment Paper: This can lead to torn or stuck layers. Line pans for smooth release.
- Overmixing Batters: This toughens your cakes. Mix until just combined once flour is added.
- Too Much Liquid in Icing: Start with less milk and add more by the teaspoon. Runny icing won’t hold its shape or design.
What to Serve With Copycat Little Debbie Valentine Cakes?
While these heart-shaped cakes are delightful on their own, pairing them with the right drinks or sides can enhance the experience — whether you’re planning a festive spread or a cozy dessert moment.
8 Recommendations
- Strawberry Milkshakes
A creamy, pink strawberry milkshake echoes the romantic theme and offers a cool contrast to the cakes’ sweetness. - Fresh Berries with Whipped Cream
Serve a bowl of raspberries, strawberries, or cherries alongside. Their tartness balances the sugary layers. - Champagne or Sparkling Rosé
If you’re celebrating, a bubbly drink is a beautiful and adult-friendly pairing that cuts through the richness. - Vanilla Bean Ice Cream
Classic, cool, and velvety — this complements the cakes without overpowering them. - Espresso or Cappuccino
Coffee adds a bold, bitter note that pairs wonderfully with the sweet frosting and cocoa in the red velvet layer. - White Chocolate-Covered Pretzels
Add a salty-sweet crunch to the table with these bite-size companions. - Raspberry Coulis Drizzle
A tangy fruit sauce can be plated underneath or drizzled over the cake for gourmet presentation. - Mint Tea or Rose Tea
Light and floral teas cleanse the palate and pair nicely with the cake’s delicate vanilla and chocolate tones.
These pairings help elevate your copycat Valentine cakes into a complete dessert experience — perfect for a tea party, romantic dinner, or themed gathering.
Storage Instructions
To keep your Copycat Little Debbie Valentine Cakes fresh and beautiful, follow these storage tips:
- Refrigeration: Store the cakes in an airtight container in the refrigerator for up to 5 days. Because of the icing and layered structure, keeping them chilled helps preserve texture and prevents the frosting from melting or smudging.
- Separation Layers: If stacking them in a container, place parchment paper between layers to avoid sticking or damaging the decorations.
- Freezing: You can freeze the fully assembled (but un-iced) cakes. Wrap each heart individually in plastic wrap and then place in a freezer-safe container. Freeze for up to 2 months. Thaw in the fridge overnight before icing and serving.
- Avoid Moisture: Keep away from high-humidity environments, which can make the icing runny and affect cake texture.
Estimated Nutrition (Per Cake, Approximate)
| Nutrient | Amount |
|---|---|
| Calories | 280–320 kcal |
| Carbohydrates | 38–42g |
| Sugars | 27–32g |
| Fat | 12–15g |
| Saturated Fat | 7–9g |
| Protein | 3–5g |
| Fiber | <1g |
| Sodium | 90–120mg |
Note: Nutrition values vary depending on exact ingredients used (especially food coloring, icing thickness, and sprinkles). For precise tracking, input your ingredient brands into a nutrition calculator.
Frequently Asked Questions
1. Can I make these cakes gluten-free?
Yes, you can substitute the all-purpose flour and cake flour with a gluten-free 1:1 baking blend. Make sure it includes xanthan gum for structure, or add ½ teaspoon per cup if not already included.
2. What can I use if I don’t have a heart-shaped cutter?
No cutter? No problem. Use a printed heart template and cut around it with a sharp paring knife. Alternatively, try round or square shapes for a different but still lovely presentation.
3. How far in advance can I make these?
You can bake the cake layers 1–2 days ahead and refrigerate. Assemble and decorate them the day of or the night before serving for the freshest texture and presentation.
4. Can I use store-bought icing?
Absolutely. While homemade icing offers better control of color and flavor, a thick canned frosting can work well — especially for the pink glaze. Warm it slightly for easier pouring.
5. Do I need to use food coloring?
Technically no, but it won’t resemble the signature Little Debbie look without it. You can use natural food-based colorings like beet powder or strawberry juice if avoiding artificial dyes.
6. Can I make these in cupcake form instead?
Yes! You can layer batters in a lined cupcake tin for a triple-layer effect, then frost each individually. Keep an eye on baking times — likely around 15–18 minutes.
7. What makes the layers stick together?
The moisture in the cakes and a gentle press after stacking usually hold the layers well. You can also brush a thin layer of simple syrup or frosting between layers if needed.
8. How do I make the white heart design look neat?
Use a piping bag fitted with a small round tip or a ziplock bag with a tiny snipped corner. Practice a few on parchment before piping onto the real cakes for confidence and control.
Conclusion
Recreating these Copycat Little Debbie Valentine Cakes is more than a baking project — it’s a charming, heart-filled experience. With their tender tri-color layers and signature pink glaze, these cakes offer all the sweetness of the original with the pride of homemade quality. Whether you’re celebrating Valentine’s Day, surprising a loved one, or indulging in a nostalgic treat, these cakes deliver love in every bite.
Now, ready to bake and impress?

Copycat Little Debbie Valentine Cakes
- Prep Time: 45 minutes
- Cook Time: 40 minutes
- Total Time: 1 hour 25 minutes
- Yield: 12–15 heart cakes 1x
Description
Fluffy, vibrant, and heart-shaped, these Copycat Little Debbie Valentine Cakes feature three delicious cake layers: vanilla, red velvet, and white. Topped with a pink glaze and white heart icing, they’re a homemade take on a nostalgic classic.
Ingredients
Vanilla Bottom Layer:
- 1/2 cup unsalted butter (softened)
- 3/4 cup granulated sugar
- 2 large eggs
- 1 tsp vanilla extract
- 1 1/2 cups all-purpose flour
- 1 tsp baking powder
- 1/4 tsp salt
- 1/2 cup whole milk
Red Velvet Middle Layer:
- 1/2 cup unsalted butter (softened)
- 3/4 cup granulated sugar
- 2 large eggs
- 1 tbsp cocoa powder
- 1 1/2 cups all-purpose flour
- 1 tsp vanilla extract
- 1/2 cup buttermilk
- 1/2 tsp baking soda
- 1/2 tsp white vinegar
- Red gel food coloring
White Cake Top Layer:
- 3 egg whites
- 1/2 cup granulated sugar
- 1 tsp vanilla extract
- 1/2 cup milk
- 1 1/4 cups cake flour
- 1 tsp baking powder
- 1/4 tsp salt
Icing and Decorations:
- 1 1/2 cups powdered sugar
- 2–3 tbsp milk
- Pink gel food coloring
- White royal icing or melted white candy coating
- Red sprinkles or sugar hearts
Instructions
- Vanilla Layer: Preheat oven to 350°F. Cream butter and sugar. Add eggs and vanilla. Mix in dry ingredients alternately with milk. Spread in parchment-lined pan and bake 12–15 minutes. Cool.
- Red Velvet Layer: Cream butter and sugar. Add eggs, cocoa, vanilla, and food coloring. Combine with buttermilk, vinegar, and dry ingredients. Spread in a second lined pan and bake 12–15 minutes. Cool.
- White Cake Layer: Beat egg whites to soft peaks. Mix sugar, vanilla, and milk. Fold in sifted dry ingredients and egg whites. Spread in a third pan and bake 12–14 minutes. Cool completely.
- Stack & Chill: Stack layers in vanilla-red velvet-white order. Press gently. Chill for 30 minutes.
- Cut & Decorate: Cut heart shapes. Mix pink icing and glaze tops. Pipe white heart designs. Add red sprinkles. Let set.