There’s something nostalgic and undeniably comforting about biting into a soft, gooey honey bun fresh from the oven. These Classic Homemade Honey Buns deliver the same tender swirls and sticky-sweet glaze as the store-bought version, but with a richer flavor and the satisfaction of baking them yourself. With their golden-brown crust and creamy icing, they’re a decadent treat perfect for breakfast, brunch, or an indulgent snack.
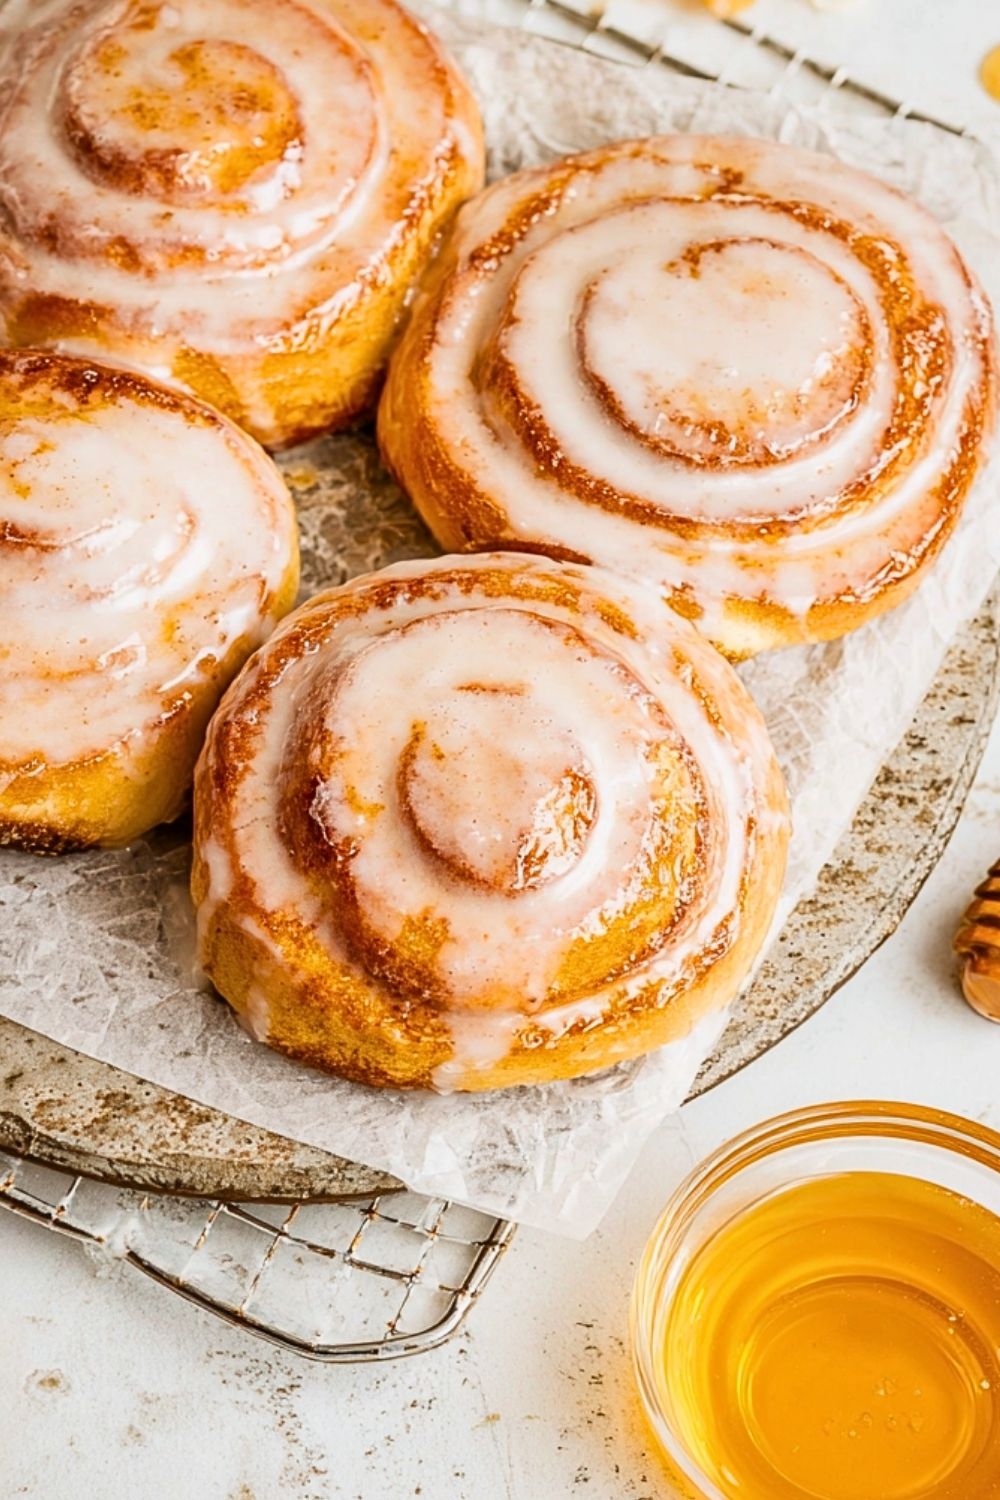
Unlike overly processed versions, these honey buns are made from scratch using simple pantry staples—flour, yeast, milk, butter, and, of course, honey. The result is a dough that’s soft yet rich, with just the right amount of chew. The swirl of cinnamon inside adds warmth and spice, while the glaze locks in moisture and gives them that signature shine.
Why You’ll Love This Honey Buns Recipe
- Soft and fluffy interior with a golden-brown crust
- Sweet, sticky honey glaze that melts in your mouth
- Nostalgic flavor made even better with real ingredients
- Perfect for breakfast, snack time, or dessert
- Freezer-friendly and easy to reheat
Preparation Phase & Tools to Use
To make these Classic Homemade Honey Buns, you’ll need a few essential kitchen tools. A stand mixer with a dough hook makes kneading much easier and ensures a soft, elastic dough. A rolling pin is crucial for evenly spreading the dough before shaping. You’ll also need a sharp knife or dough cutter to slice your rolls cleanly. A baking sheet or large cast-iron skillet lined with parchment paper helps in achieving an even bake and easier cleanup. Lastly, a pastry brush will come in handy for applying the glaze smoothly.
Each tool plays a crucial role: kneading develops the gluten for a chewy texture, slicing neatly ensures even baking, and brushing glaze gives that perfect glossy finish.
Preparation Tips
When working with yeast dough, patience is key—allow the dough to rise until it’s doubled in size for the fluffiest texture. Make sure your milk is warm, not hot, when activating the yeast to avoid killing it. Lightly flour your surface to prevent sticking, but don’t overdo it or the dough can become tough. For the best swirl, roll the dough tightly but gently to avoid squeezing out the cinnamon sugar filling. Finally, glaze the buns while they’re still warm so it seeps in slightly, giving that iconic sticky finish.
Ingredients for this Classic Homemade Honey Buns Recipe
For the Dough:
- 3 1/2 cups all-purpose flour (plus extra for dusting)
- 1 packet (2 1/4 tsp) active dry yeast
- 1/2 cup warm whole milk (110°F)
- 1/4 cup granulated sugar
- 1/4 cup unsalted butter, melted
- 1/2 tsp salt
- 2 large eggs
For the Filling:
- 1/3 cup brown sugar, packed
- 1 tbsp ground cinnamon
- 2 tbsp unsalted butter, softened
For the Honey Glaze:
- 1/3 cup honey
- 1 cup powdered sugar
- 1 tbsp milk (more if needed for consistency)
- 1/4 tsp vanilla extract
Step 1: Activate the Yeast
In a small bowl, combine the warm milk, a pinch of sugar, and yeast. Stir lightly and let sit for 5-10 minutes until it becomes frothy. This step ensures your yeast is alive and will help the dough rise properly.
Step 2: Make the Dough
In a large mixing bowl or stand mixer, combine the flour, sugar, and salt. Add the melted butter, eggs, and the activated yeast mixture. Mix until the dough comes together. Knead for about 8–10 minutes, or until the dough is smooth and elastic. If it’s too sticky, add a bit more flour, one tablespoon at a time.
Step 3: First Rise
Place the dough in a greased bowl and cover with a clean towel or plastic wrap. Let it rise in a warm, draft-free area for 1 to 1.5 hours or until doubled in size.
Step 4: Prepare the Filling
While the dough rises, mix the brown sugar and cinnamon in a small bowl. Keep the softened butter ready to spread.
Step 5: Roll Out the Dough
Once the dough has doubled in size, punch it down gently and roll it out on a floured surface into a large rectangle about 1/4 inch thick.
Step 6: Add the Filling
Spread the softened butter evenly over the dough. Then sprinkle the cinnamon-sugar mixture on top, making sure to cover all areas.
Step 7: Shape the Buns
Starting from the longer side, roll the dough tightly into a log. Slice into 8-10 even pieces using a sharp knife or dough cutter. Slightly flatten each roll with your hand to form that classic honey bun shape.
Step 8: Second Rise
Place the shaped buns on a parchment-lined baking sheet or in a greased baking dish, leaving a little space between each one. Cover and let them rise for another 30-45 minutes.
Step 9: Bake the Buns
Preheat your oven to 350°F (175°C). Bake the buns for 18–22 minutes, or until golden brown and cooked through.
Step 10: Glaze While Warm
While the buns are baking, mix all the glaze ingredients until smooth. As soon as the buns come out of the oven, brush or drizzle them generously with the honey glaze. Allow them to cool slightly before serving.
Notes
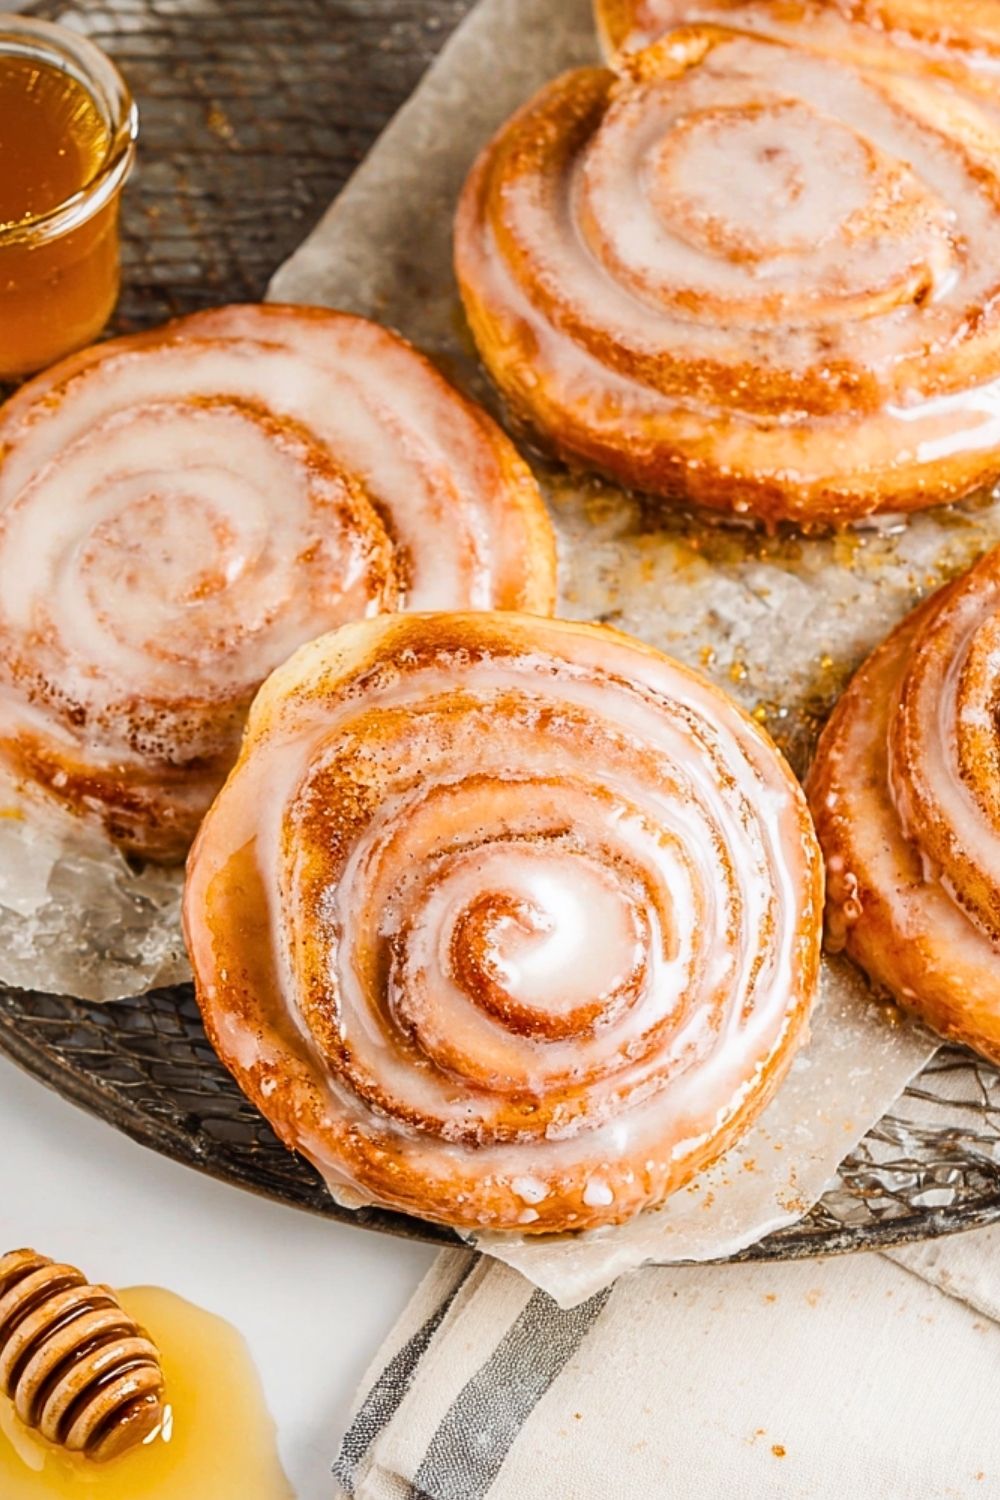
Classic Homemade Honey Buns are best enjoyed warm, when the glaze is still slightly gooey and the buns are soft and fluffy. If you’re making them ahead of time, you can slightly underbake them by a minute or two and finish them off in the oven before serving. This keeps them moist and fresh. The glaze can be customized with a touch of citrus zest or a dash of maple syrup if you want to add your own twist.
For a more decadent touch, some like to add a drizzle of cream cheese icing in addition to the honey glaze, especially when serving them for brunch or dessert.
Watch Out for These Mistakes While Cooking
- Overheating the milk: Too hot, and it can kill the yeast. Use a thermometer to make sure it stays around 110°F.
- Not letting the dough rise fully: Rushing this step will result in dense buns. Make sure the dough doubles in size.
- Over-flouring the dough: Adding too much flour makes the buns dry and tough. Only dust lightly while rolling.
- Not sealing the roll tight enough: Loose rolls can unwind during baking. Roll tightly and press the edges gently to seal.
- Skipping the second rise: This step is essential for that pillowy texture and signature honey bun puff.
Storage Instructions
Store any leftover honey buns in an airtight container at room temperature for up to 2 days. To keep them fresher longer, refrigerate them for up to 5 days, but warm them up slightly before eating to bring back their softness. You can also freeze unglazed buns for up to 2 months—just thaw overnight and glaze before serving.
Estimated Nutrition
Per serving (based on 1 of 10 buns):
- Calories: 310
- Fat: 10g
- Saturated Fat: 5g
- Unsaturated Fat: 4g
- Trans Fat: 0g
- Cholesterol: 55mg
- Sodium: 180mg
- Carbohydrates: 49g
- Fiber: 1g
- Sugar: 22g
- Protein: 6g
Frequently Asked Questions
What type of yeast should I use?
Active dry yeast works best, but instant yeast can also be used. Just adjust the rise time slightly.
Can I make the dough the night before?
Yes! Let the dough rise once, then refrigerate it overnight. Shape and do the second rise the next day.
Can I skip the cinnamon filling?
You can, but the cinnamon adds great flavor. You can substitute it with nutmeg or leave it out altogether.
How do I know when the buns are done baking?
They should be golden on top and sound hollow when tapped on the bottom. An internal temperature of 190°F is perfect.
What can I use instead of honey in the glaze?
Maple syrup or agave syrup are great alternatives. Each gives a slightly different flavor profile.
Can I make these vegan?
Yes, use plant-based milk, vegan butter, and an egg replacer like flaxseed meal. Swap honey for maple syrup.
Do I have to use a stand mixer?
No, you can knead by hand. It takes longer (around 10 minutes), but it works just as well.
Why did my buns come out dry?
Most likely due to too much flour or overbaking. Measure flour properly and check them around the 18-minute mark.
Conclusion
Making Classic Homemade Honey Buns from scratch is a rewarding process that fills your kitchen with irresistible aromas and delivers a treat that’s far superior to store-bought. With a sweet glaze, soft layers, and that nostalgic swirl, they’re perfect for special breakfasts, cozy weekends, or anytime you need a warm, gooey bite of comfort. Enjoy them fresh or freeze for later—either way, they’re a surefire hit for all ages.
Classic Homemade Honey Buns
- Prep Time: 1 hour 30 minutes
- Cook Time: 20 minutes
- Total Time: 1 hour 50 minutes
- Yield: 10 buns 1x
- Category: Breakfast, Dessert
- Method: Baking
- Cuisine: American
- Diet: Vegetarian
Description
Soft, sweet, and irresistibly sticky, these Classic Homemade Honey Buns are the perfect indulgence for any time of day. Whether you’re looking for a quick breakfast, a brunch treat, or a comforting snack, this easy recipe delivers all the nostalgic flavors you love. With tender dough spiraled with cinnamon sugar and coated in a glossy honey glaze, these buns are perfect for your list of breakfast ideas, dessert food ideas, or easy dinner treats. Baked from scratch using simple ingredients, they’re freezer-friendly, customizable, and guaranteed to disappear fast.
Ingredients
3 1/2 cups all-purpose flour
2 1/4 teaspoons active dry yeast
1/2 cup warm whole milk
1/4 cup granulated sugar
1/4 cup unsalted butter, melted
1/2 teaspoon salt
2 large eggs
1/3 cup brown sugar
1 tablespoon ground cinnamon
2 tablespoons unsalted butter, softened
1/3 cup honey
1 cup powdered sugar
1 tablespoon milk
1/4 teaspoon vanilla extract
Instructions
1. In a small bowl, mix warm milk, a pinch of sugar, and yeast. Let sit for 5-10 minutes until frothy.
2. In a large bowl, combine flour, sugar, and salt. Add melted butter, eggs, and the yeast mixture. Mix until dough forms.
3. Knead for 8–10 minutes until smooth and elastic.
4. Place dough in a greased bowl, cover, and let rise 1 to 1.5 hours until doubled.
5. Mix brown sugar and cinnamon for the filling; keep softened butter ready.
6. Roll dough into a rectangle about 1/4 inch thick.
7. Spread butter, then cinnamon-sugar mix evenly over the dough.
8. Roll dough tightly from the long side. Slice into 8–10 rolls and gently flatten each one.
9. Place rolls on a lined baking sheet or dish. Let rise again for 30–45 minutes.
10. Preheat oven to 350°F. Bake for 18–22 minutes until golden brown.
11. Mix glaze ingredients until smooth. Glaze buns immediately after baking.
12. Cool slightly and serve warm.
Notes
Use warm milk around 110°F—anything hotter may kill the yeast.
For extra gooey texture, slightly underbake and finish in a hot oven before serving.
Add orange zest or maple syrup to the glaze for a personalized touch.
Nutrition
- Serving Size: 1 bun
- Calories: 310
- Sugar: 22g
- Sodium: 180mg
- Fat: 10g
- Saturated Fat: 5g
- Unsaturated Fat: 4g
- Trans Fat: 0g
- Carbohydrates: 49g
- Fiber: 1g
- Protein: 6g
- Cholesterol: 55mg
Keywords: honey buns, easy breakfast, brunch recipe, sweet rolls, homemade snack