
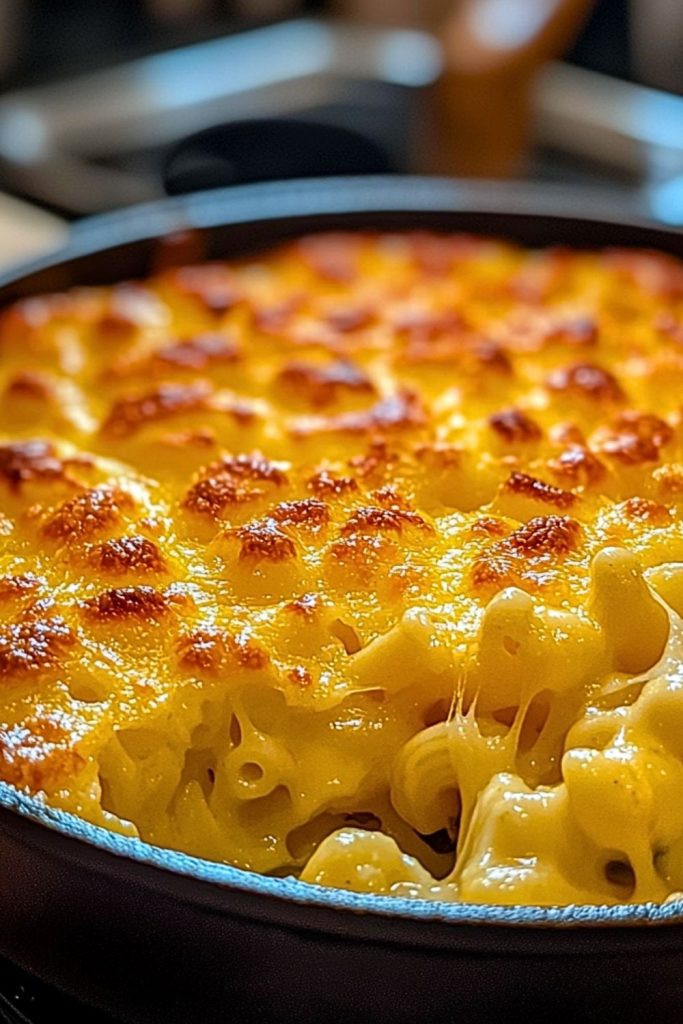
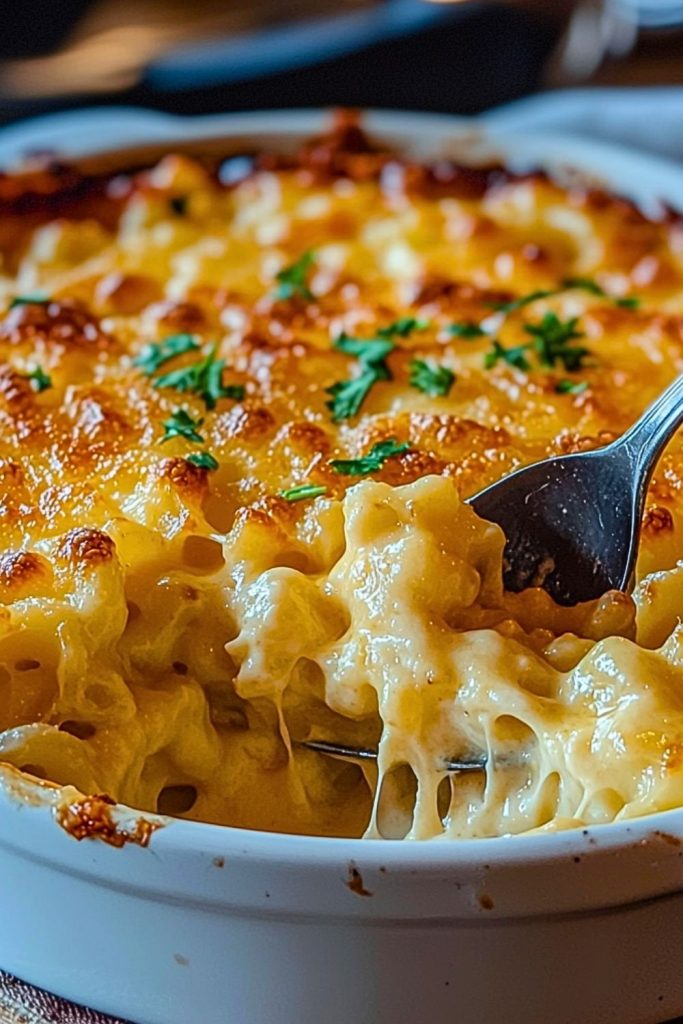
There’s something about the golden, bubbly crust and creamy, cheesy center of a baked mac and cheese that makes everything feel right. I’ve tried countless variations, but this Classic Baked Mac and Cheese always pulls me back in. It’s comforting, rich, and unapologetically indulgent — the kind of dish that makes you sneak seconds (or thirds) without a second thought.
I make this whenever I want to impress without stress. Whether it’s a family gathering or a lazy Sunday dinner, this dish wins hearts every time. It’s more than just pasta and cheese; it’s warmth baked into a dish. The blend of cheeses and that perfectly crisped top makes it irresistibly good.
Why You’ll Love This Classic Baked Mac and Cheese
This isn’t your average stovetop version. The baked version brings an entirely different level of texture and flavor. You get a gooey, creamy base hugged by perfectly tender macaroni, topped with a crisp golden crust that adds a satisfying contrast in every bite. The combination of sharp cheddar and melty cheeses creates a richness that’s balanced, not overwhelming.
You’ll love how it feels like home with every forkful. Plus, it’s a recipe that adapts beautifully to your mood — want it spicy? Add jalapeños. Craving crunch? Toss on a buttery breadcrumb topping. It’s flexible, nostalgic, and truly unbeatable.
What Type of Cheese Works Best in Classic Baked Mac and Cheese?
Cheese is the soul of this dish, so picking the right combo makes all the difference. I always go for a balance — one cheese that melts like a dream, and another that brings bold flavor. Sharp cheddar is non-negotiable for me; it adds that classic tang. Then I blend in something creamy like mozzarella or Monterey Jack for that luscious, stretchy texture. If I’m feeling fancy, I might toss in a bit of Gruyère or Fontina for an extra layer of complexity.
Avoid pre-shredded cheese if you can. It’s convenient, but it doesn’t melt as smoothly because of anti-caking agents. Freshly grated cheese is worth the few extra minutes — your sauce will thank you for it.
Options for Substitutions
While I love the traditional version, I totally get wanting to change things up. Here’s how you can personalize it:
- Cheese Alternatives: Try smoked gouda for a deeper flavor or cream cheese for an extra creamy base.
- Pasta Types: Elbow macaroni is classic, but cavatappi, shells, or rotini hold the sauce beautifully.
- Dairy-Free Options: Use plant-based milk and vegan cheese; just make sure they melt well.
- Gluten-Free: Swap regular pasta for gluten-free pasta, and use a GF flour blend for the roux.
- Add-ins: Stir in cooked bacon, caramelized onions, or roasted garlic to elevate the flavor even more.
These tweaks make it easy to match the recipe to your taste or dietary needs without sacrificing the comfort-food magic.
Ingredients for This Classic Baked Mac and Cheese
Each ingredient in this dish plays a role in building that creamy, nostalgic perfection. Here’s what I use and why it matters:
- Elbow Macaroni: The classic pasta shape that holds onto the cheese sauce like a pro. Its curves and tubes trap all that cheesy goodness.
- Sharp Cheddar Cheese: Brings the bold, tangy flavor that defines traditional mac and cheese. It’s the anchor of the cheesy mix.
- Mozzarella Cheese: Melt-in-your-mouth texture and stretchy creaminess — it balances out the sharpness of the cheddar.
- Butter: Used in the roux to create a silky base for the sauce. It also adds richness and helps the cheese melt evenly.
- All-Purpose Flour: Combines with the butter to make a roux — this thickens the sauce so it clings to the pasta just right.
- Whole Milk: Gives the sauce its body and creamy texture. You can use 2%, but whole milk gives a fuller flavor.
- Heavy Cream: Adds indulgent richness and gives the sauce a luxurious consistency.
- Salt and Pepper: Essential for seasoning the base — without them, even the best cheeses can fall flat.
- Ground Mustard (Optional but Recommended): Just a pinch brings out the cheese flavor even more. It doesn’t taste mustardy — it just enhances everything.
- Paprika (Optional): For a subtle smoky note and a warm hint of color on the topping.
Step 1: Cook the Pasta
Bring a large pot of salted water to a boil and cook the elbow macaroni until just al dente. Don’t overcook it — the pasta will continue to soften while baking. Once done, drain and set aside.
Step 2: Make the Roux
In a large saucepan, melt the butter over medium heat. Once fully melted, whisk in the flour and stir constantly for about 1–2 minutes. This step cooks out the raw flour taste and forms the base of your sauce.
Step 3: Add the Milk and Cream
Slowly whisk in the milk and heavy cream, making sure there are no lumps. Keep whisking until the mixture thickens — this should take around 5–6 minutes. You want it to coat the back of a spoon.
Step 4: Stir in the Cheese
Lower the heat and begin adding the shredded cheeses, one handful at a time, stirring after each addition. Continue until the sauce is velvety and fully melted. Add salt, pepper, and ground mustard to taste.
Step 5: Combine Pasta and Sauce
Add the drained macaroni to the cheese sauce and gently stir to coat every piece. Make sure it’s fully combined — creamy, but not soupy.
Step 6: Assemble in a Baking Dish
Pour the mac and cheese mixture into a greased baking dish or oven-safe skillet. If desired, sprinkle extra shredded cheese or paprika on top for a golden crust.
Step 7: Bake Until Bubbly
Preheat your oven to 375°F (190°C). Bake the mac and cheese uncovered for 20–25 minutes, or until the top is golden and bubbling around the edges.
How Long to Cook the Classic Baked Mac and Cheese
Once everything is assembled and ready to go into the oven, bake it at 375°F (190°C) for about 20 to 25 minutes. You’re looking for a golden-brown top with bubbling edges — that’s your sign it’s ready. If you like an extra-crispy top, you can broil it for an additional 2–3 minutes at the end, but keep a close eye to avoid burning.
Remember, the pasta is already cooked, and the cheese sauce is hot — the baking step is mainly to bring it all together and develop that beautiful texture on top.
Tips for Perfect Classic Baked Mac and Cheese
- Undercook the pasta slightly: Go for just shy of al dente. The pasta will absorb some of the sauce and soften as it bakes.
- Use freshly shredded cheese: Pre-shredded cheese often has additives that prevent smooth melting. Grating your own gives a creamier, silkier sauce.
- Warm the milk and cream before adding: This helps prevent lumps in the roux and speeds up the thickening process.
- Season as you go: Taste your sauce before mixing in the pasta to make sure it’s well-seasoned — especially with salt, pepper, and a pinch of mustard.
- Grease the baking dish: It makes cleanup easier and prevents the pasta from sticking or forming a tough crust on the edges.
- Don’t overbake: Baking too long can make the sauce dry. As soon as the top is golden and the edges bubble, it’s ready.
Watch Out for These Mistakes While Cooking
Even a simple dish like Classic Baked Mac and Cheese can go sideways with a few missteps. Here’s what I’ve learned to avoid:
- Overcooking the pasta: Fully cooked pasta turns mushy after baking. Stick to just under al dente for the perfect texture.
- Skipping the roux step: It’s tempting to melt cheese into milk, but without a proper roux, your sauce will be runny and separate.
- Using only one type of cheese: You’ll get a more complex, satisfying flavor by combining at least two types — one sharp, one melty.
- Not seasoning enough: Cheese is salty, but the sauce still needs seasoning. Underseasoned mac and cheese tastes flat.
- Overbaking: Too long in the oven dries out the dish. Stick to the 20–25 minute window and watch for bubbling edges.
Avoiding these will keep your mac and cheese creamy, flavorful, and completely crave-worthy.
What to Serve With Classic Baked Mac and Cheese?
This dish can totally hold its own, but it also shines when paired with complementary sides. Here are my favorite go-tos:
Roasted Broccoli
The slight bitterness and crunch of roasted broccoli balance out the rich creaminess of the mac and cheese beautifully.
Simple Green Salad
Something light and fresh, like a mixed greens salad with vinaigrette, offers a refreshing contrast.
Fried or Baked Chicken
Whether it’s crispy fried or oven-baked, chicken adds protein and makes the meal more hearty.
Candied or Crispy Bacon
Sprinkle crispy bacon on top or serve on the side for an irresistible salty crunch.
Tomato Soup
Mac and cheese and tomato soup make a comforting, nostalgic combo — like a warm hug on a plate.
Garlic Bread
It might sound like carb overload, but buttery garlic bread works wonderfully as a side or even for scooping.
Sauteed Spinach or Kale
A quick sauté with garlic and olive oil brings a healthy, earthy contrast to the richness.
Storage Instructions
Classic Baked Mac and Cheese stores really well, making it ideal for leftovers or meal prep. Here’s how to keep it fresh:
- Refrigerator: Transfer leftovers to an airtight container or wrap the baking dish tightly with foil. It will keep in the fridge for up to 4 days.
- Freezer: You can freeze it, either before or after baking. If freezing before, assemble the dish (without baking), wrap tightly in foil and plastic wrap, and freeze for up to 2 months. To reheat, thaw overnight in the fridge and bake as usual. If already baked, portion into containers and reheat directly from frozen or after thawing.
- Reheating: For best results, reheat in the oven at 350°F (175°C) until warmed through. To keep it from drying out, add a splash of milk or cream and cover with foil. You can also microwave it in short bursts, stirring occasionally.
Estimated Nutrition
Here’s a general idea of the nutrition per serving (based on 8 servings total):
- Calories: ~450–500 kcal
- Protein: 18–20g
- Fat: 28–30g
- Saturated Fat: 15g
- Carbohydrates: 35–40g
- Sugar: 5g
- Fiber: 1–2g
- Sodium: 400–600mg
- Calcium: High, due to the cheese and milk
This dish is definitely on the indulgent side — rich in flavor and calories — but worth every bite when you’re in the mood for comfort food.
Frequently Asked Questions
What cheeses work best besides cheddar and mozzarella?
You can try Gruyère for a nutty, rich flavor, Fontina for smooth melting, or even a bit of Parmesan for salty depth. A mix of two to three cheeses gives the best texture and flavor.
Can I make this ahead of time?
Yes! Assemble it all (without baking), cover it tightly, and refrigerate for up to 2 days. When you’re ready, bake as instructed — just add 5–10 extra minutes to account for the chill.
How do I prevent my mac and cheese from drying out?
Don’t overbake it, and if reheating, always add a splash of milk or cream and cover it to retain moisture.
Is it okay to use pre-shredded cheese?
Technically yes, but I don’t recommend it. Pre-shredded cheese contains anti-caking agents that can make the sauce grainy instead of smooth and creamy.
Can I make this gluten-free?
Absolutely. Just use gluten-free pasta and substitute the flour in the roux with a gluten-free flour blend or cornstarch (half the amount).
Can I add vegetables to this?
Totally. Stir in steamed broccoli, spinach, peas, or roasted cauliflower before baking for a more balanced, veggie-packed version.
Is this recipe spicy?
Not unless you make it that way. If you like heat, add cayenne pepper, diced jalapeños, or a few dashes of hot sauce to the cheese sauce.
Can I freeze individual portions?
Yes — portion into freezer-safe containers, label them, and freeze for up to 2 months. Perfect for quick meals later.
Conclusion
Classic Baked Mac and Cheese is more than just comfort food — it’s a dish that brings people together. From the bubbling, golden crust to the creamy, cheese-coated noodles underneath, this recipe checks every box for a soul-warming, crowd-pleasing meal. Whether you follow it to the letter or tweak it to suit your taste, one thing’s for sure: it’ll disappear fast from any table.
Now that you’ve got every tip, trick, and substitution idea, you’re ready to make your best-ever batch. Let’s wrap this up with a printable version for your kitchen!

Classic Baked Mac and Cheese
- Prep Time: 20 minutes
- Cook Time: 25 minutes
- Total Time: 45 minutes
- Yield: 6–8 servings 1x
Description
Creamy, cheesy, and topped with a bubbling golden crust, this Classic Baked Mac and Cheese is the ultimate comfort dish. Rich with a blend of sharp cheddar and mozzarella, and balanced by a smooth roux-based sauce, it’s perfect for family dinners, holidays, or indulgent weeknight meals.
Ingredients
- 1 lb elbow macaroni
- 2 cups sharp cheddar cheese, shredded
- 1 1/2 cups mozzarella cheese, shredded
- 4 tbsp unsalted butter
- 1/4 cup all-purpose flour
- 2 cups whole milk
- 1 cup heavy cream
- 1 tsp salt (adjust to taste)
- 1/2 tsp black pepper
- 1/2 tsp ground mustard (optional)
- 1/4 tsp paprika (optional, for topping)
Instructions
- Preheat oven to 375°F (190°C). Grease a 9×13-inch baking dish.
- Cook macaroni in salted boiling water until just al dente. Drain and set aside.
- In a large saucepan, melt butter over medium heat. Whisk in flour and cook for 1–2 minutes.
- Gradually whisk in warm milk and cream until the mixture thickens (5–6 minutes).
- Lower heat and stir in shredded cheeses, a handful at a time, until melted and smooth.
- Season with salt, pepper, and ground mustard (if using).
- Add cooked pasta to the cheese sauce and stir until fully coated.
- Pour the mixture into the greased baking dish and smooth the top.
- Sprinkle additional cheese or paprika on top if desired.
- Bake uncovered for 20–25 minutes or until golden and bubbly.
- Optional: Broil for 2–3 minutes at the end for extra browning. Serve hot.