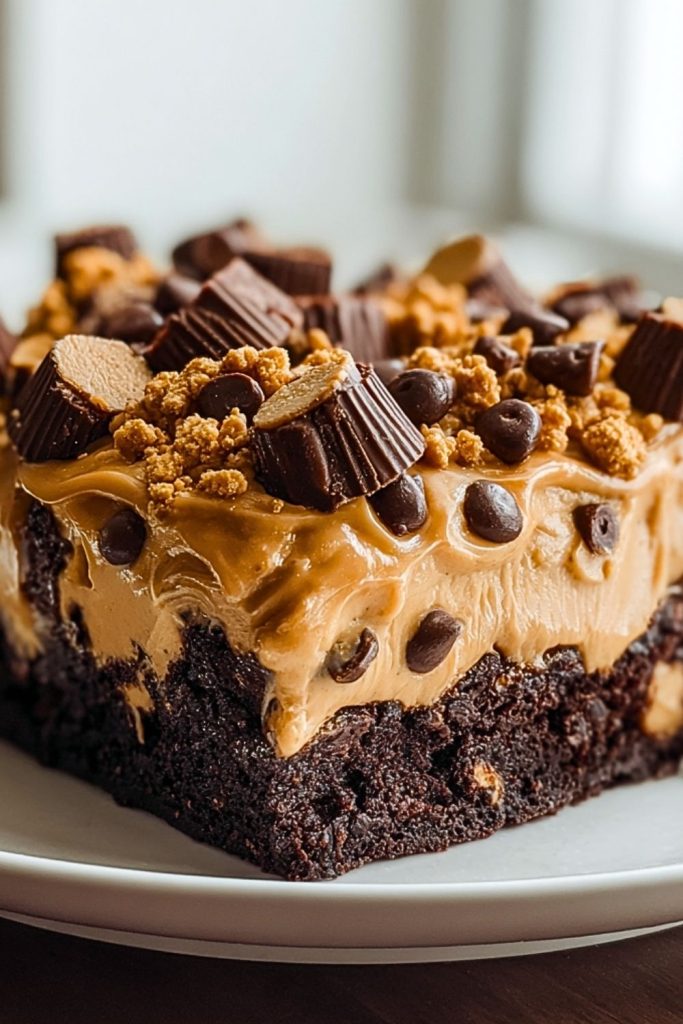
A deliciously decadent treat that combines the rich, moist goodness of chocolate cake with the creamy, nutty flavor of peanut butter, the Chocolate Peanut Butter Poke Cake is a dream come true for dessert lovers. Imagine a soft, fluffy chocolate cake with little holes poked throughout, soaking in a luscious peanut butter and chocolate topping. The result is a moist, flavor-packed dessert that’s both indulgent and satisfying. Perfect for family gatherings, birthdays, or just a special treat, this cake will have everyone asking for seconds.

The layers of chocolate and peanut butter blend harmoniously, each bite delivering a melt-in-your-mouth experience. Whether you’re a fan of chocolate, peanut butter, or both, this cake brings the best of both worlds. The smooth, creamy peanut butter layer pairs beautifully with the decadent chocolate, creating a perfect balance of flavors that will make this cake an instant favorite.
Why You’ll Love This Chocolate Peanut Butter Poke Cake
This recipe offers the perfect combination of textures and flavors. It’s easy to prepare and looks impressive, making it an ideal dessert for both beginners and seasoned bakers. The best part? The cake is super moist, thanks to the poke method, which allows all the flavors to soak into every inch. With its irresistible peanut butter filling and chocolatey top, this cake satisfies all your sweet cravings. Plus, it’s a hit with both kids and adults alike, ensuring that every gathering or dinner party is a success.
Preparation Phase & Tools to Use (Essential Tools and the Importance of Each)
Before diving into the creation of this luscious Chocolate Peanut Butter Poke Cake, assembling the right tools can make your baking experience smoother and more enjoyable.
- 9×13-Inch Baking Pan: This size is ideal for poke cakes, giving you the right thickness and room to poke holes without the cake crumbling.
- Electric Mixer or Hand Mixer: Ensures a smooth and airy cake batter, as well as a well-whipped peanut butter layer.
- Wooden Spoon or Handle of a Spatula: Used to poke evenly spaced holes into the baked cake, crucial for letting the filling seep through properly.
- Mixing Bowls: Multiple bowls are necessary for preparing the cake batter, peanut butter layer, and chocolate topping separately.
- Spatula: A rubber or silicone spatula makes spreading layers smooth and precise without breaking the cake.
- Measuring Cups and Spoons: Accuracy matters, especially in baking. Proper measurements ensure perfect texture and flavor.
- Saucepan or Microwave-Safe Bowl: For melting the chocolate topping evenly without scorching.
Each tool plays a specific role in achieving a cake that’s not only visually stunning but also irresistibly delicious.
Preparation Tips
- Room Temperature Ingredients: Allow your eggs, milk, and butter to come to room temperature before mixing. This ensures better blending and a smoother batter.
- Poking the Cake: Don’t poke too close to the edges, and aim for holes that go about ¾ of the way through the cake—not all the way to the bottom.
- Cooling Time: Let the cake cool slightly before poking and pouring in the peanut butter mixture. Too hot and it could become mushy; too cold and it won’t absorb well.
- Layering: Spread each layer gently, especially the peanut butter, to avoid tearing the cake surface.
- Chill Time: Let the finished cake sit in the fridge for at least 1–2 hours before serving to help the layers set and flavors blend beautifully.
Preparation is just as important as baking. A little care and patience at this stage go a long way in delivering a flawless Chocolate Peanut Butter Poke Cake.
Ingredients for This Chocolate Peanut Butter Poke Cake
To bring this rich, moist, and creamy dessert to life, you’ll need a well-balanced mix of baking essentials and indulgent ingredients. Here’s everything required:
For the Chocolate Cake:
- 1 box chocolate cake mix (plus eggs, oil, and water as per package instructions)
- Optional: 1 tsp espresso powder (enhances the chocolate flavor)
For the Peanut Butter Filling:
- 1 cup creamy peanut butter
- 1 cup sweetened condensed milk
- 1/2 cup whole milk (or as needed to thin the mixture slightly)
For the Chocolate Ganache Topping:
- 1 cup heavy cream
- 1 1/2 cups semi-sweet chocolate chips
For the Garnish:
- 1/2 cup peanut butter chips or chocolate chips
- Optional: crushed chocolate cookies or mini peanut butter cups for added texture
This list blends convenience with flavor, allowing you to create a bakery-style dessert with simple supermarket staples.
Step 1: Bake the Chocolate Cake
Prepare the chocolate cake batter according to the package instructions, adding the optional espresso powder if using. Pour the batter into a greased 9×13-inch baking pan and bake as directed. Once done, remove the cake from the oven and allow it to cool for about 10–15 minutes.
Step 2: Poke the Cake
Using the handle of a wooden spoon or a similar-sized utensil, poke holes all over the top of the cake. Space the holes evenly, about 1 inch apart. Be careful not to poke all the way to the bottom—about three-quarters of the way is perfect.
Step 3: Make the Peanut Butter Filling
In a medium bowl, mix together the peanut butter, sweetened condensed milk, and a splash of whole milk until smooth and pourable. The mixture should be creamy and slightly thick but able to flow into the holes easily.
Step 4: Pour and Spread the Filling
While the cake is still slightly warm, pour the peanut butter mixture slowly and evenly over the entire surface. Use a spatula to help guide it into the holes and cover the top. Let the cake cool completely afterward, allowing the filling to soak in.
Step 5: Prepare the Chocolate Ganache
Heat the heavy cream in a saucepan or microwave until just simmering. Pour it over the chocolate chips in a heatproof bowl. Let it sit for 2–3 minutes, then stir until smooth and glossy.
Step 6: Spread the Ganache
Pour the ganache over the cooled, peanut butter-filled cake. Spread it evenly with a spatula, making sure it covers the entire surface.
Step 7: Add Toppings and Chill
Sprinkle chocolate chips, peanut butter chips, or your preferred garnish over the ganache while it’s still soft. Refrigerate the cake for at least 1–2 hours to set the layers and develop full flavor.
Step 8: Serve and Enjoy
Once chilled, slice and serve your Chocolate Peanut Butter Poke Cake. Every bite should be rich, creamy, and utterly satisfying.
Notes
- You can make this cake a day ahead and refrigerate it overnight—doing so actually enhances the flavor and texture.
- For a homemade touch, substitute the boxed mix with your favorite from-scratch chocolate cake recipe.
- If you prefer a less sweet version, use dark chocolate chips for the ganache and reduce the sweetened condensed milk slightly.
- The cake can be garnished with crushed peanuts for a salty crunch, or even a drizzle of caramel for extra decadence.
- To make cutting cleaner slices, dip your knife in hot water and wipe between cuts.
Watch Out for These Mistakes While Cooking
- Over-poking: Too many holes can weaken the structure of the cake and cause it to fall apart. Stick to evenly spaced holes.
- Pouring the filling on a hot cake: If the cake is too hot, the filling may just sit on top or create a soggy layer. Let it cool slightly.
- Thick peanut butter mixture: If your filling is too thick, it won’t sink into the cake properly. Add a bit of milk to thin it to a pourable consistency.
- Skipping chill time: This cake truly benefits from refrigeration. Skipping this step can result in messy layers and weaker flavor.
- Uneven ganache: Make sure to let the chocolate chips fully melt before stirring to avoid lumps and create a silky finish.
- Not greasing the pan: Even though it’s a moist cake, sticking can still happen. Grease or line your baking dish for easy removal.
These common pitfalls are easy to avoid and will help ensure your Chocolate Peanut Butter Poke Cake comes out flawless every time.
What to Serve With Chocolate Peanut Butter Poke Cake?
A rich dessert like this can shine even brighter with the right accompaniments. Whether you’re building a dessert table or creating a complete meal, pairing it with complementary flavors and textures enhances the overall experience.
Here Are 8 Recommendations:
- Cold Brew Coffee or Espresso
The bitterness of coffee beautifully balances the sweetness of the cake, making each bite more enjoyable. - Vanilla Bean Ice Cream
Creamy and simple, it melts into the cake’s nooks and crannies for a delightful temperature contrast. - Fresh Berries
Strawberries or raspberries offer a tart, juicy counterpoint to the dense, rich cake. - Whipped Cream
A dollop of lightly sweetened whipped cream can lighten the overall dessert and add airiness. - Milkshakes
A vanilla or peanut butter milkshake pairs wonderfully without overpowering the cake. - Salted Pretzel Bites
Serve these on the side for a crunchy, salty snack that contrasts with the soft, sweet cake. - Peanut Butter Whiskey Shots
For adults, this fun pairing enhances the peanut butter flavor and makes dessert a little more exciting. - Mint Tea or Herbal Infusions
Light and refreshing drinks help cleanse the palate and balance the richness.
Choose a pairing that fits the mood—light and refreshing or bold and indulgent—each will elevate your Chocolate Peanut Butter Poke Cake experience.
Storage Instructions
Storing your Chocolate Peanut Butter Poke Cake properly ensures it stays fresh and delicious for days.
- Refrigerator: Keep the cake covered with plastic wrap or in an airtight container and refrigerate. It will stay fresh for up to 5 days. In fact, the flavor often improves after a day as the filling fully absorbs.
- Freezer: You can freeze individual slices or the entire cake (minus the toppings) for up to 2 months. Wrap tightly in plastic wrap and foil. Thaw in the refrigerator overnight before serving.
- Avoid Room Temperature: Due to the creamy peanut butter filling and ganache topping, it’s best not to leave this cake out for extended periods.
Estimated Nutrition (Per Serving – based on 12 servings)
- Calories: 490
- Total Fat: 28g
- Saturated Fat: 11g
- Cholesterol: 40mg
- Sodium: 330mg
- Carbohydrates: 55g
- Sugar: 38g
- Protein: 8g
- Fiber: 3g
Note: Nutritional values are approximate and can vary based on ingredient brands and serving sizes.
Frequently Asked Questions
1. Can I make this cake ahead of time?
Absolutely! In fact, it’s even better when made a day in advance. The flavors meld beautifully, and the texture improves after chilling.
2. What if I don’t have sweetened condensed milk?
You can substitute it with a mixture of evaporated milk and sugar, or use a homemade version by simmering milk and sugar until thickened.
3. Can I use natural peanut butter?
It’s best to use creamy, no-stir peanut butter for consistency. Natural peanut butter can separate and make the filling oily or too runny.
4. Can I make this gluten-free?
Yes! Use a gluten-free chocolate cake mix and check that all other ingredients are gluten-free. The rest of the recipe stays the same.
5. How do I prevent the ganache from becoming too thick?
Make sure your cream is hot enough and let it sit over the chocolate for a couple of minutes before stirring. Add a splash of cream if it’s too thick.
6. Is it okay to skip the ganache topping?
You can, but it’s highly recommended. The ganache adds richness and seals in the peanut butter layer, enhancing texture and flavor.
7. Can I use a homemade chocolate cake instead of boxed mix?
Definitely. If you have a favorite chocolate cake recipe, feel free to use it. Just make sure it fits a 9×13-inch pan.
8. How do I keep the cake from sticking to the pan?
Grease your baking dish well or use parchment paper. This makes serving cleaner and ensures the cake holds its shape.
Conclusion
The Chocolate Peanut Butter Poke Cake is more than just a dessert—it’s an experience. Rich, moist, and bursting with irresistible layers of flavor, it’s the perfect treat for chocolate and peanut butter lovers alike. Whether you serve it at a party or just enjoy a slice on a cozy evening, it’s guaranteed to be a hit. With simple ingredients, easy steps, and a stunning final result, this cake is one recipe you’ll want to make again and again.

Chocolate Peanut Butter Poke Cake
- Prep Time: 20 minutes
- Cook Time: 30 minutes
- Total Time: 50 minutes
- Yield: 12 servings 1x
Description
Indulge in the ultimate dessert experience with this Chocolate Peanut Butter Poke Cake. A rich, moist chocolate cake is filled with creamy peanut butter, then topped with a silky chocolate ganache and your favorite garnishes. Perfect for celebrations or casual get-togethers, each bite offers an irresistible blend of flavors and textures.
Ingredients
For the Chocolate Cake:
- 1 box chocolate cake mix (plus ingredients listed on the box)
- Optional: 1 tsp espresso powder
For the Peanut Butter Filling:
- 1 cup creamy peanut butter
- 1 cup sweetened condensed milk
- 1/2 cup whole milk
For the Chocolate Ganache Topping:
- 1 cup heavy cream
- 1 1/2 cups semi-sweet chocolate chips
For the Garnish:
- 1/2 cup peanut butter chips or chocolate chips
- Optional: crushed cookies or mini peanut butter cups
Instructions
- Preheat the oven and prepare the chocolate cake batter as directed on the box. Add espresso powder if using.
- Pour into a greased 9×13-inch baking pan and bake. Let cool for 10–15 minutes.
- Poke holes all over the top of the cake using the handle of a wooden spoon.
- In a bowl, mix peanut butter, sweetened condensed milk, and whole milk until smooth.
- Pour the mixture over the cake, spreading evenly so it seeps into the holes. Let cool completely.
- Heat the cream until just simmering and pour it over the chocolate chips. Let sit, then stir until smooth.
- Spread the ganache over the cake and sprinkle with desired toppings.
- Chill the cake in the refrigerator for at least 1–2 hours before serving.