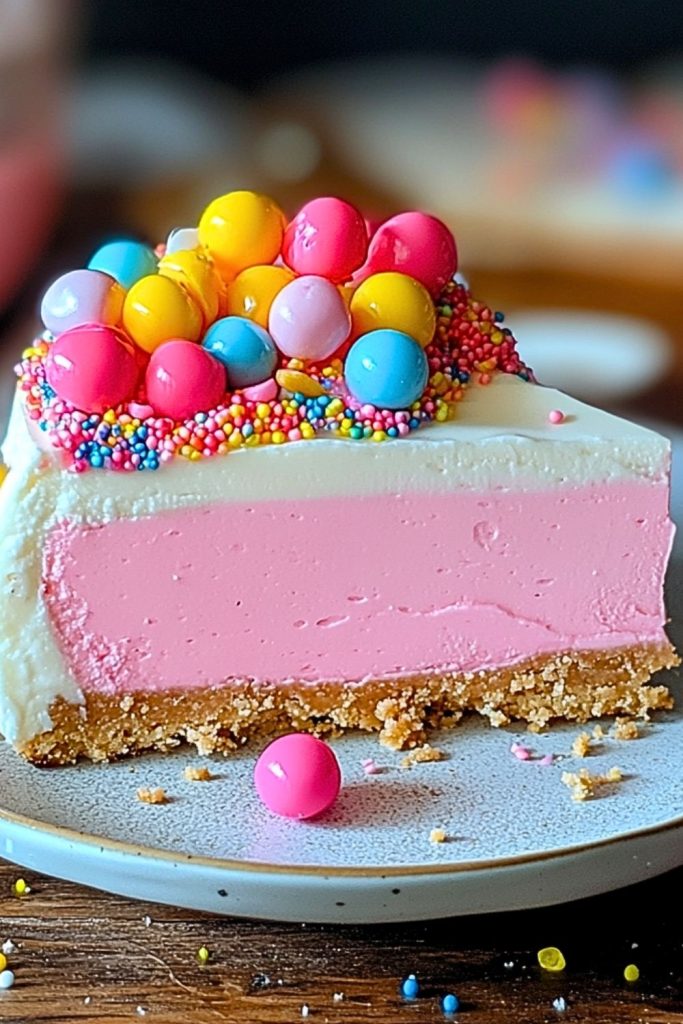
A playful blend of childhood nostalgia and creamy indulgence, Bubblegum Cheesecake is the dessert equivalent of a joyful carnival ride. With its striking pink filling, a buttery graham cracker crust, and a whipped topping crowned with colorful gumballs and rainbow sprinkles, every bite delivers whimsy, sweetness, and an unmistakable pop of bubblegum flavor.
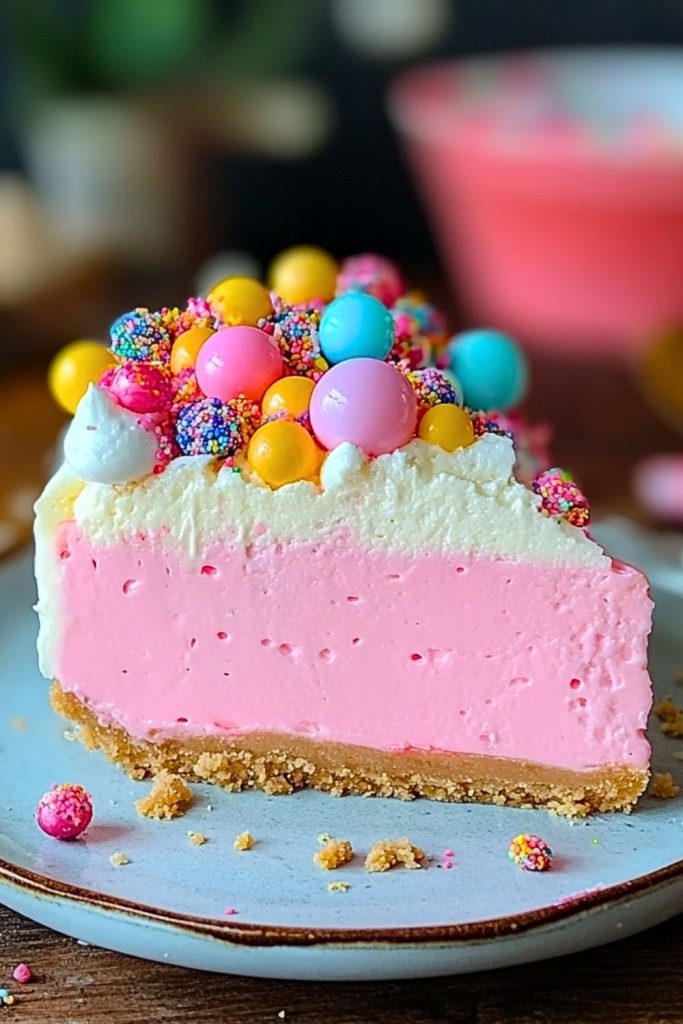
Perfect for birthday parties, baby showers, or simply a fun weekend treat, this cheesecake captures attention and hearts alike. The silky-smooth texture contrasts beautifully with the slight crunch of the crust and toppings, creating a dessert that’s as delightful to eat as it is to look at. Whether you’re serving kids or kids at heart, this cheesecake guarantees smiles all around.
Why You’ll Love This Bubblegum Cheesecake
- Fun and Festive: The bright colors and cheerful presentation make it an instant crowd-pleaser at any celebration.
- No-Bake Option: Depending on your crust and filling choice, it can be a no-bake dessert—great for warmer seasons.
- Unique Flavor Twist: The unmistakable bubblegum essence is a nostalgic yet refreshing surprise compared to typical cheesecakes.
- Customizable: Easily adaptable with different toppings, crusts, or bubblegum flavor strengths.
Preparation Phase & Tools to Use (Essential Equipment and Why Each Matters)
Creating a Bubblegum Cheesecake might look whimsical, but the process is rooted in precision and the right gear. Here’s what you’ll need and why:
- Springform Pan (8 or 9 inch): This is crucial for easy release of the cheesecake without damaging the sides. It ensures a clean, professional look—especially important for no-bake cheesecakes.
- Mixing Bowls (Various Sizes): Needed for mixing crust, filling, and whipped topping separately. Glass or stainless steel bowls work best for maintaining stable temperatures.
- Electric Mixer or Stand Mixer: Essential for beating cream cheese into a smooth, lump-free filling. This is especially important for achieving that silky pink texture.
- Rubber Spatula: Helps fold whipped topping gently into the filling without deflating it.
- Measuring Cups and Spoons: Precision is key to balancing the sweetness and texture.
- Food Processor (optional but helpful): Speeds up crust making by pulverizing graham crackers evenly.
- Offset Spatula: For leveling and smoothing the filling and topping layers beautifully.
These tools not only make the process smoother but also directly impact the visual appeal and texture of the final cheesecake.
Preparation Tips
- Room Temperature Cream Cheese: Always use room temperature cream cheese for a smoother filling that blends effortlessly.
- Chill Thoroughly: This cheesecake needs at least 4–6 hours in the fridge to firm up. Overnight is even better for perfect slicing.
- Color and Flavor Balance: Start small with food coloring and bubblegum extract—taste as you go. You want vibrant color and sweet flavor, but not overwhelming.
- Neat Crust Edges: Press the crust in firmly with the bottom of a glass to avoid a crumbly base.
- Avoid Overmixing: Once you fold in the whipped topping, don’t overmix—it will flatten your fluffy texture.
Ingredients for this Bubblegum Cheesecake
Here’s everything you’ll need to make this colorful and creamy Bubblegum Cheesecake. These ingredients are broken down into crust, filling, and topping for better clarity.
For the Crust:
- 1 ½ cups graham cracker crumbs
- ¼ cup granulated sugar
- ½ cup unsalted butter, melted
This trio creates a sweet and crunchy base that perfectly contrasts the creamy filling. Make sure the crumbs are finely ground for best results.
For the Filling:
- 16 oz (2 blocks) cream cheese, softened to room temperature
- 1 cup powdered sugar
- 1 tsp vanilla extract
- 2 tsp bubblegum extract (adjust to taste)
- A few drops pink gel food coloring
- 2 cups whipped topping (like Cool Whip), thawed
This filling is the star—smooth, creamy, and packed with bubblegum flavor. Whipped topping keeps it light and airy, while cream cheese gives it richness.
For the Topping:
- 1 cup whipped topping (optional, for layering)
- Colorful gumballs
- Rainbow sprinkles
These toppings add visual flair and texture. The gumballs serve as a fun, eye-catching garnish that enhances the bubblegum theme.
Step 1: Prepare the Crust
- In a mixing bowl, combine graham cracker crumbs and sugar, then pour in the melted butter.
- Mix until the crumbs are evenly coated and resemble wet sand.
- Press the mixture firmly into the bottom of a springform pan using the back of a spoon or the base of a glass.
- Chill in the refrigerator for 15–20 minutes while you make the filling. This sets the crust and prevents crumbling later.
Step 2: Make the Filling
- In a large bowl, beat the cream cheese until smooth and fluffy using a hand or stand mixer.
- Add in the powdered sugar, vanilla extract, and bubblegum extract, and continue beating until fully combined.
- Mix in a few drops of pink gel food coloring until you reach your desired shade of pink.
- Gently fold in the whipped topping using a rubber spatula. Do not overmix; this step is crucial for maintaining a light, mousse-like texture.
Step 3: Assemble the Cheesecake
- Spoon the pink filling over the chilled crust in the springform pan.
- Use an offset spatula to smooth the top evenly.
- Optional: Spread an extra layer of whipped topping on top of the cheesecake for a white contrast and added creaminess.
Step 4: Chill to Set
- Cover the cheesecake lightly with plastic wrap or foil.
- Refrigerate for at least 4–6 hours, or preferably overnight, until the cheesecake is firm and sliceable.
Step 5: Decorate Before Serving
- Once fully set, remove the cheesecake from the springform pan and transfer to a serving plate.
- Add a generous handful of rainbow sprinkles around the border or center.
- Top with colorful gumballs for a playful, bubblegum-themed garnish.
Notes
- Flavor Adjustment: Bubblegum extract varies in strength by brand. Start with 1½ teaspoons, then taste before adding more.
- Coloring: Gel food coloring gives a vibrant hue without altering the texture. Avoid using too much liquid food coloring.
- Whipped Topping Substitute: You can use freshly whipped cream (stiff peaks) as an alternative, but it may slightly alter texture and stability.
- Make Ahead Friendly: This cheesecake stores well in the fridge for up to 3 days, making it a great party prep option.
- Kid-Friendly: This is a hit at children’s parties, especially when paired with bubblegum or cotton candy-themed décor.
Watch Out for These Mistakes While Cooking
- Skipping the Chill Time: Rushing the setting phase can lead to a runny or unstable cheesecake. Patience is key—overnight is ideal.
- Using Cold Cream Cheese: This leads to a lumpy filling. Always let your cream cheese soften at room temperature first.
- Overmixing After Folding in Whipped Topping: This flattens the airiness. Gently fold until just combined.
- Under-pressing the Crust: A loosely packed crust can crumble during slicing. Use a firm hand or glass base to press it tightly.
- Too Much Extract or Color: Bubblegum extract and food dye are potent—start small and build up to avoid artificial or overpowering results.
- Wrong Pan Type: A springform pan is non-negotiable for easy release and presentation. Avoid standard cake pans.
- Not Leveling the Top: A smooth, level surface is essential for a polished look—use an offset spatula for precision.
- Skipping the Taste Test: Taste your filling before chilling. This is your only chance to adjust sweetness or bubblegum flavor.
What to Serve With Bubblegum Cheesecake?
This playful dessert stands out on its own but can be even more delightful when paired with the right sides and drinks. Whether you’re planning a themed party or simply looking to balance the sweetness, here are some creative and complementary ideas.
8 Recommendations
1. Strawberry or Raspberry Coulis
A tart berry sauce can beautifully contrast the sweetness of the cheesecake and add a gourmet touch.
2. Vanilla Milkshake or Bubblegum Milkshake
Lean into the theme with a nostalgic milkshake pairing—creamy, dreamy, and ultra-kid-friendly.
3. Fresh Fruit Skewers
Grapes, pineapple, and strawberries provide a fresh, juicy bite that cuts through the richness.
4. Pink Lemonade or Cotton Candy Soda
Sparkling and sweet, these drinks elevate the party feel and match the visual aesthetics.
5. White Chocolate Dipped Pretzels
For a salty-sweet contrast, serve a side of pretzels dipped in white chocolate and sprinkles.
6. Mini Cupcakes with Matching Frosting
Create a bubblegum-themed dessert table with small vanilla cupcakes topped with pink icing and sprinkles.
7. Whipped Cream Rosettes with Edible Glitter
Serve individual slices with a decorative swirl of whipped cream dusted in edible glitter—Instagram-worthy and tasty.
8. Funfetti Ice Cream
Keep things playful by serving slices with a scoop of sprinkle-loaded ice cream—colorful and perfectly complementary.
Storage Instructions
Keeping your Bubblegum Cheesecake fresh and delightful is easy with the right storage methods. Since it’s a chilled dessert, refrigeration is key to maintaining its texture and flavor.
Refrigerator:
- Store Covered: Keep the cheesecake in an airtight container or cover the springform pan with plastic wrap or foil.
- Shelf Life: It will stay fresh in the fridge for up to 3–4 days. After that, the texture may begin to soften, and the flavor can fade.
- Avoid Odors: Store away from strong-smelling foods to prevent it from absorbing unwanted flavors.
Freezer:
- Freeze Whole or in Slices: Wrap the cheesecake or slices tightly in plastic wrap, then again in foil. Place in a freezer-safe bag or container.
- Best Used Within: 1 month for peak texture and flavor.
- Thawing Instructions: Let it thaw in the refrigerator overnight before serving. Avoid microwaving to maintain the creamy consistency.
Estimated Nutrition
While it’s a treat meant for indulgence, here’s a general idea of what one slice (based on 10 servings) contains:
| Nutrient | Estimated Value (per slice) |
|---|---|
| Calories | 340–400 kcal |
| Total Fat | 24–28 g |
| Saturated Fat | 14–16 g |
| Carbohydrates | 30–35 g |
| Sugars | 22–26 g |
| Protein | 4–6 g |
| Fiber | <1 g |
| Sodium | 220–260 mg |
Note: Values may vary depending on the brand of ingredients, especially whipped topping and bubblegum extract.
Frequently Asked Questions
1. Can I make this cheesecake without bubblegum extract?
Yes, but it will lose its signature flavor. You can substitute with vanilla or cotton candy extract for a fun twist, but the result won’t taste like bubblegum.
2. Is this recipe kid-friendly?
Absolutely! Kids love the color, flavor, and playful toppings. Just keep an eye on small gumballs for younger children to avoid choking hazards.
3. Can I use a different crust instead of graham crackers?
Yes, crushed vanilla wafers, Oreos (cream removed), or even a cereal-based crust work well. Just adjust butter quantities as needed.
4. What if I don’t have a springform pan?
You can use a deep pie dish, but serving might be a bit messier. Lining with parchment paper can help with lifting slices out cleanly.
5. Is this a no-bake cheesecake?
Yes, this version is completely no-bake. It relies on chilling to firm up rather than baking, making it convenient and oven-free.
6. How do I make it more vibrant in color?
Use gel-based food coloring for bold, concentrated color without thinning the filling. Start with a drop or two and increase as needed.
7. Can I freeze the whole cheesecake for a party later?
Yes! It freezes well for up to a month. Just thaw in the fridge overnight before serving and decorate after thawing for best texture.
8. How do I prevent a soggy crust?
Chilling the crust before adding the filling is essential. For an even sturdier base, you can bake it at 350°F (175°C) for 8 minutes and let it cool before assembling.
Conclusion
Bubblegum Cheesecake is more than a dessert—it’s a celebration in slice form. With its creamy texture, whimsical color, and nostalgic flavor, it brings childlike joy to anyone who tries it. Whether you’re making it for a themed birthday party, a baby shower, or just to brighten up your weekend, this cheesecake is guaranteed to be the centerpiece of any occasion.
And the best part? It’s surprisingly easy to make, even for beginners. With a no-bake method, basic ingredients, and room for creativity in toppings and presentation, this dessert invites both fun and flavor into your kitchen.
Bubblegum Cheesecake Recipe
- Prep Time: 25 minutes
- Chill Time: 4 hours
- Total Time: 4 hours 25 minutes
- Yield: 10 servings 1x
Description
Bright, whimsical, and bursting with nostalgic flavor, this Bubblegum Cheesecake is a no-bake dessert dream. With its eye-catching pink filling, velvety texture, and colorful candy toppings, it’s the perfect addition to your collection of easy dessert ideas, fun birthday recipes, or quick no-bake party treats. Whether you’re looking for a kid-friendly dessert or a creative food idea to impress guests, this creamy and cheerful cheesecake is guaranteed to steal the spotlight. The combination of buttery graham cracker crust and bubblegum-flavored filling makes it an irresistible sweet treat for all ages.
Ingredients
For the Crust:
- 1 ½ cups graham cracker crumbs
- ¼ cup granulated sugar
- ½ cup unsalted butter, melted
For the Filling:
- 16 oz cream cheese, softened
- 1 cup powdered sugar
- 1 tsp vanilla extract
- 2 tsp bubblegum extract (to taste)
- A few drops pink gel food coloring
- 2 cups whipped topping (e.g., Cool Whip)
For the Topping:
- 1 cup whipped topping (optional)
- Colorful gumballs
- Rainbow sprinkles
Instructions
- Combine graham cracker crumbs, sugar, and melted butter in a bowl. Mix until texture resembles wet sand.
- Press the mixture into the bottom of a springform pan. Chill for 15–20 minutes.
- In a large bowl, beat cream cheese until smooth. Add powdered sugar, vanilla, and bubblegum extract. Mix well.
- Add pink food coloring and stir until the desired color is achieved.
- Gently fold in whipped topping with a rubber spatula. Do not overmix.
- Spoon the filling over the chilled crust and smooth the top with an offset spatula.
- Optionally, add a layer of whipped topping on top.
- Cover and refrigerate for 4–6 hours or overnight.
- Once set, remove from the pan and decorate with gumballs and rainbow sprinkles.
- Slice and serve chilled.