
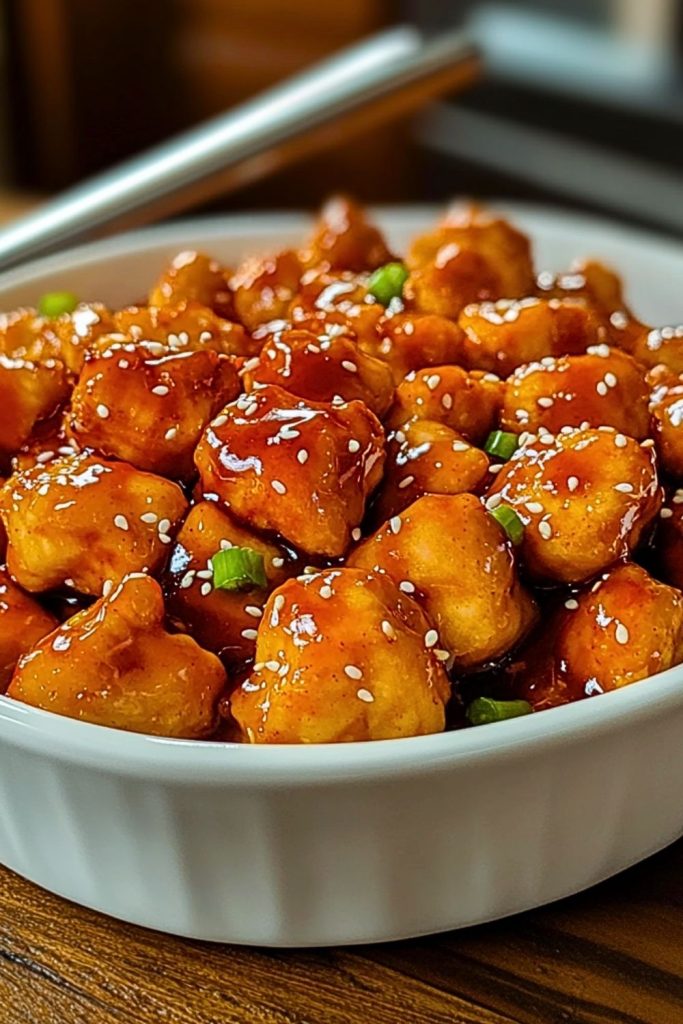
Golden, sticky, and irresistibly flavorful—Baked Sweet and Sour Chicken brings the iconic takeout flavor right into your kitchen without the deep-frying hassle. Each tender bite of chicken is oven-baked to crispy perfection, then tossed in a glossy, sweet-tangy sauce that clings beautifully to the surface. With the crunch of bell peppers and the richness of the glaze, it’s a balance of flavors that keeps you coming back for more.

Unlike traditional frying methods, this recipe offers a lighter, healthier twist without compromising taste or texture. Perfect for a family dinner or meal prep, it delivers restaurant-quality satisfaction in a surprisingly easy format. Whether served over rice or on its own, this dish is bound to become a new favorite.
Why You’ll Love This Baked Sweet and Sour Chicken
- Healthier alternative: No deep-frying involved—this version is oven-baked for a cleaner meal.
- Flavor-packed: A vibrant sauce with just the right balance of sweet and tangy.
- Simple ingredients: Easily accessible pantry staples and fresh produce.
- Meal-prep friendly: Great for batch cooking and reheating.
- Kid-approved: That sticky glaze is always a hit!
Preparation Phase & Tools to Use (Essential Tools and the Importance of Each)
Getting the right texture and flavor in Baked Sweet and Sour Chicken starts with having the right tools at your fingertips. While the recipe is straightforward, a few kitchen essentials will make the process smoother and elevate your results.
- Baking Sheet with Wire Rack: A wire rack set over a baking sheet allows the heat to circulate evenly around the chicken, crisping it up without the need for oil.
- Mixing Bowls (at least two sizes): Essential for breading the chicken and preparing the sauce. Glass or stainless steel bowls are best for ease of cleaning.
- Whisk: Crucial for blending the sauce ingredients until smooth and well emulsified.
- Tongs: Handy for flipping the chicken pieces halfway through baking without damaging the coating.
- Small Saucepan: Used to gently cook the sweet and sour sauce to thicken it before combining with the chicken.
- Measuring Cups and Spoons: Precision matters in sauces; too much sugar or vinegar can shift the balance.
Taking a few moments to prep your tools in advance will save you from scrambling mid-recipe—and ensures your focus stays on getting that perfect glaze and crunch.
Preparation Tips
- Cut chicken uniformly: Aim for 1-inch chunks to ensure even cooking and consistent texture.
- Dry chicken pieces with paper towels before breading. This helps the coating stick better.
- Double-dip for extra crisp: Coat in cornstarch or flour, then dip in egg. This creates a light, crispy shell after baking.
- Preheat the oven thoroughly to 400°F (200°C). A hot oven from the start is key for crisping.
- Don’t overcrowd the baking sheet. Give each piece space to brown—use two trays if needed.
- Let the sauce thicken on the stovetop before adding to chicken; this ensures it clings to each piece perfectly.
With these tips and tools in place, your prep will be smooth and efficient—leading to that glossy, flavorful finish you’re aiming for.
Ingredients for This Baked Sweet and Sour Chicken
Creating that perfect blend of crispy chicken and glossy, sweet-tart sauce is all about choosing the right ingredients. Each component plays a role in the texture, taste, or consistency of the dish. Here’s what you’ll need:
For the Chicken:
- 1 ½ pounds boneless, skinless chicken breasts – cut into bite-sized chunks
- ½ cup cornstarch – for a light, crisp coating
- 2 large eggs – beaten, to help bind the coating
- Salt & black pepper – to season the chicken before coating
- 1–2 tablespoons vegetable oil – optional, lightly brushed on top before baking for extra crispness
For the Sweet and Sour Sauce:
- ½ cup granulated sugar
- ¼ cup ketchup
- ½ cup apple cider vinegar – provides that signature tang
- 1 tablespoon soy sauce – adds umami depth
- 1 teaspoon garlic powder – optional, for a subtle savoriness
- 1 tablespoon cornstarch + 2 tablespoons water – for thickening the sauce
For the Vegetable Mix (Optional but Recommended):
- 1 red bell pepper – diced
- 1 yellow bell pepper – diced
- 1 cup pineapple chunks – canned or fresh, drained
These ingredients combine to create the perfect harmony of flavor, texture, and aroma. Once you’ve gathered them, the fun part begins—cooking!
Step 1: Prep the Chicken
Start by cutting the boneless chicken breasts into even, bite-sized pieces—around 1-inch cubes. Pat them dry with paper towels to help the coating stick better. Lightly season the chicken with salt and pepper.
Step 2: Coat the Chicken
Set up a dredging station with two bowls: one with cornstarch and one with the beaten eggs. Dip each piece of chicken into the cornstarch first, coating all sides, then into the egg mixture. Place each coated piece on a wire rack set over a baking sheet (or directly on a parchment-lined tray if you don’t have a rack).
Step 3: Bake Until Golden
Preheat your oven to 400°F (200°C). Once ready, bake the chicken pieces for about 20–25 minutes, flipping them halfway through. If you’re using a wire rack, this helps them get crispy all around. Optional: lightly brush or spray with oil before baking to enhance browning.
Step 4: Make the Sweet and Sour Sauce
While the chicken is baking, add the sugar, ketchup, apple cider vinegar, soy sauce, and garlic powder (if using) to a small saucepan. Bring to a gentle boil over medium heat. Stir the cornstarch and water in a separate bowl to make a slurry, then add it to the sauce. Simmer for a few minutes until the sauce thickens to a glaze-like consistency.
Step 5: Sauté the Peppers and Pineapple (Optional)
In a nonstick skillet over medium-high heat, sauté the diced bell peppers and pineapple chunks for about 3–4 minutes. You want them slightly softened but still vibrant and crisp.
Step 6: Combine Everything
Once the chicken is golden and crispy, transfer it to a large mixing bowl. Pour the hot sweet and sour sauce over the chicken and toss to coat thoroughly. Add in the sautéed peppers and pineapple if using, and toss gently to combine.
Step 7: Serve Hot
Plate your Baked Sweet and Sour Chicken immediately while everything is hot and sticky. It pairs beautifully with a bowl of steamed white rice or vegetable fried rice.
Notes
- Customize the heat: Want a spicy kick? Add a pinch of red pepper flakes or a drizzle of sriracha to the sauce.
- Use chicken thighs: Boneless, skinless thighs work just as well and can offer juicier bites.
- Gluten-free option: Substitute soy sauce with tamari or coconut aminos.
- Crispier coating tip: Let the coated chicken pieces sit for 5–10 minutes before baking—this helps the crust adhere better during cooking.
- For extra caramelization: After tossing with sauce, you can pop the chicken back in the oven for 5 more minutes.
Watch Out for These Mistakes While Cooking
- Skipping the drying step: Wet chicken won’t hold the coating well and can turn soggy during baking.
- Overcrowding the pan: This leads to steaming instead of crisping. Use multiple trays if necessary.
- Undercooking the sauce: If the sauce isn’t thickened before mixing with the chicken, it won’t cling properly and might pool at the bottom.
- Using too much cornstarch: A heavy coating can result in a gummy texture instead of a light crisp.
- Forgetting to flip: Turning the chicken halfway through baking ensures even color and crispiness.
Avoiding these common pitfalls will help you achieve that perfect balance of tender chicken, crunchy coating, and sticky-sweet glaze every single time.
What to Serve With Baked Sweet and Sour Chicken?
Pairing Baked Sweet and Sour Chicken with the right sides can elevate it from a single dish to a complete, satisfying meal. Whether you’re going for an Asian-inspired dinner spread or simply looking for balance, these options will complement the sweet, tangy, and savory notes beautifully.
8 Recommendations
1. Steamed Jasmine or Basmati Rice
The mild aroma and fluffy texture of jasmine or basmati rice offer a perfect neutral base that absorbs the rich sauce.
2. Fried Rice
A veggie-packed fried rice or egg fried rice adds texture and subtle umami that rounds out the plate.
3. Stir-Fried Vegetables
Lightly sautéed bok choy, snap peas, carrots, or broccoli offer crunch and freshness.
4. Lo Mein or Chow Mein Noodles
Tossed in sesame oil and soy sauce, these noodles add depth and act as a comforting counterpart to the tangy chicken.
5. Egg Rolls or Spring Rolls
These crunchy starters filled with veggies or meat bring contrast in both texture and flavor.
6. Asian Slaw
A crisp slaw with cabbage, carrots, and a sesame vinaigrette adds a cooling, refreshing bite.
7. Hot and Sour Soup or Egg Drop Soup
Soups with a light broth balance the meal while warming up the palate.
8. Pineapple Cucumber Salad
Sweet and cooling with a hint of citrus—this is a fantastic side to cut through the richness of the sauce.
Whether you’re serving a casual dinner or a family-style feast, these pairings bring color, contrast, and harmony to the dish.
Storage Instructions
Keeping your Baked Sweet and Sour Chicken fresh for leftovers or meal prep is easy with the right approach. Here’s how to store and reheat while maintaining flavor and texture:
- Refrigerator: Store leftovers in an airtight container for up to 4 days. Let the chicken cool completely before sealing to avoid moisture buildup.
- Freezer: For longer storage, freeze in a freezer-safe container or bag for up to 2 months. Separate into portions if you plan to thaw only part of it.
- Reheating Tips:
- Oven: For best texture, reheat in a 350°F (175°C) oven for 10–15 minutes.
- Stovetop: Use a nonstick skillet over medium heat; stir occasionally until warmed through.
- Microwave: Quickest, but softens the coating—use only if texture isn’t a priority. Cover lightly to prevent drying.
For optimal results, store sauce separately if making ahead, and toss it with freshly baked or reheated chicken just before serving.
Estimated Nutrition (Per Serving – Based on 4 Servings)
These values are approximations and may vary based on brands and portion sizes used:
- Calories: 430 kcal
- Protein: 35g
- Carbohydrates: 36g
- Sugars: 20g
- Fat: 16g
- Saturated Fat: 3g
- Cholesterol: 165mg
- Sodium: 550mg
- Fiber: 1g
While flavorful, sweet and sour sauce is naturally sugar-heavy, so pair with fiber-rich or low-carb sides if you’re watching your intake.
Frequently Asked Questions
1. Can I use chicken thighs instead of breasts?
Yes, boneless, skinless chicken thighs work great and often result in juicier, more flavorful bites. Just trim excess fat and follow the same cooking method.
2. Can this be made gluten-free?
Absolutely! Use tamari or coconut aminos in place of soy sauce, and ensure your cornstarch and ketchup are gluten-free certified.
3. Is it okay to skip the bell peppers and pineapple?
Yes, they’re optional. The chicken and sauce are flavorful on their own, but the added veggies and fruit provide extra texture and brightness.
4. Can I make this ahead of time?
You can prepare the sauce and coat the chicken in advance. For best results, bake the chicken just before serving to maintain its crispy texture.
5. Can I air-fry the chicken instead of baking it?
Definitely! Air fry at 380°F (195°C) for about 12–15 minutes, shaking halfway through. It yields an even crispier finish with less time.
6. What can I use instead of cornstarch?
Arrowroot powder or potato starch are great substitutes. All-purpose flour can work in a pinch but won’t be as crisp.
7. How can I reduce the sugar content?
Use less sugar in the sauce or substitute with honey, maple syrup, or a sugar-free sweetener to your taste. Keep in mind the flavor balance with vinegar.
8. Is this dish spicy?
Not at all! It’s naturally sweet and tangy. If you want spice, feel free to add red pepper flakes, hot sauce, or diced chili to the sauce.
Conclusion
Baked Sweet and Sour Chicken is everything you crave from your favorite takeout—only lighter, fresher, and made right in your own oven. With its addictive sauce, crispy coating, and colorful mix-ins, this dish hits every note: sweet, tangy, savory, and satisfying. It’s a fantastic go-to for weeknight dinners, potlucks, or meal prepping. Once you make it, you’ll wonder why you ever ordered it out.
Stay tuned for the final part—a printable recipe page you can keep in your kitchen or share with friends!

Baked Sweet and Sour Chicken
- Prep Time: 15 minutes
- Cook Time: 25 minutes
- Total Time: 40 minutes
- Yield: 4 servings 1x
Description
Baked Sweet and Sour Chicken is a healthier, oven-baked twist on a takeout classic. Featuring crispy coated chicken chunks tossed in a glossy, sweet-tangy sauce, it’s paired perfectly with bell peppers and pineapple for added brightness. Ideal for family dinners or meal prep, this dish offers all the flavor without the frying.
Ingredients
For the Chicken:
- 1 1/2 lbs boneless, skinless chicken breasts (cut into 1-inch chunks)
- 1/2 cup cornstarch
- 2 large eggs, beaten
- Salt and black pepper, to taste
- 1–2 tbsp vegetable oil (optional, for brushing)
For the Sweet and Sour Sauce:
- 1/2 cup granulated sugar
- 1/4 cup ketchup
- 1/2 cup apple cider vinegar
- 1 tbsp soy sauce
- 1 tsp garlic powder (optional)
- 1 tbsp cornstarch + 2 tbsp water (for slurry)
Optional Vegetable Mix:
- 1 red bell pepper, diced
- 1 yellow bell pepper, diced
- 1 cup pineapple chunks (drained if canned)
Instructions
- Preheat oven to 400°F (200°C). Line a baking sheet with parchment or use a wire rack.
- Season chicken with salt and pepper. Pat dry.
- Dip each piece in cornstarch, then in beaten egg.
- Arrange chicken on prepared baking sheet. Brush lightly with oil if using.
- Bake for 20–25 minutes, flipping halfway through.
- While baking, combine sugar, ketchup, vinegar, soy sauce, and garlic powder in a saucepan.
- Heat over medium, stir until combined, then add cornstarch slurry.
- Simmer until thickened to glaze consistency.
- Optionally, sauté bell peppers and pineapple until slightly softened.
- Toss baked chicken with sauce and sautéed vegetables.
- Serve hot over rice or noodles.